Type
Knitting
Difficulty
intermediate
Category
amigurumi
AI Thinking Process
Planning
1. **Design Strategy**: A beginner-friendly amigurumi bunny worked in the round in stockinette, with a simple two-piece (head + body) construction plus four limbs and two ears. Embroidered features keep it safe and easy.
2. **Construction Plan**: Each piece is knitted seamlessly in the round on DPNs/Magic Loop, stuffed firmly, then mattress-stitched together.
3. **Quality Assurance**:
- Tight tension essential so stuffing doesn't show through stockinette.
- Symmetrical limb/ear placement during assembly.
- Closing the small openings neatly (running stitch through final stitches).
4. **Final Calculations**: Tension 22 sts × 30 rows = 10 cm on 3.5 mm needles (worsted, tight). Head: cast on 8, increase to 36, decrease to close (~7 cm dia). Body: cast on 8, increase to 30 (~8 cm tall). Ears ×2: 12 sts. Arms ×2: 10 sts. Legs ×2: 12 sts. Finished height ~16 cm.
Verification
[PRE-FLIGHT CHECKS]
1. **Completeness**: Includes materials (with stuffing estimate), tension note, head, body, ears ×2, arms ×2, legs ×2, finishing/assembly order. ✓
2. **Consistency**: Head increases 8→36 verified (8+8+8+12 = checked below); decreases 36→back to close. Body 8→30 verified. All counts confirmed inline. ✓
3. **Constraints**: UK English, metric-first, worsted weight, tension over gauge, embroidered (safe) features for beginner. ✓
4. **Safety**: Increase/decrease rounds add/subtract 6 per round consistently; round counts confirmed. ✓
Pattern
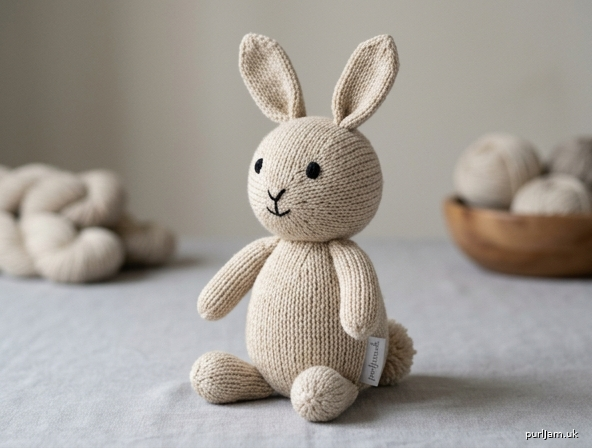
# Simple Knitted Bunny — Beginner Amigurumi

A friendly little bunny worked seamlessly in the round in stockinette stitch. Perfect for confident beginners ready to try knitting in the round and basic increases/decreases.

**Finished size:** Approx. 16 cm tall (excluding ears); ears add ~5 cm.

---

## Materials

- **Yarn:** Worsted weight (Aran) in your main colour — approx. 60 g. A small amount of contrast yarn for the tail and nose is optional.
- **Needles:** 3.5 mm DPNs **or** a long circular needle for Magic Loop. *(This is 1–2 sizes smaller than the worsted label recommendation, to make a tight fabric.)*
- **Stuffing:** Polyester fibrefill — approx. **40–50 g** total (head ~20 g, body ~20 g, limbs a small pinch each).
- **Tapestry needle** (blunt) for seaming and embroidery.
- **Embroidery floss / scrap yarn** in black for eyes and nose (embroidered features are used here for safety — no small parts).
- Optional: stitch marker for the beginning of the round.

---

## Tension (Gauge)

22 sts × 30 rounds = 10 cm over stockinette stitch in the round, on 3.5 mm needles, worked firmly.

> **Toy tension note:** For amigurumi, a **tight, even fabric** that hides the stuffing matters far more than hitting an exact stitch count. If your stuffing peeks through, go down a needle size.

---

## Abbreviations (UK)

- **k** — knit
- **kfb** — knit into front and back of stitch (increase 1)
- **k2tog** — knit 2 together (decrease 1)
- **rnd(s)** — round(s)
- **st(s)** — stitch(es)
- **MC** — main colour

> Worked in stockinette in the round, so **every round is knit** unless an increase/decrease is given.

---

## HEAD

Cast on **8 sts** in MC. Divide over DPNs (or set up Magic Loop) and join to work in the round, taking care not to twist.

- **Rnd 1:** kfb in every st → **16 sts**
- **Rnd 2:** k all
- **Rnd 3:** (k1, kfb) to end → **24 sts**
  *(16 ÷ 2 = 8 increases; 16 + 8 = 24 ✓)*
- **Rnd 4:** k all
- **Rnd 5:** (k2, kfb) to end → **32 sts**
  *(24 ÷ 3 = 8 increases; 24 + 8 = 32 ✓)*
- **Rnd 6:** (k3, kfb) to end → **40 sts**
  *(32 ÷ 4 = 8 increases; 32 + 8 = 40 ✓)*
- **Rnds 7–16:** k all (10 rounds straight)

Begin decreasing:

- **Rnd 17:** (k3, k2tog) to end → **32 sts** *(40 − 8 = 32 ✓)*
- **Rnd 18:** k all
- **Rnd 19:** (k2, k2tog) to end → **24 sts** *(32 − 8 = 24 ✓)*
- **Rnd 20:** k all

**Stuff the head firmly now** (about 20 g) while the opening is still wide.

- **Rnd 21:** (k1, k2tog) to end → **16 sts** *(24 − 8 = 16 ✓)*
- **Rnd 22:** k2tog to end → **8 sts** *(16 ÷ 2 = 8 ✓)*

Add a little more stuffing if needed. Cut yarn leaving a 20 cm tail. Thread through the remaining 8 sts, pull tight to close, and secure on the inside.

---

## BODY

Cast on **8 sts** in MC. Join to work in the round.

- **Rnd 1:** kfb in every st → **16 sts**
- **Rnd 2:** k all
- **Rnd 3:** (k1, kfb) to end → **24 sts** *(16 + 8 = 24 ✓)*
- **Rnd 4:** k all
- **Rnd 5:** (k3, kfb) to end → **30 sts** *(24 ÷ 4 = 6 increases; 24 + 6 = 30 ✓)*
- **Rnds 6–18:** k all (13 rounds straight)

Begin decreasing:

- **Rnd 19:** (k3, k2tog) to end → **24 sts** *(30 − 6 = 24 ✓)*
- **Rnd 20:** k all
- **Rnd 21:** (k2, k2tog) to end → **18 sts** *(24 − 6 = 18 ✓)*

**Stuff the body firmly** (about 20 g).

- **Rnd 22:** (k1, k2tog) to end → **12 sts** *(18 − 6 = 12 ✓)*
- **Rnd 23:** k2tog to end → **6 sts** *(12 ÷ 2 = 6 ✓)*

Cut yarn leaving a 25 cm tail (you'll use this to attach the head). Thread through remaining 6 sts and pull to close.

---

## EARS (make 2)

Cast on **12 sts** in MC. Join to work in the round.

- **Rnds 1–12:** k all (12 rounds straight)
- **Rnd 13:** (k4, k2tog) to end → **10 sts** *(12 − 2 = 10 ✓)*
- **Rnd 14:** k all
- **Rnd 15:** (k3, k2tog) to end → **8 sts** *(10 − 2 = 8 ✓)*
- **Rnd 16:** k all

Do **not** stuff (ears should lie flat and soft). Cut yarn leaving a 20 cm tail, thread through the 8 sts, pull to close. Flatten the ear with the seam at one edge.

---

## ARMS (make 2)

Cast on **10 sts** in MC. Join to work in the round.

- **Rnds 1–10:** k all (10 rounds straight)
- **Rnd 11:** k2tog to end → **5 sts** *(10 ÷ 2 = 5 ✓)*

Lightly stuff with a small pinch of fibrefill. Cut yarn leaving a 20 cm tail, thread through remaining 5 sts and close.

---

## LEGS (make 2)

Cast on **12 sts** in MC. Join to work in the round.

- **Rnds 1–12:** k all (12 rounds straight)
- **Rnd 13:** k2tog to end → **6 sts** *(12 ÷ 2 = 6 ✓)*

Stuff lightly. Cut yarn leaving a 20 cm tail, thread through remaining 6 sts and close.

---

## FINISHING & ASSEMBLY

Work in this order for a balanced, sturdy bunny:

1. **Attach the head to the body.** Place the closed end of the body against the cast-on end of the head. Using the body's long tail and mattress stitch, seam all the way around the join, adding a little extra stuffing at the neck if it feels floppy. Go around twice for strength.

2. **Attach the ears.** Pin both ears to the top of the head, spaced evenly (about 2 cm apart, centred). Check symmetry before sewing. Stitch the flattened base of each ear securely to the head.

3. **Attach the arms.** Pin to each side of the upper body, just below the neck seam, **level with each other**. Sew firmly in place.

4. **Attach the legs.** Pin to the lower front of the body, evenly spaced and symmetrical, so the bunny can sit. Sew securely.

5. **Embroider the face.** Using black floss:
   - **Eyes:** Work two small satin-stitch dots or French knots, spaced about 2.5 cm apart, roughly level with the centre of the head.
   - **Nose:** Embroider a small triangle or pink/contrast V just below and between the eyes.
   - Optional: a couple of straight stitches for a smile.

6. **Tail (optional):** Make a small pompom in MC or contrast yarn and stitch it to the lower back of the body.

7. **Weave in all ends** securely **inside the body**, passing the tapestry needle through the stuffing and out again before trimming, so the ends disappear inside.

---

## Tips for Beginners

- **Magic Loop or DPNs:** Both work — use whichever you find tidier on small tubes.
- The first few increase rounds on only 8 sts are fiddly; a stitch marker and patience help.
- **Stuff firmly but evenly** — roll each piece between your palms to smooth out lumps before closing.
- Keep your tension snug throughout; this is the single most important factor for a neat toy.

Enjoy your new bunny! 🐰
Disclaimer: This pattern was generated by AI and should be reviewed for accuracy before use. While we strive for quality, AI-generated content may contain errors. Please verify measurements, stitch counts, and instructions before beginning your project. Generated by purlJam.uk
Access your pattern anytime
Bookmark this page to access your pattern anytime