Type
Knitting
Difficulty
intermediate
Category
amigurumi
AI Thinking Process
Planning
Verification
Pattern
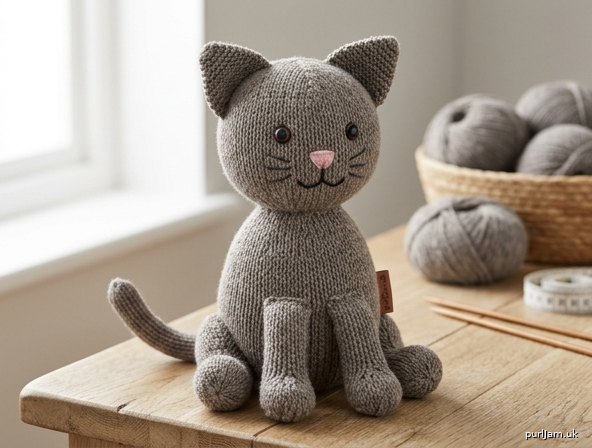
Simple Sitting Cat
A knitted amigurumi cat worked in the round
Skill level: Beginner
Finished size: Approximately 6½–7" (16.5–18 cm) tall sitting, including ears.
A small sitting cat with a round head, egg-shaped body, four stubby legs, a slender tail, and pointed ears. All round pieces are stockinette in the round; ears are worked flat in garter stitch. No purling is required for the body pieces.
Materials
- Yarn: Worsted weight (CYC 4), about 90 yd (82 m) main color (MC). A 100 g / 200 yd (180 m) skein is more than enough.
- Optional scraps: black for eyes/mouth/whiskers; pink for nose.
- Needles: US 6 / 4 mm double-pointed needles (set of 4 or 5), or a 32–40" (80–100 cm) circular needle for Magic Loop. Use a needle 1–2 sizes smaller than the yarn label recommends so the fabric is tight.
- Notions:
- Polyester fiberfill stuffing, about 2 oz / 55 g
- 9 mm safety eyes (1 pair), or black embroidery floss
- Tapestry needle
- Stitch marker
- Scissors
Safety note: If the toy is for a child under 3 years, do not use safety eyes. Embroider the eyes, nose, and mouth, and sew every piece on extra securely.
Gauge
22 sts and 28 rounds = 4" (10 cm) in stockinette stitch in the round, after a firm fabric is achieved.
Gauge note: A tight, even fabric that does not show stuffing matters more than matching this number exactly. If you see gaps between stitches, go down a needle size.
Abbreviations (US)
| Abbrev. | Meaning |
|---|---|
| CO | cast on |
| k | knit |
| kfb | knit into the front and back of the stitch (1 stitch increased) |
| k2tog | knit 2 stitches together (1 stitch decreased) |
| rnd(s) | round(s) |
| st(s) | stitch(es) |
| St st | stockinette stitch |
| pm | place marker |
| MC | main color |
| RS | right side |
| WS | wrong side |
Pattern Notes
- The cat is made in separate pieces: head, body, 4 legs, tail, and 2 ears. Stuff each round piece as directed before you close it, then sew the pieces together with mattress stitch.
- Work round pieces in the round on DPNs or Magic Loop. Knit every round for stockinette.
- Place a marker at the beginning of the round and slip it every round.
- Starting tiny rounds: Casting on 6 stitches and joining can feel fiddly. Divide 2 sts on each of 3 DPNs (or use Magic Loop). After a few rounds, use the cast-on tail to cinch any gap at the center closed.
- Leave a 12" (30 cm) tail when you bind off or gather each piece — you will use it to sew.
- Stuff firmly, especially the head and body, but do not stretch the stitches open. Legs and tail should be stuffed more lightly.
Head
With MC, CO 6 sts. Divide onto DPNs (or Magic Loop), join to work in the round being careful not to twist, and pm.
Rnd 1: kfb around. 12 sts (6 increases → 6 + 6 = 12 ✓)
Rnd 2: Knit.
Rnd 3: (k1, kfb) 6 times. 18 sts (6 increases → 12 + 6 = 18 ✓)
Rnd 4: Knit.
Rnd 5: (k2, kfb) 6 times. 24 sts (6 increases → 18 + 6 = 24 ✓)
Rnd 6: Knit.
Rnd 7: (k3, kfb) 6 times. 30 sts (6 increases → 24 + 6 = 30 ✓)
Rnd 8: Knit.
Rnd 9: (k4, kfb) 6 times. 36 sts (6 increases → 30 + 6 = 36 ✓)
Rnds 10–15: Knit. (6 rounds even; 36 sts)
Safety eyes: Insert 9 mm safety eyes between rnds 12 and 13, about 7 sts apart, centered on the face. Snap the washers on the inside before you decrease further. If you are embroidering eyes instead, wait until the head is closed and sewn on.
Rnd 16: (k4, k2tog) 6 times. 30 sts (6 decreases → 36 − 6 = 30 ✓)
Rnd 17: Knit.
Rnd 18: (k3, k2tog) 6 times. 24 sts (6 decreases → 30 − 6 = 24 ✓)
Rnd 19: Knit.
Begin stuffing the head firmly. Add more stuffing as you decrease.
Rnd 20: (k2, k2tog) 6 times. 18 sts (6 decreases → 24 − 6 = 18 ✓)
Rnd 21: Knit.
Rnd 22: (k1, k2tog) 6 times. 12 sts (6 decreases → 18 − 6 = 12 ✓)
Rnd 23: (k2tog) 6 times. 6 sts (6 decreases → 12 − 6 = 6 ✓)
Cut yarn, leaving a 12" (30 cm) tail. Thread the tail through the remaining 6 sts, pull tight to close, and weave the end through the stuffing to lock it. The cast-on end is the crown (top of the head); the gathered end is the neck.
Body
With MC, CO 6 sts. Join to work in the round and pm.
Rnd 1: kfb around. 12 sts (6 increases → 6 + 6 = 12 ✓)
Rnd 2: Knit.
Rnd 3: (k1, kfb) 6 times. 18 sts (6 increases → 12 + 6 = 18 ✓)
Rnd 4: Knit.
Rnd 5: (k2, kfb) 6 times. 24 sts (6 increases → 18 + 6 = 24 ✓)
Rnd 6: Knit.
Rnd 7: (k3, kfb) 6 times. 30 sts (6 increases → 24 + 6 = 30 ✓)
Rnd 8: Knit.
Rnd 9: (k4, kfb) 6 times. 36 sts (6 increases → 30 + 6 = 36 ✓)
Rnd 10: Knit.
Rnd 11: (k5, kfb) 6 times. 42 sts (6 increases → 36 + 6 = 42 ✓)
Rnd 12: Knit.
Rnd 13: (k6, kfb) 6 times. 48 sts (6 increases → 42 + 6 = 48 ✓)
Rnds 14–25: Knit. (12 rounds even; 48 sts)
Rnd 26: (k6, k2tog) 6 times. 42 sts (6 decreases → 48 − 6 = 42 ✓)
Rnd 27: Knit.
Rnd 28: (k5, k2tog) 6 times. 36 sts (6 decreases → 42 − 6 = 36 ✓)
Rnd 29: Knit.
Rnd 30: (k4, k2tog) 6 times. 30 sts (6 decreases → 36 − 6 = 30 ✓)
Rnd 31: Knit.
Rnd 32: (k3, k2tog) 6 times. 24 sts (6 decreases → 30 − 6 = 24 ✓)
Rnd 33: Knit.
Stuff the body firmly, filling the bottom well so the cat will sit. Add more stuffing as you decrease.
Rnd 34: (k2, k2tog) 6 times. 18 sts (6 decreases → 24 − 6 = 18 ✓)
Rnd 35: Knit.
Rnd 36: (k1, k2tog) 6 times. 12 sts (6 decreases → 18 − 6 = 12 ✓)
Rnd 37: (k2tog) 6 times. 6 sts (6 decreases → 12 − 6 = 6 ✓)
Cut yarn, leaving a 12" (30 cm) tail. Thread through the remaining 6 sts, pull tight, and secure. The cast-on end is the bottom (sitting surface); the gathered end is the neck.
Legs (make 4)
With MC, CO 6 sts. Join to work in the round and pm.
Rnd 1: kfb around. 12 sts (6 increases → 6 + 6 = 12 ✓)
Rnds 2–10: Knit. (9 rounds even; 12 sts)
Rnd 11: (k1, k2tog) 4 times. 8 sts (4 decreases → 12 − 4 = 8 ✓)
Stuff the leg lightly — just enough to hold the shape. The increase end is the paw.
Rnd 12: (k2tog) 4 times. 4 sts (4 decreases → 8 − 4 = 4 ✓)
Cut yarn, leaving a 12" (30 cm) tail. Thread through the remaining 4 sts, pull tight, and secure. The gathered end is the top of the leg (sew this end to the body).
Tail
With MC, CO 8 sts, leaving a 12" (30 cm) tail for sewing. Join to work in the round and pm.
Rnds 1–22: Knit. (22 rounds even; 8 sts)
Stuff the tail very lightly as you go, or leave it almost unstuffed so it can curve. Do not pack it firmly.
Rnd 23: (k2, k2tog) 2 times. 6 sts (2 decreases → 8 − 2 = 6 ✓)
Rnd 24: (k1, k2tog) 2 times. 4 sts (2 decreases → 6 − 2 = 4 ✓)
Cut yarn. Thread through the remaining 4 sts, pull tight to close the tip, and weave in that end. Use the cast-on tail later to sew the tail to the body.
Ears (make 2)
Worked flat in garter stitch (knit every row) so the ears stand up and do not curl. Do not stuff.
With MC, CO 10 sts.
Rows 1–2: Knit.
Row 3: K2tog, k6, k2tog. 8 sts (2 decreases → 10 − 2 = 8 ✓)
Row 4: Knit.
Row 5: K2tog, k4, k2tog. 6 sts (2 decreases → 8 − 2 = 6 ✓)
Row 6: Knit.
Row 7: K2tog, k2, k2tog. 4 sts (2 decreases → 6 − 2 = 4 ✓)
Row 8: Knit.
Row 9: K2tog, k2tog. 2 sts (2 decreases → 4 − 2 = 2 ✓)
Row 10: K2tog. 1 st (1 decrease → 2 − 1 = 1 ✓)
Cut yarn, leaving a 10" (25 cm) tail. Draw through the last stitch. The cast-on edge is the base of the ear (sew this edge to the head).
Face
If you used safety eyes, they are already in place.
If you are embroidering, use black yarn or embroidery floss and a tapestry needle:
- Eyes: Two small satin-stitch ovals or French knots, level with each other, about ½" (1.25 cm) apart, on the lower half of the head.
- Nose: With pink, a small filled triangle or Y just below and centered between the eyes (about 2–3 wrapped stitches).
- Mouth: With black, a short vertical stitch down from the nose, then a shallow V or inverted Y for the muzzle.
- Whiskers (optional): Three straight stitches on each side of the muzzle. Skip whiskers if the toy is for a very young child.
Weave all embroidery ends to the inside of the head.
Finishing and Assembly
Weave in any extra ends to the inside of each piece so nothing shows on the outside. Assembly order matters for a balanced sitting cat.
1. Ears to head.
Pin the ears to the crown, bases about ½" (1.25 cm) apart, angled slightly outward (the points tilt away from center). The inner corners sit near the top center; the outer corners sit a little lower. Sew each cast-on edge to the head with mattress stitch or overcast stitch, using the ear tail. Catch the head fabric, not just the stuffing.
2. Head to body.
Pin the neck of the head (gathered end) to the neck of the body (gathered end). Rotate the head so the face looks forward. Sew all the way around with mattress stitch, adding a pinch of extra stuffing at the neck if the join looks dented before you close the seam.
3. Front legs.
Sew the gathered (top) end of two legs to the lower front of the body, about ¾–1" (2–2.5 cm) apart, just above the sitting surface. Paws point forward and slightly out. Keep them at the same height.
4. Back legs.
Sew the remaining two legs to the lower sides/back of the body so the cat sits on its bottom. Place them symmetrically, a little farther apart than the front legs, paws pointing forward or slightly to the sides. Check that the cat sits level before fastening off.
5. Tail.
Sew the cast-on end of the tail to the lower back of the body, centered above the sitting surface, just above the back legs. Curve the tail around one hip and tack it in place with a couple of hidden stitches if you want it to stay wrapped.
Mattress stitch reminder: Thread the tapestry needle with the piece’s yarn tail. Bring the needle under one running bar (the horizontal strand between knit stitches) on piece A, then under the matching bar on piece B. Alternate sides and pull snug every few stitches so the seam disappears. For closed round joins (head to body, legs to body), work the same stitch in a circle.
Tug every sewn-on piece gently. If anything wiggles, add a few more stitches. Hide all remaining tails inside the body.
Finished look
You should have a sitting cat about 6½–7" (16.5–18 cm) tall with a round head, pointed ears, four short legs, and a curveable tail. The fabric should be dense enough that no stuffing peeks through.
End of pattern
Disclaimer: This pattern was generated by AI and should be reviewed for accuracy before use. While we strive for quality, AI-generated content may contain errors. Please verify measurements, stitch counts, charts, and instructions before beginning your project. Generated by purlJam.uk
Love this pattern?
Save this pattern to your free PurlJam libraryAccess your pattern anytime
Bookmark this page to access your pattern anytime