Type
Crochet
Difficulty
beginner
Category
amigurumi
AI Thinking Process
Planning
Verification
Pattern
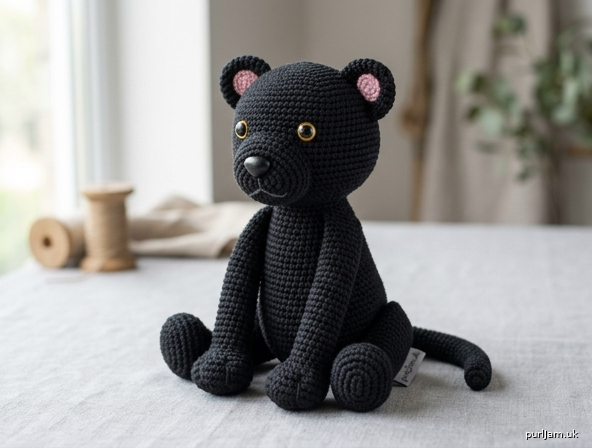
Sitting Black Panther
Crochet Toy — Simple Shapes (Beginner Amigurumi)
A cute sitting panther worked from basic spheres and tubes. The body is crocheted with gaps so the straight front legs insert at the front, the bent back legs insert at the sides, and the tail inserts at the back. Designed for 14 mm safety eyes and a 12 mm safety nose.
Skill level: Beginner. Only single crochet, increases, decreases, and chains. The sitting pose is created by shaping and assembly, not by short rows or advanced stitches.
Finished Size
About 7 inches (18 cm) tall sitting, including the head, with a tail about 4½ inches (11.5 cm) long.
Size will vary with yarn, hook, and how tightly you crochet.
Materials
- Worsted weight (4) yarn, black, about 180 yards / 3.5 oz (165 m / 100 g)
- Small amount of pink worsted yarn for inner ears (optional)
- Small amount of dark gray worsted yarn or embroidery floss for mouth and whisker dots (optional; black-on-black will not show)
- US E-4 (3.5 mm) crochet hook (or a hook 1–2 sizes smaller than your yarn label, so the fabric is tight and stuffing does not show)
- 14 mm safety eyes, 1 pair (yellow, amber, or green look especially panther-like)
- 12 mm safety nose, 1
- Polyester fiberfill stuffing
- Yarn needle
- Stitch marker
- Pins for assembly
- Scissors
Safety note: Safety eyes and safety noses are a choking hazard. Do not use them on toys for children under 3 years. Embroider the features instead.
Gauge
5.5 sc and 5.5 rounds = 1 inch (2.5 cm) worked tightly in single crochet in the round.
Gauge is important for the 14 mm eyes to sit well on the head. If your head looks much smaller than 2½ inches (6.5 cm) across at the widest point, go up a hook size. If the fabric is loose and stuffing shows, go down a hook size. Exact gauge is less critical than a firm, closed fabric.
Abbreviations (US)
- MR — magic ring
- ch — chain
- sc — single crochet
- inc — increase (2 sc in the same stitch)
- dec — invisible decrease (insert hook in front loop of next 2 stitches, yarn over, pull through both, yarn over, pull through 2)
- sl st — slip stitch
- st(s) — stitch(es)
- rnd(s) — round(s)
- FO — fasten off
- [ ] — stitch count at end of round
Pattern Notes
- Work in a continuous spiral unless the instructions say otherwise. Do not join rounds. Use a stitch marker in the first stitch of every round and move it up as you go.
- Work tightly so the stuffing does not show through.
- Use invisible decreases for a smoother surface.
- Stuff as you go. It is hard to stuff the paws and the body base after they are closed.
- The body gaps are made with chain, skip stitches. On the next round you crochet into each chain so the stitch count stays the same. The chains plus the skipped stitches form the opening that a limb sews into.
- Keep the body stitch marker at center back for the whole body so the front-leg, back-leg, and tail gaps land in the right places.
- Pin every piece before sewing. Check that the panther sits level before you finish the seams.
Head (black)
Worked from the top of the head down.
Rnd 1: 6 sc in MR. [6] Rnd 2: Inc in each st. [12] (6 increases → 6 + 6 = 12 ✓) Rnd 3: (Sc, inc) around. [18] (6 increases → 12 + 6 = 18 ✓) Rnd 4: (2 sc, inc) around. [24] (6 increases → 18 + 6 = 24 ✓) Rnd 5: (3 sc, inc) around. [30] (6 increases → 24 + 6 = 30 ✓) Rnd 6: (4 sc, inc) around. [36] (6 increases → 30 + 6 = 36 ✓) Rnd 7: (5 sc, inc) around. [42] (6 increases → 36 + 6 = 42 ✓) Rnds 8–13: Sc around. [42] (6 rounds)
Place features before the opening gets small:
- Insert the 14 mm safety eyes between Rounds 10 and 11, with 7 stitches between the eye posts.
- Insert the 12 mm safety nose centered between the eyes, between Rounds 13 and 14.
- Lock the washers on the back. Do not close the head until you like the face.
Rnd 14: (5 sc, dec) around. [36] (6 decreases → 42 − 6 = 36 ✓) Rnd 15: (4 sc, dec) around. [30] (6 decreases → 36 − 6 = 30 ✓) Rnd 16: (3 sc, dec) around. [24] (6 decreases → 30 − 6 = 24 ✓) Rnd 17: (2 sc, dec) around. [18] (6 decreases → 24 − 6 = 18 ✓) Stuff the head firmly, filling the cheeks around the eyes and nose. Rnd 18: (Sc, dec) around. [12] (6 decreases → 18 − 6 = 12 ✓) Rnd 19: Dec around. [6] (6 decreases → 12 − 6 = 6 ✓) FO, leaving a tail. Thread the tail through the front loops of the remaining 6 stitches, pull closed, and weave in.
Ears (make 2, black)
Do not stuff. The ear is flattened into a small rounded triangle.
Rnd 1: 6 sc in MR. [6] Rnd 2: (Sc, inc) around. [9] (3 increases → 6 + 3 = 9 ✓) Rnds 3–4: Sc around. [9] (2 rounds) FO, leaving a 12 inch (30 cm) tail for sewing. Flatten the ear so it has 4 stitches along one edge and 5 along the other (or 4 and 4 with the extra stitch at the side).
Optional inner ear (pink, make 2): 6 sc in MR, sl st to first sc. [6] FO, leaving a tail. Sew to the front of each black ear before attaching the ears to the head.
Front Legs (make 2, black)
Straight tubes. Start at the paw. Leave the top open so the leg can go into the front of the body.
Rnd 1: 6 sc in MR. [6] Rnd 2: Inc in each st. [12] (6 increases → 6 + 6 = 12 ✓) Rnd 3: (3 sc, inc) around. [15] (3 increases → 12 + 3 = 15 ✓) Rnd 4: Sc around. [15] Rnd 5: (3 sc, dec) around. [12] (3 decreases → 15 − 3 = 12 ✓) Rnds 6–16: Sc around. [12] (11 rounds) Stuff the paw firmly and the rest of the leg firmly, leaving the last 2 rounds lightly stuffed so the open end can sit inside the body. FO, leaving a 14 inch (35 cm) tail for sewing. Do not close the top. [12 open stitches]
Back Legs (make 2, black)
Bent sitting legs. Start at the paw. The lower leg is a straight tube; the thigh is made wider on one side, left open, then folded to an L and tacked.
Rnd 1: 6 sc in MR. [6] Rnd 2: Inc in each st. [12] (6 increases → 6 + 6 = 12 ✓) Rnd 3: (3 sc, inc) around. [15] (3 increases → 12 + 3 = 15 ✓) Rnds 4–5: Sc around. [15] (2 rounds) Rnd 6: (3 sc, dec) around. [12] (3 decreases → 15 − 3 = 12 ✓) Rnds 7–13: Sc around. [12] (7 rounds) Stuff the paw and lower leg firmly.
Thigh (wider end, left open): Rnd 14: Inc in the next 6 sts, sc in the next 6 sts. [18] (6 increases → 12 + 6 = 18 ✓) The 6 increases are the outside of the knee / top of the bend. Rnds 15–17: Sc around. [18] (3 rounds) Stuff the thigh. Leave the top open. FO, leaving an 18 inch (45 cm) tail for sewing and for tacking the bend.
Shape the bend: Fold the leg into an L. The open 18-st thigh end faces inward (toward the body). The lower leg points forward. The increase side of Round 14 sits at the outside of the knee. Using the yarn tail, make 3–4 small stitches through the inner corner of the fold only — just enough to lock a 90° sit. Do not close the open end and do not flatten the thigh.
Tail (black)
Rnd 1: 6 sc in MR. [6] Rnd 2: (2 sc, inc) around. [8] (2 increases → 6 + 2 = 8 ✓) Rnds 3–24: Sc around. [8] (22 rounds) Stuff lightly as you go so the tail can curve. Leave the last 2 rounds unstuffed. FO, leaving a 12 inch (30 cm) tail for sewing. Leave the top open. [8 open stitches]
Body (black)
Worked from the neck down. The stitch marker at the start of the round is center back for every round. Do not move that “center back” identity when you make the gaps.
Rnd 1: 6 sc in MR. [6] Rnd 2: Inc in each st. [12] (6 increases → 6 + 6 = 12 ✓) Rnd 3: (Sc, inc) around. [18] (6 increases → 12 + 6 = 18 ✓) Rnd 4: (2 sc, inc) around. [24] (6 increases → 18 + 6 = 24 ✓) Rnd 5: Sc around. [24] (neck) Rnd 6: (3 sc, inc) around. [30] (6 increases → 24 + 6 = 30 ✓) Rnd 7: (4 sc, inc) around. [36] (6 increases → 30 + 6 = 36 ✓) Rnd 8: Sc around. [36]
Front-leg gaps (two 12-st openings at the front; each opening is 6 chains + 6 skipped stitches = 12 ✓): Rnd 9: Sc 9, ch 6, skip 6, sc 6, ch 6, skip 6, sc 9. [36] (9 + 6 + 6 + 6 + 9 = 36 ✓) Rnd 10: Sc in each sc and in each ch around. [36] (24 sc + 12 ch = 36 ✓)
Rnd 11: (5 sc, inc) around. [42] (6 increases → 36 + 6 = 42 ✓) Rnd 12: Sc around. [42]
Back-leg gaps (two 18-st openings at the sides; each opening is 9 chains + 9 skipped stitches = 18 ✓): Rnd 13: Sc 6, ch 9, skip 9, sc 12, ch 9, skip 9, sc 6. [42] (6 + 9 + 12 + 9 + 6 = 42 ✓) Rnd 14: Sc in each sc and in each ch around. [42] (24 sc + 18 ch = 42 ✓)
Tail gap (one 8-st opening at center back; 4 chains + 4 skipped stitches = 8 ✓): Rnd 15: Ch 4, skip 4, sc 38. [42] (4 + 38 = 42 ✓) Rnd 16: Sc in each ch and in each sc around. [42] (4 ch + 38 sc = 42 ✓)
Rnds 17–19: Sc around. [42] (3 rounds — this is the sitting base)
Rnd 20: (5 sc, dec) around. [36] (6 decreases → 42 − 6 = 36 ✓) Rnd 21: (4 sc, dec) around. [30] (6 decreases → 36 − 6 = 30 ✓) Rnd 22: (3 sc, dec) around. [24] (6 decreases → 30 − 6 = 24 ✓) Stuff the body firmly, with extra stuffing in the base so the panther sits flat and does not flop forward. You can already poke the open ends of the legs and tail into their gaps to check placement, then pull them out again if it is easier to sew after closing. Rnd 23: (2 sc, dec) around. [18] (6 decreases → 24 − 6 = 18 ✓) Rnd 24: (Sc, dec) around. [12] (6 decreases → 18 − 6 = 12 ✓) Rnd 25: Dec around. [6] (6 decreases → 12 − 6 = 6 ✓) FO, close the hole, and weave in.
Assembly
Pin every piece first. Set the body on a table and check the sit before you sew.
1. Ears. Flatten each ear. Sew to the head over Rounds 4–7, about 4 stitches apart at the inner edges, slightly angled (tops tilting outward). The pink inner ear, if used, faces forward.
2. Face details (optional). With dark gray yarn, embroider a small cat mouth under the nose (a short vertical stitch down from the nose, then a tiny V or inverted triangle). Add 2–3 tiny whisker dots on each cheek.
3. Head to body. Pin the head on Rounds 1–5 of the body (the 24-st neck). Tilt the head a little forward for a cute sit. Whipstitch all the way around, adding a pinch of stuffing in the neck if it looks sunken.
4. Front legs (straight, into the front gaps). Each front gap has 12 edge stitches (6 chains + 6 skipped stitches). Each front leg has 12 open stitches. Insert the open end of the leg into the gap from the outside, at a downward angle so the leg is straight and the paw rests on the table in front of the body. Push the lightly stuffed top of the leg into the body cavity. Whipstitch each of the 12 leg stitches to the 12 gap stitches. Repeat for the second front leg. The two legs should be parallel.
5. Back legs (bent, into the side gaps). Each back gap has 18 edge stitches (9 chains + 9 skipped stitches). Each back leg has 18 open thigh stitches. Insert the open thigh into the side gap. The thigh points into the body; the tacked bend sits just outside the gap; the lower leg points forward; the paw rests on the table beside the body. Whipstitch all 18 stitches. Repeat on the other side, mirroring the pose. Add extra stuffing through the gap before you finish the seam if the hip looks dented.
6. Tail (into the back gap). The tail gap has 8 edge stitches; the tail has 8 open stitches. Insert the open end into the center-back gap. Angle the tail so it curves along the table or lifts slightly. Whipstitch all 8 stitches.
7. Level check. Sit the panther on a flat surface. The body base, both back paws, and both front paws should all touch the table. If a front leg is short, take out a few sewing stitches and let more of the tube sit outside the gap. If a back hip splay is too wide, sew a hidden stitch from the inner thigh to the body to pull it in.
Finishing
Weave in every remaining tail on the inside or under a seam. Roll the stuffed pieces in your hands to round the head and settle the body base. Do not wash in a machine if you used safety eyes or a safety nose; spot-clean only.
Your sitting black panther is ready.
Disclaimer: This pattern was generated by AI and should be reviewed for accuracy before use. While we strive for quality, AI-generated content may contain errors. Please verify measurements, stitch counts, charts, and instructions before beginning your project. Generated by purlJam.uk
Love this pattern?
Save this pattern to your free PurlJam libraryAccess your pattern anytime
Bookmark this page to access your pattern anytime