Type
Crochet
Difficulty
beginner
Category
amigurumi
AI Thinking Process
Planning
Verification
Pattern
Sitting Fox Amigurumi
Beginner Crochet Toy — Simple Shapes
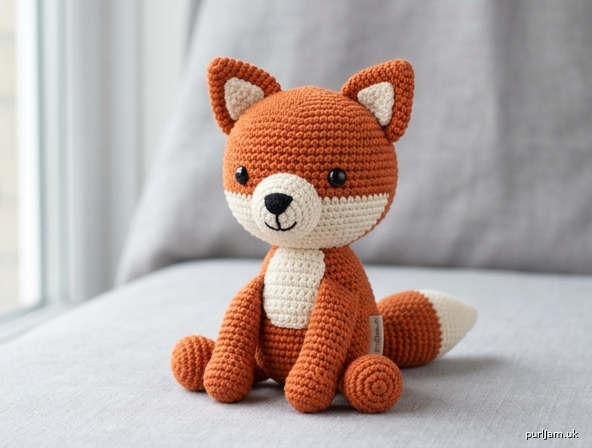
A small sitting fox made from basic amigurumi shapes: a round head, a round body, cone ears, a cone tail, stubby cylinder legs, and a cream muzzle and chest. Only single crochet, increases, and decreases are used. Pieces are sewn together at the end.
Skill level: Beginner
Terminology: US crochet terms
Finished Size
About 4½ in (11.5 cm) tall sitting, excluding ears; about 5½ in (14 cm) tall including ears. About 3 in (7.5 cm) wide at the body.
Size will vary with yarn, hook, and how tightly you crochet.
Materials
Yarn: DK weight (Category 3), acrylic or cotton-blend recommended
- Color A (fox orange / rust): 70 yd (64 m)
- Color B (cream / off-white): 25 yd (23 m)
- Color C (black): 5 yd (5 m), or black embroidery floss, for nose and mouth
Hook: US E-4 / 3.5 mm (or the hook that gives a dense fabric with no gaps)
Go down 1–2 sizes from the yarn label so stuffing does not show.
Notions:
- Polyester fiberfill stuffing
- Yarn needle
- Stitch marker
- Pins for assembly
- 1 pair 6 mm (¼ in) safety eyes
Or black yarn/floss to embroider eyes (required for children under 3 years)
Gauge
26 sc and 28 rnds = 4 in (10 cm) in single crochet, worked tightly in the round.
Gauge is a density check, not a fit check. If you can see gaps between stitches, go down a hook size. A 2 in (5 cm) swatch in the round is enough.
Abbreviations (US)
- ch — chain
- sc — single crochet
- inc — increase (2 sc in the same stitch)
- dec — decrease (sc2tog; invisible decrease preferred: insert hook through front loops of next 2 sts, yarn over, pull through both loops, yarn over, pull through 2)
- MR — magic ring (adjustable ring)
- sl st — slip stitch
- st(s) — stitch(es)
- rnd(s) — round(s)
- FO — fasten off
- FLO — front loop only
Pattern Notes
- Work in continuous spirals. Do not join rounds or chain at the start of a round unless told to. Mark the first stitch of every round and move the marker up as you go.
- Work tightly for a smooth amigurumi surface.
- Stuff as you go. It is hard to stuff later through a small opening.
- Numbers in [brackets] are the stitch count at the end of the round.
- Leave long tails (about 12 in / 30 cm) on pieces that will be sewn.
- Safety eyes are a choking hazard. Do not use them on toys for children under 3 years; embroider eyes instead.
Head
Color A. Stuff firmly as you decrease.
Rnd 1: 6 sc in MR. [6]
Rnd 2: Inc in each st around. [12] (6 inc: 6 + 6 = 12 ✓)
Rnd 3: (Sc, inc) around. [18] (6 inc: 12 + 6 = 18 ✓)
Rnd 4: (2 sc, inc) around. [24] (6 inc: 18 + 6 = 24 ✓)
Rnd 5: (3 sc, inc) around. [30] (6 inc: 24 + 6 = 30 ✓)
Rnds 6–10: Sc around. [30] (5 rnds)
Rnd 11: (3 sc, dec) around. [24] (6 dec: 30 − 6 = 24 ✓)
Rnd 12: (2 sc, dec) around. [18] (6 dec: 24 − 6 = 18 ✓)
Insert safety eyes between Rnds 7 and 8, 6 sts apart, centered on the face. If embroidering eyes, wait until the head is closed.
Stuff the head firmly, filling the top first.
Rnd 13: (Sc, dec) around. [12] (6 dec: 18 − 6 = 12 ✓)
Rnd 14: Dec around. [6] (6 dec: 12 − 6 = 6 ✓)
FO, leaving a 12 in (30 cm) tail. Thread the tail through the front loops of the remaining 6 sts and pull to close the hole. Weave in the end, or keep the tail if you prefer to use it to sew the head to the body.
Body
Color A. Stuff firmly so the fox can sit.
Rnd 1: 6 sc in MR. [6]
Rnd 2: Inc in each st around. [12] (6 inc: 6 + 6 = 12 ✓)
Rnd 3: (Sc, inc) around. [18] (6 inc: 12 + 6 = 18 ✓)
Rnd 4: (2 sc, inc) around. [24] (6 inc: 18 + 6 = 24 ✓)
Rnd 5: (3 sc, inc) around. [30] (6 inc: 24 + 6 = 30 ✓)
Rnds 6–12: Sc around. [30] (7 rnds)
Rnd 13: (3 sc, dec) around. [24] (6 dec: 30 − 6 = 24 ✓)
Rnd 14: (2 sc, dec) around. [18] (6 dec: 24 − 6 = 18 ✓)
Stuff firmly.
Rnd 15: (Sc, dec) around. [12] (6 dec: 18 − 6 = 12 ✓)
Rnd 16: Dec around. [6] (6 dec: 12 − 6 = 6 ✓)
FO, close the hole as for the head, and weave in the end. The closed end is the bottom of the body.
Muzzle
Color B. Stuff lightly.
Rnd 1: 6 sc in MR. [6]
Rnd 2: Inc in each st around. [12] (6 inc: 6 + 6 = 12 ✓)
Rnd 3: (Sc, inc) around. [18] (6 inc: 12 + 6 = 18 ✓)
Rnds 4–5: Sc around. [18] (2 rnds)
FO, leaving a 12 in (30 cm) tail for sewing. Stuff lightly so the muzzle stays a soft oval, not a hard ball.
Chest Patch
Color B. Do not stuff. Worked in the round as a flat circle.
Rnd 1: 6 sc in MR. [6]
Rnd 2: Inc in each st around. [12] (6 inc: 6 + 6 = 12 ✓)
Rnd 3: (Sc, inc) around. [18] (6 inc: 12 + 6 = 18 ✓)
Rnd 4: Sc around. [18]
FO, leaving a 12 in (30 cm) tail for sewing. Flatten the circle.
Ears (make 2)
Color A. Do not stuff (or push in a pea-sized bit of stuffing at the base only).
Rnd 1: 4 sc in MR. [4]
Rnd 2: (Sc, inc) around. [6] (2 inc: 4 + 2 = 6 ✓)
Rnd 3: (2 sc, inc) around. [8] (2 inc: 6 + 2 = 8 ✓)
Rnd 4: (3 sc, inc) around. [10] (2 inc: 8 + 2 = 10 ✓)
Rnd 5: (4 sc, inc) around. [12] (2 inc: 10 + 2 = 12 ✓)
Rnd 6: Sc around. [12]
FO, leaving a 10 in (25 cm) tail. Flatten each ear into a triangle with Rnd 1 at the tip.
Inner Ears (make 2)
Color B. Worked flat in rows.
Row 1: Ch 5, sc in 2nd ch from hook and in each ch across. [4]
Row 2: Ch 1, turn, (dec) twice. [2] (2 dec: 4 − 2 = 2 ✓)
Row 3: Ch 1, turn, dec. [1] (1 dec: 2 − 1 = 1 ✓)
FO, leaving an 8 in (20 cm) tail. The piece is a small triangle. Sew one inner ear to the front of each outer ear, with the points matching, using Color B. Weave in the Color B ends.
Tail
Begin with Color B (cream tip). Stuff as you go, more firmly at the base and lightly at the tip.
Rnd 1: 4 sc in MR. [4]
Rnd 2: (Sc, inc) around. [6] (2 inc: 4 + 2 = 6 ✓)
Rnd 3: Sc around. [6]
Change to Color A.
Rnd 4: (2 sc, inc) around. [8] (2 inc: 6 + 2 = 8 ✓)
Rnd 5: Sc around. [8]
Rnd 6: (3 sc, inc) around. [10] (2 inc: 8 + 2 = 10 ✓)
Rnd 7: Sc around. [10]
Rnd 8: (4 sc, inc) around. [12] (2 inc: 10 + 2 = 12 ✓)
Rnd 9: Sc around. [12]
Rnd 10: (5 sc, inc) around. [14] (2 inc: 12 + 2 = 14 ✓)
Rnds 11–14: Sc around. [14] (4 rnds)
FO, leaving a 12 in (30 cm) tail. Finish stuffing. Do not close the opening; you will sew it to the body.
Legs (make 4)
Color A. Stuff lightly.
Rnd 1: 6 sc in MR. [6]
Rnd 2: Inc in each st around. [12] (6 inc: 6 + 6 = 12 ✓)
Rnds 3–5: Sc around. [12] (3 rnds)
FO, leaving a 10 in (25 cm) tail. Stuff lightly so the legs stay squat. Do not close the opening.
Assembly
Pin every piece before sewing. Use matching yarn and a yarn needle. Sew through both loops unless a piece is already flattened.
1. Ears to head
Place the ears on top of the head, spanning Rnds 3–6, tilted slightly outward, about 4 sts apart at the inner edges. The cream inner ear faces forward. Sew all around the open base of each ear.
2. Muzzle to head
Center the muzzle on the lower face, covering Rnds 8–12, just below the eyes, with the stuffed side out. Sew all around, adding a pinch more stuffing if the muzzle looks flat.
3. Face
With Color C (or black floss):
- Embroider a filled triangle nose at the top center of the muzzle, about ⅜ in (1 cm) wide.
- Embroider a short vertical line down from the nose and a small shallow V or curve for a smile.
If you did not use safety eyes, embroider two small filled ovals or French knots on Rnds 7–8, 6 sts apart.
4. Chest to body
Sew the cream chest patch to the front of the body, covering roughly Rnds 6–11, centered. Keep it flat.
5. Head to body
Pin the head on top of the body, slightly toward the front so the fox looks forward, not straight up. The head closed-end (Rnd 14) sits on the body closed-end-up (the body Rnd 1 / starting ring is the top). Sew all around the neck join, going around twice for strength. Add a little extra stuffing in the neck if the head wobbles.
6. Legs
The fox sits on four stubby legs like a small chair:
- Front legs: sew to the front underside, one on each side of the chest, openings against the body, angled slightly forward.
- Back legs: sew to the back underside, angled slightly out to the sides.
All four open edges should sit on the same plane so the toy rests level. Check that it sits before fastening off each leg, and restitch if it tips.
7. Tail
Sew the open end of the tail to the lower back of the body, just above the back legs, angled up and slightly to one side. Catch enough stitches around the opening so the tail does not flop.
Finishing
Weave in every remaining end through the stuffing, not along the surface. Roll the head and body gently between your hands to round them. If a seam dimples, tug nearby stitches or add a tiny bit of stuffing under the dimple with the needle.
Your sitting fox is ready.
Disclaimer: This pattern was generated by AI and should be reviewed for accuracy before use. While we strive for quality, AI-generated content may contain errors. Please verify measurements, stitch counts, charts, and instructions before beginning your project. Generated by purlJam.uk
Love this pattern?
Save this pattern to your free PurlJam libraryAccess your pattern anytime
Bookmark this page to access your pattern anytime