Type
Crochet
Difficulty
intermediate
Category
amigurumi
AI Thinking Process
Planning
Verification
Pattern
Sitting Cat Amigurumi
Skill level: Intermediate
Construction: Separate pieces, sewn assembly
Finished size: Approximately 18 cm (7 in) tall sitting, including ears, using the stated yarn and tension.
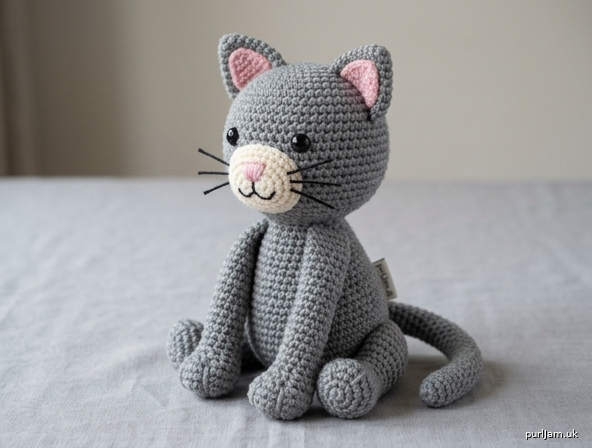
A classic sitting cat with a round head, oval muzzle, pointed two-tone ears, egg-shaped body, defined paws, haunch-shaped hind legs and a curving tail. Worked in UK terminology in continuous spirals.
Materials
- Yarn: Aran / worsted weight (approx. 10 ply; typical 100 g = 180–200 m)
- MC (main colour — e.g. grey, ginger or black): 80 g
- CC1 (muzzle — e.g. cream or white): 15 g
- CC2 (inner ears and nose — e.g. pink): 10 g
- Small amount of black 4-ply / stranded cotton for mouth and whiskers
- Hook: 3.5 mm (or size needed to obtain a dense fabric)
- Notions:
- 10 mm safety eyes (pair)
- Polyester toy stuffing
- Stitch marker
- Tapestry needle
- Pins
- Scissors
Safety note: Safety eyes are a choking hazard for children under 36 months. Embroider the eyes instead if the toy is intended for a baby or toddler.
Tension (gauge)
11 dc and 12 rounds = 5 cm × 5 cm (2 in × 2 in), worked in the round in dc.
Tension in amigurumi is less about matching a swatch and more about fabric density: stitches should be tight enough that stuffing cannot show through. If the fabric is loose, go down a hook size.
Abbreviations (UK)
| Abbreviation | Meaning |
|---|---|
| BLO | back loop only |
| CC | contrast colour |
| ch | chain |
| dc | double crochet (US sc) |
| dc2tog | double crochet 2 together (decrease) |
| dec | invisible decrease (preferred) or dc2tog |
| FO | fasten off |
| inc | 2 dc in next stitch (increase) |
| MC | main colour |
| MR | magic ring |
| rnd(s) | round(s) |
| sl st | slip stitch |
| st(s) | stitch(es) |
| yrh | yarn round hook |
Invisible decrease: Insert hook under the front loop of the next st, then under the front loop of the following st (2 loops on hook), yrh, pull through both front loops, yrh, pull through 2 loops.
Pattern notes
- Work in a continuous spiral unless stated. Do not join or turn at the end of a round. Mark the first stitch of every round and move the marker up as you go.
- The starting chain of flat inner-ear rows does not count as a stitch.
- Stuff as directed: firmly for head, body and paws; lightly for the muzzle; base-only for the tail.
- Leave long tails on pieces that will be sewn (body, legs, ears, muzzle, tail).
- Numbers in parentheses at the end of a round are the stitch count after that round is complete.
- Inline checks (e.g. “6 inc → 12 ✓”) confirm the arithmetic of that round.
Head (MC)
Worked from the crown down.
Rnd 1: 6 dc in MR. (6)
Rnd 2: Inc in each st around. (6 inc → 6 + 6 = 12 ✓)
Rnd 3: (1 dc, inc) 6 times. (6 inc → 12 + 6 = 18 ✓)
Rnd 4: (2 dc, inc) 6 times. (6 inc → 18 + 6 = 24 ✓)
Rnd 5: (3 dc, inc) 6 times. (6 inc → 24 + 6 = 30 ✓)
Rnd 6: (4 dc, inc) 6 times. (6 inc → 30 + 6 = 36 ✓)
Rnd 7: (5 dc, inc) 6 times. (6 inc → 36 + 6 = 42 ✓)
Rnds 8–14: 1 dc in each st around. (42 sts for 7 rnds)
Safety eyes: Insert between rnds 10 and 11, 7 stitches apart, centred on the face. Do not fix the washers until the muzzle has been dry-fitted (see Assembly).
Rnd 15: (5 dc, dec) 6 times. (6 dec → 42 − 6 = 36 ✓)
Rnd 16: (4 dc, dec) 6 times. (6 dec → 36 − 6 = 30 ✓)
Rnd 17: (3 dc, dec) 6 times. (6 dec → 30 − 6 = 24 ✓)
Stuff the head firmly, filling the crown well so it stays round.
Rnd 18: (2 dc, dec) 6 times. (6 dec → 24 − 6 = 18 ✓)
Rnd 19: (1 dc, dec) 6 times. (6 dec → 18 − 6 = 12 ✓)
Rnd 20: Dec 6 times. (6 dec → 12 − 6 = 6 ✓)
FO, leaving a short tail. Thread the tail through the remaining 6 front loops, pull closed and weave in.
Muzzle (CC1)
Rnd 1: 6 dc in MR. (6)
Rnd 2: Inc in each st around. (6 inc → 12 ✓)
Rnd 3: (1 dc, inc) 6 times. (6 inc → 12 + 6 = 18 ✓)
Rnd 4: 1 dc in each st around. (18)
FO, leaving a 25 cm tail for sewing. Stuff lightly just before attaching.
Outer ears (make 2, MC)
Worked as a pointed oval; do not stuff. The two increases sit opposite each other so the piece flattens into a triangle.
Rnd 1: 4 dc in MR. (4)
Rnd 2: (1 dc, inc) 2 times. (2 inc → 4 + 2 = 6 ✓)
Rnd 3: (2 dc, inc) 2 times. (2 inc → 6 + 2 = 8 ✓)
Rnd 4: (3 dc, inc) 2 times. (2 inc → 8 + 2 = 10 ✓)
Rnd 5: (4 dc, inc) 2 times. (2 inc → 10 + 2 = 12 ✓)
Rnd 6: (5 dc, inc) 2 times. (2 inc → 12 + 2 = 14 ✓)
Rnd 7: 1 dc in each st around. (14)
FO, leaving a 20 cm tail. Flatten with the increase-lines at the sides so a point forms at the tip.
Inner ears (make 2, CC2)
Worked flat, in rows.
Foundation: Ch 7.
Row 1: 1 dc in 2nd ch from hook and in each ch to end, turn. (6)
Row 2: Ch 1 (does not count as a st), dec, 2 dc, dec, turn. (2 dec → 6 − 2 = 4 ✓)
Row 3: Ch 1, dec, dec, turn. (2 dec → 4 − 2 = 2 ✓)
Row 4: Ch 1, dc2tog. (1)
FO, leaving a 15 cm tail. The piece is a small triangle.
Body (MC)
Worked from the base up. The top is left open for sewing to the head.
Rnd 1: 6 dc in MR. (6)
Rnd 2: Inc in each st around. (6 inc → 12 ✓)
Rnd 3: (1 dc, inc) 6 times. (6 inc → 18 ✓)
Rnd 4: (2 dc, inc) 6 times. (6 inc → 24 ✓)
Rnd 5: (3 dc, inc) 6 times. (6 inc → 30 ✓)
Rnd 6: (4 dc, inc) 6 times. (6 inc → 36 ✓)
Rnd 7: (5 dc, inc) 6 times. (6 inc → 42 ✓)
Rnds 8–15: 1 dc in each st around. (42 sts for 8 rnds)
Rnd 16: (5 dc, dec) 6 times. (6 dec → 42 − 6 = 36 ✓)
Rnds 17–18: 1 dc in each st around. (36 sts for 2 rnds)
Rnd 19: (4 dc, dec) 6 times. (6 dec → 36 − 6 = 30 ✓)
Rnd 20: 1 dc in each st around. (30)
Rnd 21: (3 dc, dec) 6 times. (6 dec → 30 − 6 = 24 ✓)
FO, leaving a 40 cm tail for sewing. Stuff the body firmly, with extra filling in the base so the cat sits stably. Do not close the 24-st opening.
Front legs (make 2, MC)
Rnd 1: 6 dc in MR. (6)
Rnd 2: Inc in each st around. (6 inc → 12 ✓)
Rnd 3: 1 dc BLO in each st around. (12) — this ridge marks the paw.
Rnds 4–13: 1 dc in each st around. (12 sts for 10 rnds)
FO, leaving a 25 cm tail. Stuff the paw (rnds 1–4) firmly and the remainder of the leg lightly so it keeps a slight bend.
Hind legs (make 2, MC)
Shaped as sitting haunches: wider at the thigh, narrower at the foot.
Rnd 1: 6 dc in MR. (6)
Rnd 2: Inc in each st around. (6 inc → 12 ✓)
Rnd 3: (1 dc, inc) 6 times. (6 inc → 12 + 6 = 18 ✓)
Rnds 4–7: 1 dc in each st around. (18 sts for 4 rnds)
Rnd 8: (1 dc, dec) 6 times. (6 dec → 18 − 6 = 12 ✓)
Rnds 9–10: 1 dc in each st around. (12 sts for 2 rnds)
FO, leaving a 25 cm tail. Stuff firmly throughout so the haunch holds its oval shape.
Tail (MC)
Rnd 1: 6 dc in MR. (6)
Rnd 2: (2 dc, inc) 2 times. (2 inc → 6 + 2 = 8 ✓)
Rnds 3–25: 1 dc in each st around. (8 sts for 23 rnds)
FO, leaving a 20 cm tail. Stuff the first 4–5 cm (the base) lightly; leave the rest unstuffed so the tail can curve and drape.
Assembly
Pin every piece before sewing. Use whip stitch or mattress stitch with matching yarn, and add a little extra stuffing under each join if a hollow appears.
1. Inner ears onto outer ears
Centre each CC2 triangle on a flattened MC ear, pink side facing you, tip towards the ear tip. Sew around the inner-ear edges. The inner ear should sit slightly in from the outer edge.
2. Muzzle
Pin the muzzle to the lower face, centred between the eye posts, covering approximately rnds 12–16 of the head, with the top edge sitting just below the eyes. Stuff it lightly into a soft oval as you sew it down all around.
3. Safety eyes
Once the muzzle sits where you like it, lock the 10 mm safety-eye washers on the inside of the head. Eyes sit between rnds 10 and 11, 7 stitches apart.
4. Nose and mouth
With CC2, embroider a small inverted triangle (or a tight satin-stitch Y) on the upper centre of the muzzle. With black thread, add a short vertical stitch down from the nose and a shallow wide “W” or “3” for the mouth.
5. Whiskers
Using black thread, take 3 long stitches out from each side of the muzzle (6 whiskers in total), each about 2–2.5 cm. Tie off inside the head, or use a tiny backstitch at the muzzle edge so the whiskers cannot pull through.
6. Ears to head
Pin the ears to the crown, inner-ear facing forwards, spanning approximately rnds 4–8, with about 6–7 stitches between the inner edges. The points should tilt slightly outwards. Sew all around the open (flattened) base.
7. Head to body
Centre the closed base of the head over the 24-st body opening. The face should look straight forward. Sew the body opening to the head around all 24 stitches, adding stuffing at the neck before closing the last 4–5 stitches so the head does not wobble.
8. Front legs
Sew the open tops of the front legs to the upper front of the body, just below the neck join, about 4 stitches apart, angled slightly forward so the paws rest on the “ground” in a sitting pose.
9. Hind legs
Sew the wider (18-st) section of each hind leg to the lower side of the body, with the narrower foot pointing forwards and slightly out. The two haunches should sit level so the cat is stable. The bottoms of the hind legs should align with the base of the body.
10. Tail
Sew the open end of the tail to the lower back, centred just above the body base. Curve the tail around one haunch and tack it in one or two places if you want it to stay wrapped.
Finishing
Weave in every remaining end. Roll the head and body between your palms to even out the stuffing. Check that the cat sits without tipping; add a little extra stuffing through a small gap at the base of a hind leg if needed, then close.
Optional extras (not required): a few long stitches of MC or a darker shade across the forehead and cheeks for tabby markings; a small CC1 oval sewn to the chest as a bib.
End of pattern.
Disclaimer: This pattern was generated by AI and should be reviewed for accuracy before use. While we strive for quality, AI-generated content may contain errors. Please verify measurements, stitch counts, charts, and instructions before beginning your project. Generated by purlJam.uk
Love this pattern?
Save this pattern to your free PurlJam libraryAccess your pattern anytime
Bookmark this page to access your pattern anytime