Type
Crochet
Difficulty
beginner
Category
kimono
AI Thinking Process
Planning
Verification
Pattern
Skull Cardigan
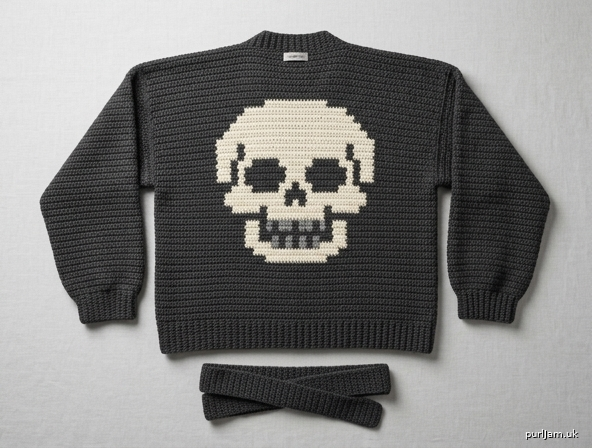
An oversized, open-front kimono-style cardigan worked in worsted-weight yarn. The body and sleeves are simple rectangles with no armhole, shoulder, or waist shaping and no sleeve taper — they meet at right angles in a classic T. A single large skull is worked in intarsia colourwork on the back. Wear it open, or wrap it with the sash.
This pattern uses UK crochet terms throughout.
Difficulty: Intermediate (intarsia colourwork, even tension, seaming)
Sizes
S/M (L/XL, 2XL/3XL)
To fit bust 81–97 (102–117, 122–147) cm / 32–38 (40–46, 48–58) in
Shown with 15–30 cm (6–12 in) positive ease. Choose the size whose finished bust is 15–30 cm larger than your actual bust. Length and sleeve length affect the look more than bust on this silhouette — adjust row counts if you want a cropped or longer body.
Finished measurements
Measurements are after light blocking.
| S/M | L/XL | 2XL/3XL | |
|---|---|---|---|
| Bust (fronts meeting) | 117 cm (46 in) | 132 cm (52 in) | 152 cm (59¾ in) |
| Back width | 58 cm (22¾ in) | 65.5 cm (25¾ in) | 75.5 cm (29¾ in) |
| Front width (each) | 29.5 cm (11½ in) | 33 cm (13 in) | 38 cm (15 in) |
| Body length | 70 cm (27½ in) | 74 cm (29 in) | 78 cm (30¾ in) |
| Sleeve length (dropped shoulder to cuff) | 36 cm (14¼ in) | 36 cm (14¼ in) | 36 cm (14¼ in) |
| Sleeve circumference | 45.5 cm (18 in) | 50 cm (19¾ in) | 54.5 cm (21½ in) |
| Back neck width | 19.5 cm (7¾ in) | 22 cm (8¾ in) | 24.5 cm (9¾ in) |
The shoulders are dropped: the sleeve seam sits well below the natural shoulder. 36 cm is a full-length sleeve on this construction. For ¾-length, work 28 rows (about 23 cm / 9 in) instead of 43.
Yarn
Worsted / aran / 10-ply yarn with about 200 m per 100 g.
A wool or wool-blend gives stitch definition and a little structure, which helps the skull read clearly. Cotton, bamboo, Tencel, or silk blends drape more but can grow with wear — block a swatch and hang it overnight before you commit.
Yarn A (main colour — charcoal, black, or dark grey):
1000 (1200, 1400) g / 2000 (2400, 2800) m
Yarn B (skull — bone, cream, or off-white):
80 (90, 100) g / 160 (180, 200) m
Allow extra Yarn A if your tension is tight or you lengthen the body. Intarsia uses more yarn than a single-colour fabric of the same size.
Hooks and notions
- 5 mm hook (UK 6) — or the size needed to obtain tension
- 4.5 mm hook (UK 7) for edging and sash
- 6–8 stitch markers
- Yarn needle
- Scissors
- Bobbins for intarsia (at least 3; more if the skull has isolated colour blocks)
- Blocking mats and pins
Optional: 2 toggle buttons or leather ties in place of the sash.
Tension (gauge)
16 sts and 12 rows = 10 cm (4 in) over half treble crochet (UK htr) using 5 mm hook, measured after light blocking.
Work a swatch at least 15 × 15 cm, in the round-trip of rows you will use (2 ch, htr in first st, turn). Count 16 sts and 12 rows in the centre 10 cm.
Colourwork must match this tension. If the skull section pulls in, go up to 5.5 mm for the motif only, or loosen your Yarn B hand. If it flares, drop to 4.5 mm for the motif only.
Abbreviations (UK)
| Abb. | Meaning |
|---|---|
| ch | chain |
| dc | double crochet (US single crochet) |
| htr | half treble (US half double crochet) |
| sl st | slip stitch |
| st(s) | stitch(es) |
| RS | right side |
| WS | wrong side |
| yoh | yarn over hook |
| rem | remaining |
| rep | repeat |
UK/US note: UK dc = US sc. UK htr = US hdc. UK tr is not used in this pattern.
Pattern notes
- Work in rows, turning at the end of every row. Do not join into the round.
- 2 ch at the start of a row does not count as a stitch. Work the first htr into the first stitch. Work the last htr into the last stitch (not into the 2-ch). This gives a firm, seamable edge.
- The cardigan is a T-shape: no armhole decreases, no sleeve taper, no waist shaping, no set-in sleeve. Do not add them.
- Pieces are oversized rectangles. Fit comes from positive ease and drape, not from shaping.
- Change colour on the last yoh of the previous stitch: for htr, stop when 3 loops are on the hook, yoh with the new colour, pull through all 3 loops.
- Intarsia: use a separate ball or bobbin of Yarn A on each side of the skull, and Yarn B for the skull. Twist the two yarns once at each colour change to avoid holes. Do not carry Yarn B right across the Back.
- Weave in colourwork ends as you go, or leave 12 cm tails and weave them in on the WS after blocking.
- Instructions are written S/M (L/XL, 2XL/3XL). Where only one number is given, it applies to all sizes.
Colourwork — the skull
A chart panel may be used for the motif. The written pattern does not depend on a specific grid.
Motif. One forward-facing skull, centred on the Back. Rounded cranium, two large empty eye sockets, an inverted triangular nasal cavity, and a row of teeth along the lower jaw. Yarn B forms the bone; Yarn A forms the background and the negative space of the sockets, nasal cavity, and any gaps between teeth. Do not add a third colour unless your chart marks one.
Size on the body. Aim for a motif about 22–28 cm (8½–11 in) wide and 24–32 cm (9½–12½ in) tall so it sits as a single statement on the upper back. If your chart is larger than the remaining rows before the shoulder, start it earlier so it finishes at least 5 cm (2 in) below the shoulder line.
Placement. Centre the skull horizontally. Begin it after the plain Yarn A rows given in the Back, so the motif sits in the upper two-thirds of the Back.
Centring without a known stitch width. Count the stitches in one full row of your chart (or of your graph). Subtract that number from the Back stitch count. Divide the remainder by 2 — that is how many Yarn A stitches to work each side of the motif.
- S/M: 93 minus chart width, then divide by 2.
- L/XL: 105 minus chart width, then divide by 2.
- 2XL/3XL: 121 minus chart width, then divide by 2.
If the remainder is odd, place the extra Yarn A stitch at the left edge of the Back (as worn).
Reading a chart in crochet. Each square = 1 htr. RS rows (odd-numbered Back rows once you are on the motif): read right to left. WS rows: read left to right. Turn at the end of every row as usual.
Without a chart. Graph a skull to your tension (16 sts and 12 rows to 10 cm) at the centimetre size above, then follow your own graph using the same centring method.
Back
With 5 mm hook and Yarn A, ch 94 (106, 122).
Row 1 (RS): Htr in 2nd ch from hook and in each ch to end, turn.
93 (105, 121) htr.
(Foundation: ch 94 (106, 122) → skip 1 ch, 93 (105, 121) htr ✓)
Row 2: 2 ch (does not count as a st), htr in first st and in each st to end, turn.
93 (105, 121) htr.
Rep Row 2 until 36 (38, 40) rows have been worked in Yarn A.
(36 (38, 40) rows × 10 cm / 12 rows = 30 (31.5, 33.5) cm ✓)
Last of these rows is a WS row.
Begin skull (RS): Continue in htr, working Yarn A each side and Yarn B (and Yarn A negative space) across the centred motif as described above. Keep 93 (105, 121) htr on every row.
When the motif is complete, break Yarn B. Continue in Yarn A only until the Back measures 70 (74, 78) cm / 27½ (29, 30¾) in from the foundation edge, ending with a WS row — 84 (89, 94) rows in total if your tension matches.
(84 (89, 94) rows × 10 / 12 = 70 (74, 78) cm ✓)
Fasten off, leaving a 40 cm tail for seaming.
Place markers on the last row for the shoulder split:
- Outer 31 (35, 41) sts = right shoulder (as worn)
- Centre 31 (35, 39) sts = back neck (leave unseamed)
- Outer 31 (35, 41) sts = left shoulder
(31 + 31 + 31 = 93 ✓; 35 + 35 + 35 = 105 ✓; 41 + 39 + 41 = 121 ✓)
Right Front
Worked as a plain rectangle in Yarn A. The inner long edge (the edge that will sit at centre front) is the left edge of RS rows.
With 5 mm hook and Yarn A, ch 48 (54, 62).
Row 1 (RS): Htr in 2nd ch from hook and in each ch to end, turn.
47 (53, 61) htr.
(ch 48 (54, 62) → 47 (53, 61) htr ✓)
Row 2: 2 ch, htr in first st and in each st to end, turn.
47 (53, 61) htr.
Rep Row 2 until the Front matches the Back in row count and length: 84 (89, 94) rows, 70 (74, 78) cm. End with a WS row.
Fasten off, leaving a 40 cm tail.
Mark the shoulder edge (the last row): 31 (35, 41) sts at the armhole/side edge will be seamed to the Back shoulder. The remaining 16 (18, 20) sts at the centre-front edge stay open.
(47 − 31 = 16 ✓; 53 − 35 = 18 ✓; 61 − 41 = 20 ✓)
Left Front
Work exactly as Right Front. Mark the last row as a mirror: 31 (35, 41) sts at the side/armhole edge for the shoulder seam; 16 (18, 20) sts at centre front left open.
Sleeves (make 2)
Wide rectangles — the same width at cuff and at the body. Do not taper.
With 5 mm hook and Yarn A, ch 74 (81, 88).
Row 1 (RS): Htr in 2nd ch from hook and in each ch to end, turn.
73 (80, 87) htr.
(ch 74 (81, 88) → 73 (80, 87) htr ✓)
(73 (80, 87) sts × 10 cm / 16 sts = 45.5 (50, 54.5) cm sleeve circumference ✓)
Row 2: 2 ch, htr in first st and in each st to end, turn.
73 (80, 87) htr.
Rep Row 2 until the Sleeve measures 36 cm / 14¼ in from the foundation edge — 43 rows if your tension matches. End with a WS row.
(43 rows × 10 / 12 = 36 cm ✓)
Fasten off, leaving a long tail for the underarm seam.
The foundation edge is the cuff; the last row is the edge that attaches to the body.
Assembly
Block all pieces before seaming, especially the Back, so the skull lies flat and the rectangles are true. Pin to the finished measurements, mist or steam according to the fibre, and leave to dry fully.
Use mattress stitch or whip stitch through both loops, with Yarn A, unless noted. Keep seams flat — a bulky ridge will spoil the T-shape.
1. Shoulder seams
With RS together (or WS together if you prefer mattress stitch from the RS), join 31 (35, 41) sts of the Right Front last row to the matching 31 (35, 41) sts of the Back. Repeat for the Left Front.
The centre 31 (35, 39) sts of the Back remain open for the neck. The inner 16 (18, 20) sts of each Front remain open. There is no shoulder slope — the seam is a straight horizontal line.
2. Attach sleeves
The sleeve sits at a right angle to the body (T-shape). The last row of the Sleeve is sewn to the side edges of Front and Back, centred on the shoulder seam.
On each side of the garment, measure 23 (25, 27) cm / 9 (9¾, 10¾) in down from the shoulder seam along the Back side edge, and the same distance down the Front side edge. Mark both points.
(23 + 23 = 46 cm against a 45.5 cm sleeve edge — ease to fit ✓)
(25 + 25 = 50 cm against 50 cm ✓)
(27 + 27 = 54 cm against 54.5 cm — ease to fit ✓)
Pin the last row of the Sleeve between these two marks, matching the Sleeve midpoint to the shoulder seam. Sew. Repeat for the second Sleeve.
The sleeve seam sits well below the natural shoulder. That is correct.
3. Side seams
Sew each Front to the Back from the hem up to the underarm (the lower Sleeve-attach mark). Do not sew into the sleeve opening.
Side seam length is about 47 (49, 51) cm / 18½ (19¼, 20 in).
(Body 70 (74, 78) − 23 (25, 27) = 47 (49, 51) cm ✓)
4. Sleeve undersides
Fold each Sleeve so the long side edges meet. Sew from the cuff up to the underarm, joining to the side seam. The sleeve is the same width all the way down.
Border
With RS facing, 4.5 mm hook, and Yarn A, join at the Right Front hem (centre-front corner).
Work dc evenly up the Right Front, around the back neck, and down the Left Front as follows:
- 1 dc in each foundation ch along any hem you choose to include later; for the vertical front edges, work 1 dc in each row end of htr.
- Across the back neck, 1 dc in each of the 31 (35, 39) open sts.
- 3 dc in the two hem/front corners if you also work along the hem in the same round; if you work fronts and neck only, 3 dc in the two shoulder-to-neck corners are not needed — just continue around the neck in an even curve.
Round 1: Dc as above. At the two inner neck corners (where Front meets Back neck), work 1 dc, 1 ch, 1 dc if the corner looks tight; otherwise work even. Do not turn if you are working as a continuous edging; if you prefer rows, turn.
Round 2: Dc in each dc. At any 1-ch corner space, (1 dc, 1 ch, 1 dc).
Round 3: As Round 2. Fasten off.
Optional Round 4 (corded edge): reverse dc (crab stitch) in each st, with 4.5 mm hook, RS facing, working from left to right. Fasten off.
Work 2 rounds of dc around each Sleeve cuff with 4.5 mm hook, joining with sl st and fastening off. Do not decrease — the cuff stays wide. Fold back as a deep cuff if you prefer a shorter look.
Work 2 rounds of dc along the hem (both Fronts and Back) if you did not include it in the front border, joining neatly at the centre-front corners.
Sash
With 4.5 mm hook and Yarn A, ch 11.
Row 1: Htr in 2nd ch from hook and in each ch to end, turn. 10 htr.
Row 2: 2 ch, htr in first st and in each st to end, turn. 10 htr.
Rep Row 2 until the sash measures 160 (170, 180) cm / 63 (67, 71) in, or long enough to wrap and tie at your waist. Fasten off. Add a round of dc around the entire sash if you want a firmer edge.
Wear the cardigan open, or wrap the sash at the waist. Optional: sew a small belt loop of 8 dc at each side seam, 2 cm below the underarm, to park the sash.
Finishing
- Weave in all remaining ends on the WS. Intarsia tails should be woven along their own colour.
- Check that the skull sits flat; if a colour-change hole shows, close it with a single duplicate-stitch or a tiny yarn-needle tack in matching colour.
- Block the finished cardigan once more, pinning the T-shape square: body rectangles true, sleeves at right angles, skull centred. Do not stretch the sleeves into a taper.
- Steam lightly if the fibre allows. Let dry completely before wearing.
Schematic (measurements)
Bust (fronts meeting): 117 (132, 152) cm
Body length:           70 (74, 78) cm
Back width:            58 (65.5, 75.5) cm
Each front:            29.5 (33, 38) cm
Sleeve length:         36 cm (all sizes)
Sleeve circumference:  45.5 (50, 54.5) cm
Body is a split rectangle (two fronts + back). Sleeves are rectangles joined at right angles to the side edges, centred on the straight shoulder seam. No armhole curve. No waist. No sleeve taper.
Customisation
- Cropped: work Back and Fronts to 52 (54, 56) cm / about 62 (65, 67) rows, and start the skull after 18 (20, 22) rows so it still sits on the upper back.
- Longline: add rows in Yarn A after the skull; 10 cm ≈ 12 rows.
- ¾ sleeves: 28 rows (23 cm) instead of 43.
- Short sleeves: 12 rows (10 cm).
- Closure: replace the sash with two chain ties at the waist, or one toggle through the front border.
- Collar: after Border Round 3, work 4 extra rows of dc on the back-neck sts only, then taper into the front edges, for a small turned neckband.
Disclaimer: This pattern was generated by AI and should be reviewed for accuracy before use. While we strive for quality, AI-generated content may contain errors. Please verify measurements, stitch counts, charts, and instructions before beginning your project. Generated by purlJam.uk
Love this pattern?
Save this pattern to your free PurlJam libraryAccess your pattern anytime
Bookmark this page to access your pattern anytime