Type
Crochet
Difficulty
beginner
Category
amigurumi
AI Thinking Process
Planning
Verification
Pattern
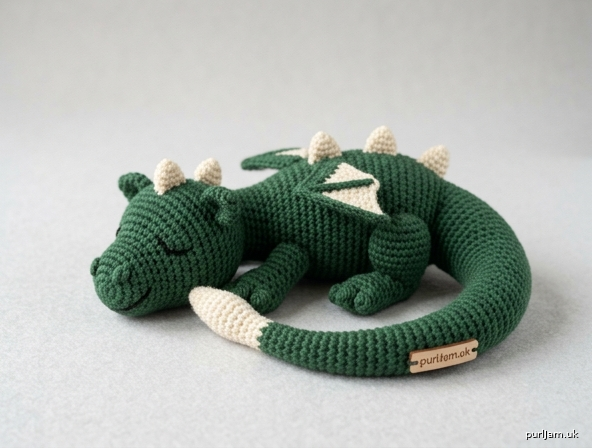
Sleepy Curled Dragon (Lay-Down Amigurumi)
A beginner-friendly crocheted dragon toy made entirely from simple shapes. The dragon lies flat with its tail curled toward its head. Finished size approximately 4½ inches (11.5 cm) from nose to hip; curled tail adds about 3 inches (7.5 cm).
Materials
- Worsted weight (4) yarn:
- Main color (MC): 40 yd / 37 m (dragon body — green, purple, or teal suggested)
- Contrast color (CC): 10 yd / 9 m (belly, wing membranes, or spikes — cream or lighter shade)
- Small amount black or dark yarn for nostrils/mouth (or embroidery floss)
- US E-4 (3.5 mm) crochet hook (or size needed to obtain gauge; go down 1–2 sizes from yarn label)
- Polyester fiberfill stuffing
- Yarn needle
- Stitch marker
- Optional: 6 mm safety eyes (or embroider eyes)
- Optional: small amount of felt for wing accents
Gauge
5 sc and 5 rnds = 1 inch (2.5 cm) in sc worked in the round. Gauge is important for a firm fabric that hides stuffing. Adjust hook size if necessary.
Abbreviations (US Terms)
- ch: chain
- sc: single crochet
- inc: 2 sc in same stitch
- dec: invisible decrease (sc2tog through front loops)
- st(s): stitch(es)
- rnd(s): round(s)
- MR: magic ring
- FO: fasten off
- [ ]: total stitch count at end of round
- ( ) × n: repeat instructions in parentheses n times
Pattern Notes
- Work in continuous spirals unless otherwise stated; do not join rounds. Use a stitch marker to mark the first stitch of each round.
- Stuff firmly as you go, especially the body and head.
- Invisible decrease keeps the surface smooth.
- All pieces are made separately and sewn together.
- The laying pose and tail curl are created during assembly.
Pieces
Head (sphere — make 1 in MC)
Rnd 1: 6 sc in MR. [6] Rnd 2: inc in each st around. [12] Rnd 3: (sc, inc) around. [18] Rnds 4–6: sc around. [18] Insert safety eyes between Rnds 4–5, about 4 sts apart, if using. Rnd 7: (sc, dec) around. [12] Stuff firmly. Rnd 8: dec around. [6] FO, leaving a long tail. Thread tail through front loops of remaining 6 sts and pull tight to close. Weave in end. (6 decreases → 12 – 6 = 6 ✓)
Body (elongated oval — make 1 in MC)
Foundation: Ch 7. Rnd 1: sc in 2nd ch from hook, sc in next 4 ch, 3 sc in last ch; rotate to work along opposite side of foundation chain, sc in next 4 ch, 2 sc in last ch (same as starting ch). [14] Rnd 2: inc, sc in next 4 sts, inc × 3, sc in next 4 sts, inc × 2. [20] Rnd 3: sc, inc, sc in next 5 sts, (sc, inc) × 2, sc in next 6 sts, (sc, inc) × 2. [24] Rnds 4–10: sc around. [24] (7 rounds even = approx 1½ inches / 4 cm length) Rnd 11: sc, dec, sc in next 5 sts, (sc, dec) × 2, sc in next 6 sts, (sc, dec) × 2. [20] Rnd 12: dec, sc in next 4 sts, dec × 3, sc in next 4 sts, dec × 2. [14] Stuff firmly, shaping into a gentle oval that will lie flat. Rnd 13: (sc, dec) around, ending with dec if needed to reach 9–10 sts. [approx 9–10] FO, leaving a long tail for sewing. Close remaining hole by weaving through front loops and pulling tight. (Body length nose-to-hip ready for head ≈ 3 inches / 7.5 cm ✓)
Legs (small cylinders — make 4 in MC)
Rnd 1: 6 sc in MR. [6] Rnd 2: (sc, inc) around. [9] Rnds 3–5: sc around. [9] Lightly stuff. FO, leaving a long tail for sewing. Do not close the top; the open edge will be sewn to the body.
Tail (tapered tube — make 1 in MC)
Rnd 1: 4 sc in MR. [4] Rnd 2: (sc, inc) around. [6] Rnd 3: sc around. [6] Rnd 4: (2 sc, inc) around. [8] Rnds 5–6: sc around. [8] Rnd 7: (3 sc, inc) around. [10] Rnds 8–12: sc around. [10] (length ≈ 2½ inches / 6.5 cm before curl) Lightly stuff the thicker base only; leave the tip unstuffed or very lightly stuffed so it can curl. FO, leaving a very long tail (18 inches / 45 cm) for sewing and shaping the curl.
Wings (flat triangles — make 2 in MC or CC)
Row 1: Ch 2, 2 sc in 2nd ch from hook. Turn. [2] Row 2: Ch 1, inc in each st. Turn. [4] Row 3: Ch 1, sc, inc, inc, sc. Turn. [6] Row 4: Ch 1, sc across. Turn. [6] Row 5: Ch 1, sc, dec, dec, sc. Turn. [4] Row 6: Ch 1, dec × 2. [2] FO, leaving a long tail for sewing. Wings are flat; no stuffing.
Optional Belly Patch (simple oval — make 1 in CC)
Ch 5. Rnd 1: sc in 2nd ch from hook, sc in next 2 ch, 3 sc in last ch; rotate, sc in next 2 ch, 2 sc in last ch. [10] Rnd 2: inc, sc in next 2 sts, inc × 3, sc in next 2 sts, inc × 2. [16] FO, leaving a long tail for sewing. (Optional — sew to underside of body before attaching legs.)
Optional Spikes (tiny cones — make 3–5 in CC)
Rnd 1: 4 sc in MR. [4] Rnd 2: (sc, inc) around. [6] Rnd 3: sc around. [6] FO, leaving a tail. Lightly stuff or leave unstuffed. Sew in a row along the spine.
Assembly
- Head to Body: Pin the head to the narrower front end of the body so the dragon appears to be looking slightly to one side or straight ahead while lying down. Sew securely with the yarn tail, adding a tiny bit more stuffing at the neck join if needed for a smooth transition.
- Belly Patch (if using): Center and sew the CC oval to the underside of the body.
- Legs: Position the four legs under the body in a relaxed lying-down pose — front legs angled slightly forward, back legs angled slightly back. The open tops of the legs sit flat against the body. Pin, then sew firmly. The dragon should rest stably on a flat surface.
- Wings: Pin wings to the upper sides of the body, slightly toward the back, angled upward or folded gently against the sides. Sew along the straight inner edge.
- Tail and Curl (key feature): Sew the thick base of the tail to the rear of the body. Curve the tail in a gentle spiral or C-shape so the tip points toward or rests near the head. Use the long yarn tail to tack the curl in place with a few invisible stitches on the underside — catch only the inner edge of the tail so the outer curve stays smooth. The tip should sit close to the head or cheek.
- Spikes (if using): Sew in a straight line from the top of the head down the neck and along the back, stopping before the tail.
- Face Details: With black yarn or embroidery floss, add two small straight stitches or French knots for nostrils on the muzzle. Optionally embroider a simple curved smile. If you did not use safety eyes, embroider sleepy half-closed eyes (horizontal dashes or shallow curves) to emphasize the resting pose.
- Final Shaping: Gently roll and squeeze the body and head so the dragon lies flat and symmetrical. Adjust the tail curl until it frames the head nicely. Weave in all remaining ends securely.
Finishing
- Check that all seams are tight and stuffing is evenly distributed.
- Spot-clean only; do not machine wash.
- Optional: Add a small ribbon or keychain finding at the back if desired for hanging, though the piece is designed as a shelf or desk toy.
Your sleepy curled dragon is complete! It uses only the simplest amigurumi shapes and stitches while capturing a cute laying-down pose with the signature tail curl toward the head.
Disclaimer: This pattern was generated by AI and should be reviewed for accuracy before use. While we strive for quality, AI-generated content may contain errors. Please verify measurements, stitch counts, and instructions before beginning your project. Generated by purlJam.uk
Love this pattern?
Save this pattern to your free PurlJam libraryAccess your pattern anytime
Bookmark this page to access your pattern anytime