Type
Knitting
Difficulty
intermediate
Category
amigurumi
AI Thinking Process
Planning
Verification
Pattern
Small Knitted Gruffalo
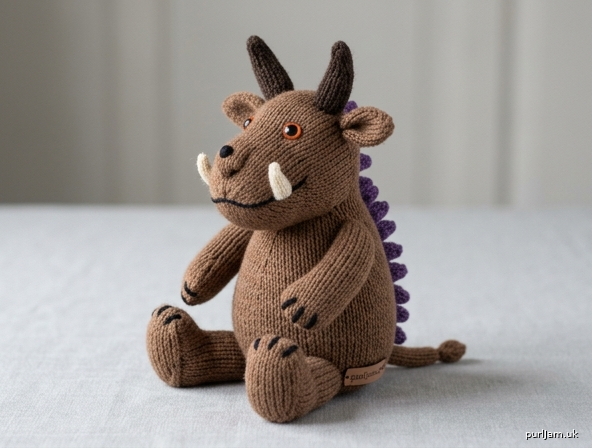
A little seated monster toy with horns, a snout, tusks, and purple prickles. Worked in the round in stockinette stitch. Separate pieces are stuffed, then sewn together.
Skill level: Beginner
Finished size: About 6½" (16.5 cm) tall seated, from base to horn tips
Gauge
20 sts and 28 rnds = 4" (10 cm) in stockinette stitch in the round, on US 6 / 4 mm needles.
A tight, even fabric that does not show stuffing matters more than matching this number exactly. If your fabric looks loose or holey, go down to US 5 / 3.75 mm.
Materials
- Worsted weight yarn (CYC 4)
- MC (brown): about 70 yd / 64 m (35 g)
- CC1 (dark brown): about 8 yd / 7 m (horns)
- CC2 (purple): about 6 yd / 5.5 m (prickles)
- CC3 (cream or off-white): about 3 yd / 3 m (tusks)
- Black: scrap or embroidery floss (wart, mouth, claws, pupils)
- Orange: scrap or embroidery floss (eyes), if not using safety eyes
- US 6 / 4 mm double-pointed needles (set of 4 or 5), or a 32" (80 cm) circular needle for Magic Loop
Use needles 1–2 sizes smaller than the yarn label recommends. - Stitch marker
- Polyester fiberfill: about 1½ oz (40 g)
- 9 mm orange safety eyes (optional) or orange and black yarn/floss for embroidered eyes
- Tapestry needle
- Small amount of waste yarn or locking stitch markers (for placing limbs)
Safety note: Safety eyes are a choking hazard. Do not use them on a toy for a child under 3 years. Embroider the eyes instead, and stitch every piece on very firmly.
Abbreviations (US)
- BO – bind off
- CC – contrast color
- CO – cast on
- k – knit
- k2tog – knit 2 stitches together (1 stitch decreased)
- kfb – knit into the front and back of the stitch (1 stitch increased)
- MC – main color
- rep – repeat
- rnd(s) – round(s)
- st(s) – stitch(es)
- St st – stockinette stitch (knit every round when working in the round)
Notes
- The toy is worked in the round in stockinette (knit every round).
- Place a marker for the beginning of the round.
- Joining 6 stitches: Cast on 6 sts and divide onto 3 DPNs (2 sts per needle). Join to work in the round on Rnd 1, being careful not to twist. The first round (kfb around) opens the circle quickly.
- Stuff as you go, and stuff firmly. Soft stuffing makes a floppy toy and a wobbly neck.
- Leave long tails (8–12" / 20–30 cm) when you cast on and bind off; use them to sew pieces together and hide the ends inside the toy.
- Closing a piece: Cut yarn, leaving a tail. Thread the tail through the remaining stitches, pull tight, and run the needle through the stitches a second time. Push the end to the inside.
Head
With MC, CO 6 sts. Divide onto 3 DPNs, join to work in the round.
Rnd 1: Kfb 6 times. (6 increases → 6 + 6 = 12 sts ✓)
Rnd 2: Knit. (12 sts)
Rnd 3: *K1, kfb; rep from * to end. (6 increases → 12 + 6 = 18 sts ✓)
Rnd 4: Knit. (18 sts)
Rnd 5: *K2, kfb; rep from * to end. (6 increases → 18 + 6 = 24 sts ✓)
Rnd 6: Knit. (24 sts)
Rnd 7: *K3, kfb; rep from * to end. (6 increases → 24 + 6 = 30 sts ✓)
Rnds 8–16: Knit. (30 sts; 9 rounds even)
Place eyes now, while the head is still open:
Insert 9 mm safety eyes between Rnds 12 and 13, about 6 sts apart, on what will be the front of the face. (If you are embroidering eyes, skip this and mark the same spots with waste yarn.)
Rnd 17: *K3, k2tog; rep from * to end. (6 decreases → 30 − 6 = 24 sts ✓)
Rnd 18: Knit. (24 sts)
Rnd 19: *K2, k2tog; rep from * to end. (6 decreases → 24 − 6 = 18 sts ✓)
Rnd 20: Knit. (18 sts)
Stuff the head firmly, filling out the top and cheeks.
Rnd 21: *K1, k2tog; rep from * to end. (6 decreases → 18 − 6 = 12 sts ✓)
Rnd 22: K2tog 6 times. (6 decreases → 12 − 6 = 6 sts ✓)
Close remaining 6 sts. The cast-on end is the top of the head; the closed decrease end is the neck.
Snout
With MC, CO 12 sts. Divide onto 3 DPNs (4 sts per needle), join to work in the round.
Rnds 1–5: Knit. (12 sts)
Rnd 6: K2tog 6 times. (6 decreases → 12 − 6 = 6 sts ✓)
Stuff lightly. Close remaining 6 sts. The snout is a short, blunt oval about ¾" (2 cm) long.
Body
With MC, CO 6 sts. Divide onto 3 DPNs, join to work in the round.
Rnd 1: Kfb 6 times. (6 increases → 6 + 6 = 12 sts ✓)
Rnd 2: Knit. (12 sts)
Rnd 3: *K1, kfb; rep from * to end. (6 increases → 12 + 6 = 18 sts ✓)
Rnd 4: Knit. (18 sts)
Rnd 5: *K2, kfb; rep from * to end. (6 increases → 18 + 6 = 24 sts ✓)
Rnd 6: Knit. (24 sts)
Rnd 7: *K3, kfb; rep from * to end. (6 increases → 24 + 6 = 30 sts ✓)
Rnd 8: Knit. (30 sts)
Rnd 9: *K4, kfb; rep from * to end. (6 increases → 30 + 6 = 36 sts ✓)
Rnds 10–22: Knit. (36 sts; 13 rounds even)
Rnd 23: *K4, k2tog; rep from * to end. (6 decreases → 36 − 6 = 30 sts ✓)
Rnd 24: Knit. (30 sts)
Rnd 25: *K3, k2tog; rep from * to end. (6 decreases → 30 − 6 = 24 sts ✓)
Rnd 26: Knit. (24 sts)
Stuff the body firmly, pushing stuffing into the top (cast-on) end so the shoulders stay round.
Rnd 27: *K2, k2tog; rep from * to end. (6 decreases → 24 − 6 = 18 sts ✓)
Rnd 28: *K1, k2tog; rep from * to end. (6 decreases → 18 − 6 = 12 sts ✓)
Rnd 29: K2tog 6 times. (6 decreases → 12 − 6 = 6 sts ✓)
Close remaining 6 sts. The cast-on end is the neck; the closed end is the bottom.
Arms (make 2)
With MC, CO 6 sts. Divide onto 3 DPNs, join to work in the round.
Rnd 1: Kfb 6 times. (6 increases → 6 + 6 = 12 sts ✓)
Rnds 2–12: Knit. (12 sts; 11 rounds even)
Stuff lightly — firmer at the paw, softer near the top so the arm can sit against the body.
Rnd 13: K2tog 6 times. (6 decreases → 12 − 6 = 6 sts ✓)
Close remaining 6 sts. Each arm is about 1¾" (4.5 cm) long. The decrease end is the paw; the cast-on end sews to the body.
Legs (make 2)
With MC, CO 6 sts. Divide onto 3 DPNs, join to work in the round.
Rnd 1: Kfb 6 times. (6 increases → 6 + 6 = 12 sts ✓)
Rnd 2: *K1, kfb; rep from * to end. (6 increases → 12 + 6 = 18 sts ✓)
Rnds 3–14: Knit. (18 sts; 12 rounds even)
Stuff firmly.
Rnd 15: *K1, k2tog; rep from * to end. (6 decreases → 18 − 6 = 12 sts ✓)
Rnd 16: K2tog 6 times. (6 decreases → 12 − 6 = 6 sts ✓)
Close remaining 6 sts. Each leg is about 2¼" (5.5 cm) long. The decrease end is the foot; the cast-on end sews to the body.
Horns (make 2)
With CC1 (dark brown), CO 9 sts. Divide onto 3 DPNs (3 sts per needle), join to work in the round.
Rnds 1–2: Knit. (9 sts)
Rnd 3: *K1, k2tog; rep from * to end. (3 decreases → 9 − 3 = 6 sts ✓)
Rnds 4–5: Knit. (6 sts)
Rnd 6: K2tog 3 times. (3 decreases → 6 − 3 = 3 sts ✓)
Cut yarn, thread through remaining 3 sts, and pull tight. Do not stuff (or add only a pinch at the base). Each horn is a small cone about ¾" (2 cm) tall.
Ears (make 2)
With MC, CO 8 sts. Divide onto 3 DPNs, join to work in the round.
Rnds 1–4: Knit. (8 sts)
Rnd 5: K2tog 4 times. (4 decreases → 8 − 4 = 4 sts ✓)
Cut yarn, thread through remaining 4 sts, and pull tight. Flatten the ear into a small cupped oval. Do not stuff.
Tail
With MC, work a 4-stitch i-cord:
CO 4 sts onto one DPN.
Knit 4. Do not turn. Slide the stitches back to the right end of the needle. Pull the working yarn firmly across the back; rep from * until the cord measures 1½" (4 cm) — about 12 rows.
Next row: K2tog twice. (2 sts)
Pass the first st over the second and fasten off.
Tusks (make 2)
With CC3 (cream), work a 3-stitch i-cord:
CO 3 sts.
Work i-cord as for the tail until the cord measures ¾" (2 cm) — about 6 rows.
Next row: K2tog, k1. (2 sts)
Pass the first st over the second and fasten off. Leave a tail for sewing. Do not stuff.
Finishing
Assembly order
Use mattress stitch and the yarn tails. Pin or baste every piece with waste yarn before sewing, and check both sides in a mirror so the limbs match.
- Snout. Sew the open (cast-on) edge of the snout to the lower front of the head, centered under the eyes, covering roughly Rnds 14–20. The closed tip points forward.
- Horns. Sew one horn to each side of the top of the head, just in front of the cast-on center, about 4 sts apart. Angle them slightly outward.
- Ears. Sew one ear to each side of the head, just behind and below the horns.
- Tusks. Sew one tusk to each side of the snout, pointing down and a little out.
- Head to body. Mattress-stitch the neck end of the head to the cast-on (top) end of the body. Add a last pinch of stuffing at the join so the neck does not dent.
- Legs. Sew the cast-on end of each leg to the lower sides of the body, toward the front, so the toy sits. Turn the feet slightly outward. The two legs should sit at the same height.
- Arms. Sew the cast-on end of each arm to the sides of the body, about ½" (1.5 cm) below the head seam, in line with each other. Let the paws rest on the belly or hang forward.
- Tail. Sew the cast-on end of the tail to the lower back of the body, centered above the sitting edge.
Weave every remaining end into the stuffing. Do not leave knots on the outside.
Face
- Eyes (if embroidered): With orange yarn, satin-stitch two ovals over the marked spots. With black, add a small satin-stitch or French-knot pupil on each eye.
- Wart: With black, satin-stitch a small circle on the very tip of the snout.
- Mouth: With black, stitch one short straight or slightly curved line under the snout.
- Optional knobbly knees: With MC, stitch a small circle on the front of each leg.
Claws
With black yarn, embroider 3 short straight stitches on the end of each paw and each foot.
Purple prickles
With CC2 (purple) and a tapestry needle, work a line of prickles down the center back, from the back of the head (between the horns) to the tail:
Make 8–10 large straight stitches or lazy-daisy loops, each about ⅜–½" (1–1.5 cm) long, spaced along the spine. They should stand a little proud of the fabric.
(Optional 3-D version: make six 3-stitch i-cords, each ½" / 1.5 cm long, and sew them along the same line.)
Finished look
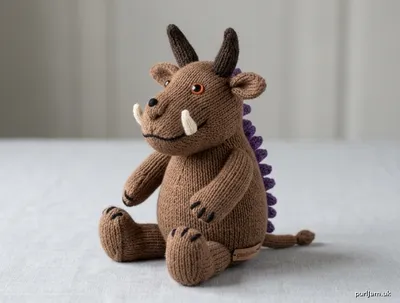
A small brown seated monster, about 6½" (16.5 cm) to the horn tips, with dark horns, a blunt snout, cream tusks, a black wart, orange eyes, and a ridge of purple prickles down the back. Limbs are short and firmly stuffed; toes turn out.
If the neck wobbles, add stuffing through a tiny gap in the head–body seam and restitch. If stuffing shows, the fabric is too loose — go down a needle size next time.
Disclaimer: This pattern was generated by AI and should be reviewed for accuracy before use. While we strive for quality, AI-generated content may contain errors. Please verify measurements, stitch counts, charts, and instructions before beginning your project. Generated by purlJam.uk
Love this pattern?
Save this pattern to your free PurlJam libraryAccess your pattern anytime
Bookmark this page to access your pattern anytime