Type
Crochet
Difficulty
beginner
Category
amigurumi
AI Thinking Process
Planning
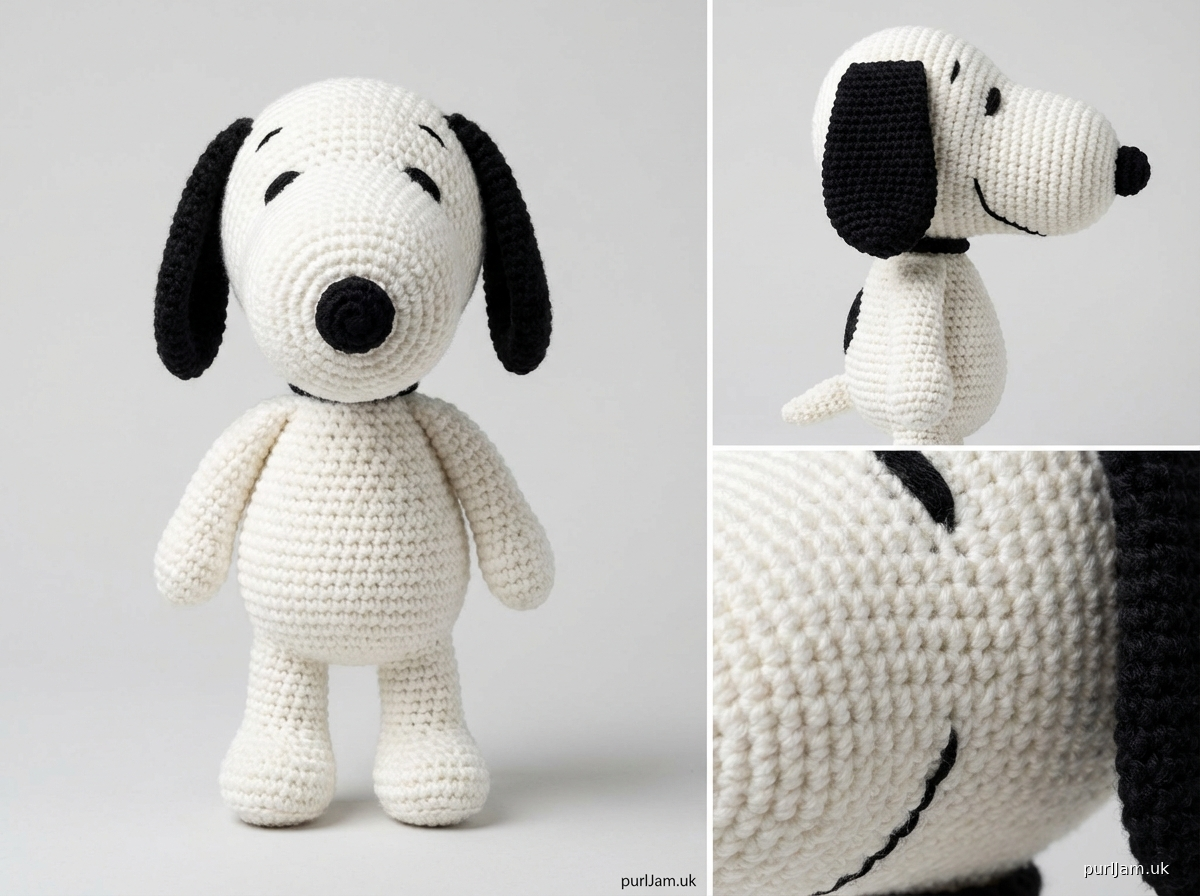
1. **Design Strategy**: Creating a beginner-friendly Snoopy amigurumi using simple shapes - sphere for head, oval for body, cylinders for limbs and snout, small circles for ears. Using white yarn as primary color with black details for nose, ears, and spots. Keeping construction simple with basic sc stitches and standard amigurumi techniques.
2. **Construction Plan**: Each body part will be worked separately in continuous rounds, then assembled. Head (sphere), body (oval), legs (4 small cylinders), arms (2 small cylinders), snout (small oval), ears (2 flat ovals worked in rows). All pieces stuffed except ears. Simple embroidery for facial features to keep beginner-friendly.
3. **Quality Assurance**: Main concerns - ensuring proportions look like Snoopy (elongated snout is key), keeping pieces firmly stuffed for structure, clear assembly instructions for proper placement. Will include visual guidance for ear and snout placement. Avoiding safety eyes to keep fully embroidered/sewn features for safety and simplicity.
4. **Final Calculations**: Using worsted weight with 3.5mm hook creates approximately 4-5" tall Snoopy. Head sphere increases to 24 sts, body oval to approximately 24 sts, limbs at 9-12 sts for proportion. Verifying all increase/decrease rounds maintain proper stitch counts.
Verification
[PRE-FLIGHT CHECKS]
1. **Completeness**: Pattern includes materials, gauge, abbreviations, instructions for all body parts (head, body, snout, ears, arms, legs), assembly, and finishing details ✓
2. **Consistency**: Stitch counts verified for each round - head reaches 24 sts, body reaches 24 sts, limbs proportional at 9-12 sts ✓
3. **Constraints**: Beginner-friendly with only basic stitches (sc, inc, dec), simple shapes from template, worsted weight yarn as specified ✓
4. **Safety**: All increase/decrease math checked - Round totals calculated and verified inline throughout pattern ✓
Pattern
<pattern>

# Snoopy Crochet Pattern

A beginner-friendly amigurumi pattern to create everyone's favorite beagle! This adorable Snoopy uses simple shapes and basic stitches, perfect for your first character project.

## Finished Size
Approximately 4.5-5 inches (11-13 cm) tall when made with worsted weight yarn

## Materials

**Yarn:**
- Worsted weight (4) yarn in:
  - White: 50-60 yards (main color)
  - Black: 10-15 yards (ears, nose, spots - optional)

**Recommended Yarns:**
- Red Heart Super Saver
- Lion Brand Vanna's Choice
- Caron Simply Soft

**Other Supplies:**
- US E-4 (3.5mm) crochet hook
- Fiberfill stuffing (polyester)
- Yarn needle for sewing
- Stitch marker
- Black embroidery thread or yarn for facial features
- Scissors
- Pins (for assembly guidance)

## Gauge
Not critical for this project, but approximately:
- 18 sts × 20 rows = 4 inches (10 cm) in sc
- Work tightly for amigurumi to prevent stuffing from showing through

## Abbreviations
- ch = chain
- sc = single crochet
- inc = increase (2 sc in same stitch)
- dec = invisible decrease (insert hook in front loops of next 2 sts, yarn over, pull through both, yarn over, pull through 2 loops)
- st(s) = stitch(es)
- rnd(s) = round(s)
- [ ] = total stitch count at end of round
- () = repeat instructions within parentheses

## Special Techniques

**Magic Ring:** Wrap yarn around fingers to form ring, insert hook and pull up loop, ch 1, work stitches into ring, pull tail to close.

**Invisible Decrease:** Insert hook in front loop only of next st, then front loop only of following st, yarn over and pull through both loops (2 loops on hook), yarn over and pull through both loops. Creates smoother decreases than standard sc2tog.

**Working in Continuous Rounds:** Do not join rounds unless specified. Use stitch marker to track beginning of round, moving it up as you work.

## Pattern Notes
- Work in continuous rounds unless otherwise stated (do not join or turn)
- Use stitch marker to track beginning of rounds
- Stuff pieces firmly as you go for best results
- All pieces are worked in white except ears (black) and nose (black)
- For safety, use embroidered features rather than plastic eyes

## Instructions

### HEAD (make 1 in white)

Rnd 1: 6 sc in magic ring [6]
(Check: 6 sts total)

Rnd 2: inc in each st around [12]
(6 inc = 12 sts total)

Rnd 3: (sc, inc) around [18]
(6 repeats: 6 sc + 6 inc = 18 sts total)

Rnd 4: (2 sc, inc) around [24]
(6 repeats: 12 sc + 6 inc = 24 sts total)

Rnd 5: (3 sc, inc) around [30]
(6 repeats: 18 sc + 6 inc = 30 sts total)

Rnds 6-11: sc in each st around [30]
(6 rounds of 30 sc each)

Rnd 12: (3 sc, dec) around [24]
(6 repeats: 18 sc + 6 dec = 24 sts total)

Rnd 13: sc in each st around [24]

Rnd 14: (2 sc, dec) around [18]
(6 repeats: 12 sc + 6 dec = 18 sts total)

**Begin stuffing head firmly**

Rnd 15: (sc, dec) around [12]
(6 repeats: 6 sc + 6 dec = 12 sts total)

**Add more stuffing, stuff firmly**

Rnd 16: dec around [6]
(6 dec = 6 sts total)

Fasten off leaving long tail. Use yarn needle to weave through remaining 6 sts and pull tight to close hole. Weave in end.

### BODY (make 1 in white)

Start with oval base:

Rnd 1: Ch 6, starting in 2nd ch from hook: 4 sc, 3 sc in last ch; working along opposite side of chain: 3 sc, 2 sc in last ch [12]
(Check: 4 + 3 + 3 + 2 = 12 sts total)

Rnd 2: inc, 3 sc, inc × 3, 3 sc, inc × 2 [18]
(1 inc + 3 sc + 3 inc + 3 sc + 2 inc = 18 sts total)

Rnd 3: sc, inc, 3 sc, (sc, inc) × 3, 3 sc, (sc, inc) × 2 [24]
(Check: 24 sts total)

Rnd 4: 2 sc, inc, 3 sc, (2 sc, inc) × 3, 3 sc, (2 sc, inc) × 2 [30]
(Check: 30 sts total)

Rnds 5-12: sc in each st around [30]
(8 rounds of 30 sc each)

Rnd 13: (3 sc, dec) around [24]
(6 repeats: 18 sc + 6 dec = 24 sts total)

Rnd 14: sc in each st around [24]

Rnd 15: (2 sc, dec) around [18]
(6 repeats: 12 sc + 6 dec = 18 sts total)

**Begin stuffing body firmly**

Rnd 16: (sc, dec) around [12]
(6 repeats: 6 sc + 6 dec = 12 sts total)

**Add more stuffing**

Rnd 17: dec around [6]
(6 dec = 6 sts total)

Fasten off leaving long tail. Close hole as with head. Weave in end.

### SNOUT (make 1 in white)

Rnd 1: Ch 4, starting in 2nd ch from hook: 2 sc, 3 sc in last ch; working along opposite side of chain: sc, 2 sc in last ch [8]
(Check: 2 + 3 + 1 + 2 = 8 sts total)

Rnd 2: inc, sc, inc × 3, sc, inc × 2 [14]
(1 inc + 1 sc + 3 inc + 1 sc + 2 inc = 14 sts total)

Rnd 3: sc, inc, sc, (sc, inc) × 3, sc, (sc, inc) × 2 [20]
(Check: 20 sts total)

Rnds 4-6: sc in each st around [20]
(3 rounds of 20 sc each)

Fasten off leaving long tail for sewing. Stuff lightly (not too firm - should be slightly soft).

### LEGS (make 4 in white)

Rnd 1: 6 sc in magic ring [6]

Rnd 2: inc in each st around [12]
(6 inc = 12 sts total)

Rnds 3-8: sc in each st around [12]
(6 rounds of 12 sc each)

Fasten off leaving long tail for sewing. Stuff firmly.

### ARMS (make 2 in white)

Rnd 1: 6 sc in magic ring [6]

Rnd 2: (sc, inc) around [9]
(3 repeats: 3 sc + 3 inc = 9 sts total)

Rnds 3-9: sc in each st around [9]
(7 rounds of 9 sc each)

Fasten off leaving long tail for sewing. Stuff firmly but leave last few rounds softer for easier attachment.

### EARS (make 2 in black)

**Worked in rows (not rounds)**

Ch 6

Row 1: Starting in 2nd ch from hook, sc in each ch across [5]
(5 sc total)

Row 2: Ch 1, turn, 2 sc in first st, 3 sc, 2 sc in last st [7]
(2 sc + 3 sc + 2 sc = 7 sts total)

Rows 3-6: Ch 1, turn, sc in each st across [7]
(4 rows of 7 sc each)

Row 7: Ch 1, turn, dec, 3 sc, dec [5]
(1 dec + 3 sc + 1 dec = 5 sts total)

Row 8: Ch 1, turn, dec, sc, dec [3]
(1 dec + 1 sc + 1 dec = 3 sts total)

Fasten off leaving long tail for sewing. Do not stuff - ears should be flat.

### NOSE (make 1 in black)

Rnd 1: 6 sc in magic ring [6]

Rnd 2: inc in each st around [12]
(6 inc = 12 sts total)

Fasten off leaving long tail for sewing. Stuff very lightly, just enough to give slight dome shape.

### TAIL (make 1 in white)

Rnd 1: 4 sc in magic ring [4]

Rnds 2-4: sc in each st around [4]
(3 rounds of 4 sc each)

Rnd 5: (sc, inc) around [6]
(2 repeats: 2 sc + 2 inc = 6 sts total)

Rnds 6-7: sc in each st around [6]

Fasten off leaving long tail for sewing. Stuff very lightly.

## Assembly

**Use pins to position pieces before sewing for best results!**

1. **Attach Head to Body:** Position head on top of body, slightly forward. Using white yarn and yarn needle, whipstitch securely around entire circumference. Add extra stuffing if needed before closing completely.

2. **Attach Snout to Head:** Position snout on lower front of head (off-center, about 2/3 down from top). The snout should angle slightly downward. Pin in place, then sew around entire edge using white yarn.

3. **Attach Black Nose:** Center the small black nose on the tip/end of the snout. Sew securely in place.

4. **Attach Ears:** Position ears on top of head, angled slightly backward and to the sides (like floppy dog ears). The wider end should attach to the head. Space them evenly on either side of the head's center. Using black yarn, sew securely along the wide edge only - ears should hang down naturally.

5. **Attach Legs:** Position 4 legs evenly spaced at bottom of body (two front, two back). Front legs attach at front bottom edge, back legs attach at back bottom edge. Sew securely in a circular pattern around the opening of each leg.

6. **Attach Arms:** Position arms on upper sides of body, about 1/3 down from where head attaches. Angle slightly forward. Sew securely around opening of each arm.

7. **Attach Tail:** Center tail on back of body, near the bottom. Sew securely around base.

## Embroidering Features

Using black embroidery thread or thin black yarn:

**Eyes:**
- Position eyes on head, above and to either side of snout
- Embroider two small ovals or circles using satin stitch
- Space them about 4-5 stitches apart
- Each eye should be about 3-4 stitches tall

**Eyebrows (optional):**
- Above each eye, embroider a short curved line using backstitch
- Gives Snoopy more expression!

**Mouth:**
- Starting at base of nose, embroider a short line downward (1-2 stitches)
- Then create a gentle smile on each side using backstitch

**Black Spot (optional but iconic):**
- On one side of body (traditionally his right side/your left when facing him), embroider or sew a black irregular circle/oval
- Make it about 1 inch diameter
- Use satin stitch to fill in, or sew on a crocheted circle

## Optional Black Spot Circle

If you prefer a crocheted spot instead of embroidered:

Rnd 1: 6 sc in magic ring with black yarn [6]
Rnd 2: inc in each st around [12]
Fasten off, flatten, and sew onto body side.

## Finishing

- Weave in all remaining ends
- Gently shape the ears and limbs
- Add a collar using red yarn if desired (chain long enough to fit around neck, fasten off, tie around neck)
- Give your Snoopy a hug!

## Tips for Success

1. **Tight Tension:** Keep your stitches tight to prevent stuffing from showing through. The fabric should be firm with no gaps.

2. **Firm Stuffing:** Stuff firmly, especially the head and body. This helps the toy maintain its shape and makes it more durable.

3. **Snout Placement:** The snout makes Snoopy recognizable! Position it slightly off-center and lower on the face. Look at reference photos if needed.

4. **Ear Attachment:** Attach ears so they flop naturally. Don't sew them standing straight up - angle them back slightly.

5. **Pin Before Sewing:** Use straight pins to position all pieces before permanently sewing. This lets you adjust for the best look.

6. **Embroidery Practice:** If you're new to embroidering features, practice on scrap fabric first. Simple oval eyes work perfectly!

## Customization Ideas

- **Size Up:** Use bulky yarn and larger hook (5.5mm) for a 7-8 inch Snoopy
- **Size Down:** Use sport weight yarn and smaller hook (3mm) for a keychain-sized version
- **Flying Ace:** Make a small brown aviator cap and add goggles with felt
- **Joe Cool:** Add tiny sunglasses using black craft wire or felt
- **Different Colors:** While white is traditional, you could make Snoopy
Disclaimer: This pattern was generated by AI and should be reviewed for accuracy before use. While we strive for quality, AI-generated content may contain errors. Please verify measurements, stitch counts, and instructions before beginning your project. Generated by purlJam.uk
Access your pattern anytime
Bookmark this page to access your pattern anytime