Type
Crochet
Difficulty
advanced
Category
blanket
AI Thinking Process
Planning
Verification
Pattern
Snuggle Bear Baby Blanket
Intermediate textured motif blanket — US crochet terminology
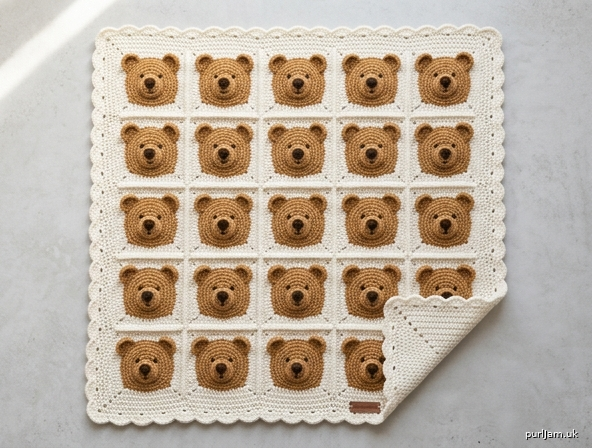
A generous 40" × 40" baby blanket made from 25 teddy-bear-face squares. Each bear has a cream muzzle, a raised bobble nose, two dimensional ears, and embroidered eyes (no buttons or beads). Squares are worked as a circle, then squared with solid double crochet so the fabric is dense, warm, and baby-friendly. A shell border frames the grid.
Skill level: Intermediate (magic ring, color changes, ears worked onto a round, circle-to-square, bobble, whip-stitch joining, shell edging, embroidery).
Finished size: 40" × 40" (102 × 102 cm), after blocking, including border.
Materials
Yarn — worsted weight (medium #4), soft, machine-washable acrylic or acrylic blend recommended for baby items.
| Color | Role | Amount |
|---|---|---|
| C Ivory / cloud white | Square frames, join, border | 950 yd (870 m) |
| A Honey brown | Bear heads and ears | 550 yd (505 m) |
| B Light beige / cream | Muzzles | 125 yd (115 m) |
| D Dark espresso brown | Bobble noses, embroidered eyes and mouths | 40 yd (37 m) |
Shown colorway: honey bears on ivory. Gray bears on oatmeal, or taupe bears on dusty mint, also work.
Hook: US I/9 (5.5 mm), or size needed to obtain gauge.
Notions:
- 4 stitch markers (chin, 2 ears, nose)
- Yarn needle
- Scissors
- Blocking mats and rustproof pins
- Optional: US H/8 (5.0 mm) for slightly firmer ears
Not used (safety): buttons, plastic eyes, beads, or sew-on hardware.
Gauge
In dc with I/9 (5.5 mm): 15 dc and 8 rows = 4" (10 cm).
Motif gauge (blocked): one square = 7" × 7" (18 × 18 cm).
Make one full square and block it before starting the remaining 24. If the square is smaller than 7", go up a hook size; if larger, go down. Border width assumes a 7" square.
Abbreviations (US)
| Abbr | Meaning |
|---|---|
| A, B, C, D | yarn colors as listed |
| blo | back loop only |
| bo | 5-dc bobble (see Special Stitches) |
| ch | chain |
| dc | double crochet |
| FLO | front loop only |
| FO | fasten off |
| hdc | half double crochet |
| MR | magic ring |
| RS | right side |
| rnd | round |
| sc | single crochet |
| sc2tog | single crochet 2 together (decrease) |
| sk | skip |
| sl st | slip stitch |
| st(s) | stitch(es) |
| WS | wrong side |
| yo | yarn over |
Special Stitches
Magic ring (MR): Wrap yarn around a finger to form a ring, work the stated stitches into the ring, then pull the tail to close.
5-dc bobble (bo): Yo, insert hook in indicated st, yo, pull up a loop, yo, draw through 2 loops (2 loops on hook). Repeat from * 4 more times in the same st (6 loops on hook). Yo, draw through all 6 loops. Ch 1 to close. The closing ch-1 does not count as a stitch in this pattern; skip it when working into the bobble on the next rnd (work into the bobble top only).
Sc2tog: Insert hook in next st, yo, pull up a loop (2 loops); insert hook in following st, yo, pull up a loop (3 loops); yo, draw through all 3.
Shell: 5 dc in the same stitch.
Corner shell: 7 dc in the same stitch.
Notes
- All joins are with a sl st to the first st of the rnd unless stated otherwise. Ch 3 at the start of a dc rnd counts as the first dc. Ch 1 at the start of a sc or hdc rnd does not count as a stitch.
- Work with RS facing throughout the square (do not turn at the end of rnds). Ear rows do turn.
- Keep the chin marker aligned with the bottom of the muzzle (opposite the nose) so every bear faces the same way on the blanket.
- Weave each color tail as you go, splitting the plies and doubling back 1–1½". Baby items need extra-secure ends.
- Safety: Embroider eyes and mouth with Color D. Do not use buttons, safety eyes, or beads. Check all bobble noses and ear tips after blocking; stitch down any gap with matching yarn.
- Squares are joined after blocking. Do not join unblocked squares — size drift will show in a 5 × 5 grid.
Stitch diagram — one teddy square
Read rnds from the center out. Ears are worked on Rnd 8, then pushed forward while the dc frame is worked into the same 48 sts.
                    ∩ ear          ∩ ear
              ┌──────────── ch-2 ────────────┐
              │  R12  27 dc per side  (C)    │
              │    R11  23 dc per side       │
              │      R10  19 dc per side     │
              │        R9   15 dc per side   │
              │           48 sc head (A)     │
              │         ◎  eyes (D, embroider)│
              │            ★ nose bo (D)     │
              │           (B) muzzle 16 sc   │
              │              MR 8 sc (B)     │
              └──────────── ch-2 ────────────┘
Feature map (head, RS, ears at top):
        Ear (sts 19–24)    Ear (sts 31–36)
                  \          /
                   ●  forehead (25–30)
              ◉ eye              ◉ eye
                     ★ nose
                   (B muzzle)
                     smile
                      ●
                    chin (st 1)
Legend
| Symbol | Stitch |
|---|---|
| MR | magic ring |
| ● | sc |
| ○ | hdc |
| ┼ | dc |
| △ | 2 sts in 1 (increase) |
| ★ | 5-dc bobble (nose) |
| ∩ | ear (sc rows) |
| ◇ | (2 dc, ch 2, 2 dc) corner |
| ◉ | embroidered eye (French knot or satin stitch) |
| — | embroidered smile (backstitch) |
| ↻ | join with sl st; do not turn |
Teddy Bear Square (make 25)
Finished, blocked: 7" × 7" (18 × 18 cm).
Muzzle (Color B)
Rnd 1: With B, 8 sc in MR, join. (8 sc ✓)
Rnd 2: Ch 1, 2 sc in each st around, join. (16 sc ✓) FO B, leaving a 6" tail.
Nose: Join D in any st of Rnd 2 (this st is now the top of the muzzle — mark the opposite st as chin for later). Work 1 bo in that st. FO D, leaving a 6" tail. Weave both D tails to the WS, splitting the plies and doubling back.
Mark the chin st (directly opposite the nose). This marker stays until the ears are placed.
Head (Color A)
Join A in any unused st of Rnd 2.
Rnd 3: Ch 1, *sc in next st, 2 sc in next st; repeat from * around, join. (8 increases → 16 + 8 = 24 sc ✓)
Rnd 4: Ch 1, *sc in next 2 sts, 2 sc in next st; repeat from * around, join. (8 increases → 24 + 8 = 32 sc ✓)
Rnd 5: Ch 1, *sc in next 3 sts, 2 sc in next st; repeat from * around, join. (8 increases → 32 + 8 = 40 sc ✓)
Rnd 6: Ch 1, *sc in next 4 sts, 2 sc in next st; repeat from * around, join. (8 increases → 40 + 8 = 48 sc ✓)
Rnd 7: Ch 1, sc in each st around, join. (48 sc ✓)
Rnd 8: Ch 1, sc in each st around, join. (48 sc ✓) Do not FO.
Rotate the head so the chin marker is at the bottom and the nose is at the top. Counting the chin st as st 1, place markers in st 19 and st 31 (ear starts). Forehead is sts 25–30.
Ears (Color A) — worked back and forth on Rnd 8
Ears are built on Rnd 8 so all 48 sts remain free for squaring. Push each ear forward when you work Square Rnd 9 into those same base sts.
Ear 1 With A still attached, sl st in each st to st 19.
- Row 1 (RS): Ch 1, sc in sts 19–24, turn. (6 sc ✓)
- Row 2: Ch 1, sc2tog, sc in next 2 sts, sc2tog, turn. (4 sc ✓)
- Row 3: Ch 1, sc2tog twice, turn. (2 sc ✓)
- Row 4: Ch 1, sc2tog. (1 sc ✓) FO A.
Ear 2 Join A in st 31.
- Rows 1–4: Work as Ear 1 over sts 31–36. FO A.
Weave ear tails to the WS. The 6 forehead sts (25–30) sit between the ears.
Squaring the circle (Color C)
Join C in the chin st (st 1) of Rnd 8, RS facing. Work into all 48 sts of Rnd 8; keep the ears in front of the hook.
Square Rnd 9: Ch 3 (counts as dc), dc in next 10 sts, *(2 dc, ch 2, 2 dc) in next st, dc in next 11 sts; repeat from * 2 more times, (2 dc, ch 2, 2 dc) in next st, join to top of ch-3.
Check: 4 sides of 11 dc + 4 corner sts = 44 + 4 = 48 ✓. Each side = 11 dc + 2 dc + 2 dc = 15 dc and 1 ch-2 sp ✓.
Square Rnd 10: Ch 3, *dc in each dc to next ch-2 sp, (2 dc, ch 2, 2 dc) in ch-2 sp; repeat from * around, dc in any remaining dc, join.
Each side: 15 + 4 = 19 dc and 1 ch-2 sp ✓. Total dc: 19 × 4 = 76 ✓.
Square Rnd 11: Repeat Rnd 10.
Each side: 19 + 4 = 23 dc and 1 ch-2 sp ✓. Total dc: 23 × 4 = 92 ✓.
Square Rnd 12: Repeat Rnd 10. FO C, leaving a 24" tail if you plan to use the tails to sew, otherwise a 6" tail.
Each side: 23 + 4 = 27 dc and 1 ch-2 sp ✓. Total dc: 27 × 4 = 108 ✓.
Square complete. Unblocked size is about 7–7¼".
Embroidered features (Color D)
Work before blocking so stitches settle into the fabric.
Eyes (make 2): Using a yarn needle and a 18" length of D, make a tight French knot (wrap 3 times) or a ¼" satin-stitch oval on Rnds 5–6 of the head, one on each side of the muzzle, about ¾–1" apart and slightly above the nose. Tie off on the WS and weave 1½".
Smile: Backstitch a shallow curve, ½–¾" wide, just below the nose on the muzzle. Weave ends securely.
Do not use beads, buttons, or glue-on eyes.
Blocking the squares
Wet-block every square to 7" × 7" before joining.
- Soak in lukewarm water with a drop of wool wash or mild soap for 15 minutes. Do not agitate.
- Press out water in a towel (do not wring).
- Pin each square to 7" × 7" on a blocking mat, matching ch-2 corners to the corners of a 7" template. Let the ears stand up; pin only the dc frame. Do not crush the bobble nose.
- Dry completely.
Steam blocking is acceptable if you hover the iron and never press the ears or nose flat.
Assembly
Layout: 5 rows of 5 squares, 25 squares. All ears point toward the same blanket edge (the “top”).
  ↑ ears
 [1] [2] [3] [4] [5]
 [6] [7] [8] [9][10]
[11][12][13][14][15]
[16][17][18][19][20]
[21][22][23][24][25]
Join: Whip stitch with Color C, RS facing you, working through the inner loops only (the back loop of the front square and the front loop of the back square as they lie side by side). This makes a nearly flat, baby-friendly seam.
- Join in rows first (5 horizontal strips of 5 squares), matching st for st: 27 dc to 27 dc, and the two ch-2 corner sps at each meeting point.
- Then join the 5 strips along the long seams, again matching st for st.
At each 4-square junction, take one extra stitch through all corner sps so no hole remains.
Body size: 5 × 7" = 35" × 35" (89 × 89 cm) ✓.
Border
Join C in any blanket-corner ch-2 sp, RS facing. Work with I/9 (5.5 mm).
Even spacing along each side: 27 dc per square × 5 squares = 135 dc, plus 1 sc in each of the 4 seams between squares = 139 sts per side, not counting the corner sps ✓.
Rnd 1 (sc): Ch 1, *3 sc in corner ch-2 sp, sc in each of next 139 sts; repeat from * around, join. (4 × 139) + (4 × 3) = 556 + 12 = 568 sc ✓.
Mark the center sc of each 3-sc corner.
Rnd 2 (dc): Ch 3 (counts as dc), *dc in each st to center corner sc, 3 dc in center sc; repeat from * around, dc in any remaining sts, join.
4 corners × 2 extra sts = +8 → 568 + 8 = 576 dc ✓.
Rnd 3 (dc): Repeat Rnd 2, working 3 dc in each center corner dc. (576 + 8 = 584 dc ✓)
Rnd 4 (sc): Ch 1, sc in each st around, working 3 sc in each center corner dc, join. (584 + 8 = 592 sc ✓)
Rnd 5 (shells): Ch 1, sc in the same st as join.
- Sides: *Sk 1 st, 5 dc in next st (shell), sk 1 st, sc in next st; repeat from * to next corner.
- Each corner: Sk any leftover 0–1 st as needed so a 7-dc corner shell lands in the center sc of the 3-sc corner. Then sc in the next st and resume the side repeat.
The 4-st repeat (sk 1, 5 dc, sk 1, sc) fits a multiple of 4. 592 ÷ 4 = 148 ✓; use the corner 7-dc shells in place of one repeat at each of the 4 corners and skip 1 extra st on a side if a shell would land in a seam. FO C.
Optional Rnd 6 (corded edge): Join A in any sc between shells. Work reverse sc (crab stitch) in each sc and in each dc around, 2 reverse sc in the center dc of each corner shell. FO A.
Finishing
- Weave in every remaining end on the WS. For Color D feature tails, split the ply and weave in two directions. Tug from the RS; nothing should pull through.
- Check 25 noses, 50 ears, and 50 eyes. If an ear tip curls, tack the WS of Row 1 to Rnd 8 with a matching A stitch.
- Block the finished blanket. Wet-block or steam-hover to 40" × 40" (102 × 102 cm). Pin the shell border so the shells lie flat, not ruffled. Dry fully.
- Final safety pass: no loose ends, no holes at 4-square junctions, no hardware.
Care
Machine wash cold, gentle cycle, in a mesh bag. Tumble dry low or lay flat. Do not iron the ears or bobble noses. Recheck embroidered features after the first wash.
Schematic
40" (102 cm)
◄──────────────────────────────────►
┌─ 2.5" border ─────────────────────┐  ▲
│  ┌────┬────┬────┬────┬────┐      │  │
│  │Bear│Bear│Bear│Bear│Bear│      │  │
│  ├────┼────┼────┼────┼────┤      │  │
│  │Bear│Bear│Bear│Bear│Bear│      │  40"
│  ├────┼────┼────┼────┼────┤      │  (102 cm)
│  │Bear│Bear│Bear│Bear│Bear│      │  │
│  ├────┼────┼────┼────┼────┤      │  │
│  │Bear│Bear│Bear│Bear│Bear│      │  │
│  ├────┼────┼────┼────┼────┤      │  │
│  │Bear│Bear│Bear│Bear│Bear│      │  │
│  └────┴────┴────┴────┴────┘      │  │
│         5 × 7" = 35" body         │  ▼
└───────────────────────────────────┘
     shells on Rnd 5
Each inner cell is one 7" teddy square. Outer frame is the 2.5" five-round border (Rnd 1 sc, Rnds 2–3 dc, Rnd 4 sc, Rnd 5 shells).
Stitch-count quick card
| Location | Count | Check |
|---|---|---|
| Muzzle Rnd 1 | 8 sc | MR |
| Muzzle Rnd 2 | 16 sc | 8 × 2 |
| Head Rnd 3 | 24 sc | 16 + 8 |
| Head Rnd 4 | 32 sc | 24 + 8 |
| Head Rnd 5 | 40 sc | 32 + 8 |
| Head Rnds 6–8 | 48 sc | 40 + 8; then even |
| Ear | 6 → 4 → 2 → 1 sc | two sc2tog per decrease row |
| Square Rnd 9 | 15 dc / side | 11 + 4 |
| Square Rnd 10 | 19 dc / side | 15 + 4 |
| Square Rnd 11 | 23 dc / side | 19 + 4 |
| Square Rnd 12 | 27 dc / side | 23 + 4 |
| Blanket body | 35" × 35" | 5 × 7" |
| Border Rnd 1 | 568 sc | 139 × 4 + 12 |
| Border Rnd 2 | 576 dc | 568 + 8 |
| Border Rnd 3 | 584 dc | 576 + 8 |
| Border Rnd 4 | 592 sc | 584 + 8 |
| Finished | 40" × 40" | 35 + 2.5 + 2.5 |
Pattern in US terminology. Do not substitute UK treble for dc, or UK dc for sc.
Disclaimer: This pattern was generated by AI and should be reviewed for accuracy before use. While we strive for quality, AI-generated content may contain errors. Please verify measurements, stitch counts, charts, and instructions before beginning your project. Generated by purlJam.uk
Love this pattern?
Save this pattern to your free PurlJam libraryAccess your pattern anytime
Bookmark this page to access your pattern anytime