Type
Crochet
Difficulty
intermediate
Category
custom
AI Thinking Process
Planning
Verification
Pattern
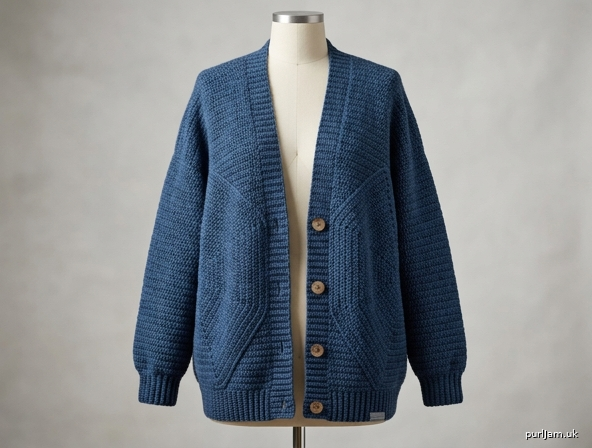
Solid Hexagon Cardigan
An oversized, open-front cardigan constructed from two solid double-crochet hexagons. Each hexagon is seamed into a sleeve-and-body panel, the panels are joined at the center back, then extra length, sleeve depth, and ribbed trims are added. Intermediate. US terms.
Materials
Yarn: Worsted weight (#4), wool or wool-blend preferred for drape and stitch definition. Yardage: 1050 (1200, 1400, 1600, 1800, 2050, 2300) yd / 960 (1100, 1280, 1460, 1650, 1870, 2100) m.
Hooks:
- US I/9 (5.5 mm) for hexagons, body, and sleeves
- US H/8 (5.0 mm) for ribbing
Notions: 6 stitch markers; tapestry needle; measuring tape; scissors; optional 5 buttons, ⅞–1" (22–25 mm).
Gauge
14 dc and 8 rows = 4" (10 cm) in double crochet with US I/9 (5.5 mm), blocked.
Hexagon check: After 8 rounds the hexagon should measure about 8" (20.5 cm) from one straight side to the opposite straight side. Adjust hook size until this matches.
Sizes
XS (S, M, L, XL, 2X, 3X)
To fit bust: 30–32 (34–36, 38–40, 42–44, 46–48, 50–52, 54–56)" / 76–81 (86–91, 97–102, 107–112, 117–122, 127–132, 137–142) cm
Finished back width: 19 (22, 24, 26, 29, 31, 33)" / 48 (56, 61, 66, 74, 79, 84) cm
Finished length from nape, including ribbing: 24 (25, 26, 27, 28, 29, 31)" / 61 (63.5, 66, 68.5, 71, 73.5, 79) cm
Sleeve length from underarm, including cuff: 16½ (16½, 17, 17, 17½, 17½, 18½)" / 42 (42, 43, 43, 44.5, 44.5, 47) cm
Fit is relaxed/oversized with approximately 8–12" (20.5–30.5 cm) of ease. Choose the size whose finished back width is about half your bust plus 4–6" (10–15 cm). Instructions are written for XS with larger sizes in parentheses. When only one number is given, it applies to all sizes.
Abbreviations (US)
- blo — back loop only
- ch — chain
- dc — double crochet
- pm — place marker
- rem — remaining
- rep — repeat
- rnd(s) — round(s)
- RS — right side
- sc — single crochet
- sl st — slip stitch
- sp(s) — space(s)
- st(s) — stitch(es)
- WS — wrong side
Corner (used throughout the hexagon): (dc, ch 2, dc) in the indicated ch-2 space.
Pattern Notes
- Ch 3 at the start of a round or row counts as 1 dc.
- Ch 5 at the start of a hexagon round counts as 1 dc + ch 2 (the first half of a corner).
- Join hexagon rounds with sl st to the 3rd ch of the beginning ch-5 (or to the top of beginning ch-3 on Rnd 1). Do not turn; RS faces you throughout the hexagons and sleeves.
- Work in both loops unless the ribbing instructions say blo.
- Each hexagon round adds 2 dc on every side and 12 dc total. Count every few rounds.
- Move a marker up in each of the 6 ch-2 corner spaces as you go.
- Make 2 identical hexagons. The round-join line will be hidden at the underarm if you start seaming with that join sitting on a sleeve side.
- Block both hexagons before seaming. Geometry is much easier to read on blocked pieces.
- Stitch counts appear in parentheses at the end of each round/row.
Hexagon (make 2)
With US I/9 (5.5 mm), make a magic ring (or ch 4 and sl st in first ch to form a ring).
Rnd 1: Ch 3 (counts as dc), dc in ring, ch 2, [2 dc in ring, ch 2] 5 times, join to top of ch-3. Pull ring closed. (12 dc, 6 ch-2 sps; 2 dc per side ✓)
Pm in each ch-2 sp.
Rnd 2: Sl st in next dc and into first ch-2 sp, ch 5 (counts as dc + ch 2), dc in same sp, dc in next 2 dc, *(dc, ch 2, dc) in next ch-2 sp, dc in next 2 dc; rep from * around, join to 3rd ch of ch-5. (24 dc, 6 ch-2 sps; 4 dc per side. 12 + 12 = 24 ✓)
Rnd 3: Sl st into first ch-2 sp, ch 5, dc in same sp, dc in each dc to next ch-2 sp, *(dc, ch 2, dc) in next ch-2 sp, dc in each dc to next ch-2 sp; rep from * around, join to 3rd ch of ch-5. (36 dc; 6 dc per side. 24 + 12 = 36 ✓)
Rnds 4–17 (19, 21, 23, 25, 27, 29): Rep Rnd 3. Each round adds 12 dc (2 dc per side).
| Rnd | Dc per side | Total dc |
|---|---|---|
| 4 | 8 | 48 |
| 5 | 10 | 60 |
| 6 | 12 | 72 |
| 7 | 14 | 84 |
| 8 | 16 | 96 |
| 9 | 18 | 108 |
| 10 | 20 | 120 |
| 11 | 22 | 132 |
| 12 | 24 | 144 |
| 13 | 26 | 156 |
| 14 | 28 | 168 |
| 15 | 30 | 180 |
| 16 | 32 | 192 |
| 17 (XS) | 34 | 204 |
| 19 (S) | 38 | 228 |
| 21 (M) | 42 | 252 |
| 23 (L) | 46 | 276 |
| 25 (XL) | 50 | 300 |
| 27 (2X) | 54 | 324 |
| 29 (3X) | 58 | 348 |
Check: Final round has 2n dc per side and 12n dc total, where n is the round number. For size M, n = 21 → 42 dc per side, 42 × 6 = 252 ✓.
Size check before fastening off: The hexagon should measure 17 (19, 21, 23, 25, 27, 29)" / 43 (48, 53.5, 58.5, 63.5, 68.5, 73.5) cm from one straight side to the opposite straight side, and each side should measure about 9¾ (10¾, 12, 13¼, 14¼, 15½, 16½)" / 25 (27.5, 30.5, 33.5, 36, 39.5, 42) cm. Work 1 more or 1 fewer round if needed so the measurement matches; keep both hexagons the same.
Fasten off. Weave in the center tail, cinching the ring shut.
Assembly
Label the 6 corners of each blocked hexagon A–F clockwise. Sides are named by their two corners:
        A
     F     B
     E     C
        D
- Cuff side = AB
- Sleeve sides = FA and BC (the two sides touching the cuff)
- Back side = DE (directly opposite the cuff)
- Body sides = CD and EF
Sleeves (repeat on each hexagon)
Fold the hexagon with RS together so side FA lies on top of side BC. Match stitch for stitch: 34 (38, 42, 46, 50, 54, 58) dc plus the corner spaces.
Starting at the cuff corners (match A to B) and working toward the underarm corners (match F to C), join FA to BC with mattress stitch or a loose slip-stitch seam. Seam the full side. Do not seam side AB — that opening is the cuff.
Turn RS out. You now have a sleeve tube. Cuff opening = side AB = 34 (38, 42, 46, 50, 54, 58) dc plus 2 ch-2 sps. Underarm is the F/C join.
Center back
Lay both sleeved pieces RS together, sleeves pointing outward. Align back side DE of the left piece with DE of the right piece. Join along the entire side with mattress stitch or a loose slip-stitch seam. This seam runs from the nape down the center back.
Turn RS out. The remaining unseamed edges (CD and EF of both pieces) form the front openings and the lower edge.
Body Extension
The hexagon portion is cropped. Extra rows are worked across the hem only so the cardigan reaches hip length.
Lay the cardigan open, RS facing you. Identify the lower edge from the bottom of the left front around to the bottom of the right front (do not pick up the vertical front openings yet).
With US I/9 (5.5 mm), join yarn at the lower left front corner.
Row 1 (RS): Ch 3 (counts as dc), work 83 (95, 107, 115, 127, 135, 147) more dc evenly across the lower edge to the lower right front corner — about 3½ sts per inch / 2.5 cm. In ch-2 spaces along this edge work 1 dc (not a full corner) so the hem stays as straight as the geometry allows. Do not gather and do not flare; add or subtract 1–2 sts if the edge puckers. Turn. (84 (96, 108, 116, 128, 136, 148) dc)
Rows 2–24: Ch 3, dc in each dc across, turn. (84 (96, 108, 116, 128, 136, 148) dc each row ✓)
Work fewer rows for a cropped cardi, or more for a longline, until the piece measures about 22 (23, 24, 25, 26, 27, 29)" / 56 (58.5, 61, 63.5, 66, 68.5, 73.5) cm from the nape, not including the hem ribbing still to come. Fasten off.
Sleeve Extension
Cuff openings currently measure about 10¾ (12, 13¼, 14¼, 15½, 16½, 17¾)" / 27.5 (30.5, 33.5, 36, 39.5, 42, 45) cm around. Smaller sizes need more added length; larger sizes already have a longer hexagon sleeve.
With US I/9 (5.5 mm), RS facing, join yarn at the underarm seam of one sleeve.
Rnd 1: Ch 3 (counts as dc), work 37 (41, 45, 49, 53, 57, 61) more dc evenly around the cuff opening (1 dc in each dc, 2 dc in each of the 2 ch-2 sps). Join to top of ch-3. (38 (42, 46, 50, 54, 58, 62) dc. 34+2+2 = 38 for XS ✓)
Rnds 2–10 (8, 6, 4, 2, 2, 0): Ch 3, dc in each dc around, join. (38 (42, 46, 50, 54, 58, 62) dc)
If your size lists 0 rounds, skip to ribbing after Rnd 1. Fasten off. Rep on the second sleeve.
Ribbing
Use US H/8 (5.0 mm) for all ribbing. Applied ribbing is worked perpendicular to the edge and joined as you go.
Ribbing module (used on hem, cuffs, and front band):
Ch 9.
Row 1: Sc in 2nd ch from hook and in each ch across, sl st in next 2 sts of the garment edge, turn. (8 sc)
Row 2: Skip the 2 sl sts, sc blo in each of the 8 sc, turn. (8 sc blo)
Row 3: Ch 1, sc blo in each of the 8 sc, sl st in next 2 sts of the garment edge, turn.
Rep Rows 2–3 around the indicated edge. Each 2-row ridge attaches to 2 edge stitches and is about ⅜" (1 cm) along the edge. Do not work tightly.
Hem ribbing
RS facing, join yarn at one front-bottom corner of the body extension. Work ribbing across all 84 (96, 108, 116, 128, 136, 148) dc of the hem. Fasten off, leaving a tail. Seam the first and last ribbing rows to the front corners with the tapestry needle if they sit slightly proud.
Cuff ribbing
RS facing, join yarn at the underarm of one sleeve. Work ribbing around all 38 (42, 46, 50, 54, 58, 62) dc. After the last ridge, join the first and last ribbing rows with mattress stitch or sl st to close the cuff. Rep on the second sleeve. The ribbing draws the sleeve in at the wrist.
Front band
RS facing, join yarn at the lower right front corner (right as worn), at the outer edge of the hem ribbing.
Pick up a foundation of sc up the right front, around the nape, and down the left front as follows:
- 1 sc in each ribbing row-end of the hem ribbing at each front corner
- 2 sc in each dc row-end of the 24-row body extension
- 1 sc in each dc and 1 sc in each ch-2 sp along the hexagon front edges
- 2–3 sc at the nape (top of the back seam) so the band does not pull
Do not worry about a fixed total; the band should lie flat. Pm at the start of the neck curve on each side.
Work applied ribbing (ch 9, 8 sc blo) along this entire picked-up edge, from lower right front, around the neck, to lower left front.
Optional buttonholes (right front as worn): On the right-front section only, work 5 buttonholes spaced evenly between 1" (2.5 cm) above the hem and the start of the neck. Buttonhole row of ribbing: sc blo in first 3 sc, ch 2, skip 2 sc, sc blo in last 3 sc; on the return row, sc blo in each sc and 2 sc blo in the ch-2 sp. Sew buttons to the left front to match.
Fasten off.
Finishing
Weave in all ends. Block the finished cardigan to the measurements in the size chart, pinning the hexagon corners so the six-sided geometry stays crisp and the ribbing is allowed to relax, not stretched.
If the back seam or sleeve seams feel tight, steam them lightly so they drape with the fabric.
Schematic measurements (blocked)
| XS | S | M | L | XL | 2X | 3X | |
|---|---|---|---|---|---|---|---|
| Hexagon rounds | 17 | 19 | 21 | 23 | 25 | 27 | 29 |
| Hexagon side | 9¾" | 10¾" | 12" | 13¼" | 14¼" | 15½" | 16½" |
| Hexagon flat-to-flat | 17" | 19" | 21" | 23" | 25" | 27" | 29" |
| Back width | 19" | 22" | 24" | 26" | 29" | 31" | 33" |
| Length, nape to hem | 24" | 25" | 26" | 27" | 28" | 29" | 31" |
| Sleeve, underarm to cuff | 16½" | 16½" | 17" | 17" | 17½" | 17½" | 18½" |
Tips
- Stripe the hexagons by changing color every 2 rounds; carry yarn up the wrong side of the round join or cut and weave in.
- If a hexagon cups, your corners are too tight — loosen the ch-2. If it ruffles, you are adding extra stitches on the sides; recount (must be 2n dc per side).
- Try the sleeved hexagons on before joining the back. The cuff should sit on the forearm; the opposite side should reach the nape-to-mid-back. Adjust by adding or removing 1 hexagon round on both pieces.
- Seams should be loose enough that the fabric still drapes. A tight slip-stitch seam will pull the underarms up.
Disclaimer: This pattern was generated by AI and should be reviewed for accuracy before use. While we strive for quality, AI-generated content may contain errors. Please verify measurements, stitch counts, charts, and instructions before beginning your project. Generated by purlJam.uk
Love this pattern?
Save this pattern to your free PurlJam libraryAccess your pattern anytime
Bookmark this page to access your pattern anytime