Type
Knitting
Difficulty
intermediate
Category
amigurumi
AI Thinking Process
Planning
Verification
Pattern
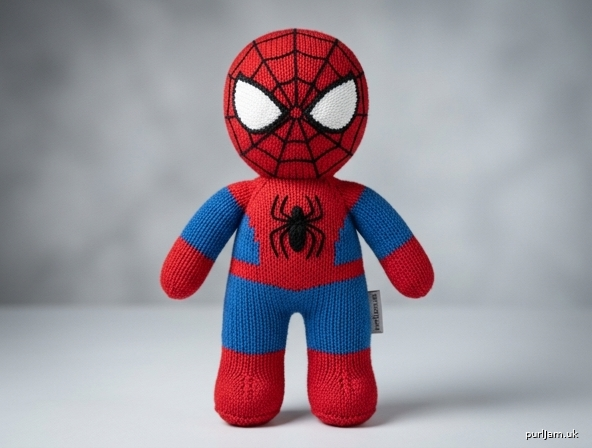
Spider-Man Knitted Softie
A stuffed superhero toy worked in the round in stockinette stitch. Classic red mask, white eye lenses, blue limbs, red gloves and boots, and a black web-and-spider motif.
Skill level: Intermediate
Skills used: Knitting in the round (DPNs or Magic Loop), kfb, k2tog, ssk, clean color changes, firm stuffing, mattress-stitch seaming, embroidery / duplicate stitch.
Finished measurements
Height: about 11 in (28 cm) from boot to crown, after stuffing
Head circumference: about 10¼ in (26 cm)
Body circumference: about 8¾ in (22 cm)
Measurements are taken on the stuffed toy at the given gauge. A slightly tighter or looser fabric will change size more than stitch count; for toys, a dense fabric matters more than matching gauge exactly.
Materials
Yarn: Worsted weight (medium 4), acrylic or wool-blend recommended for stitch definition and easy washing.
- MC (red): 110 yd (100 m) — mask, chest, gloves, boots
- CC1 (blue): 85 yd (78 m) — arms, legs, lower torso
- CC2 (black): 25 yd (23 m) — web lines, eye outlines, spider emblem
- CC3 (white): 15 yd (14 m) — eye lenses
Needles: US 5 / 3.75 mm double-pointed needles, or a 32 in (80 cm) circular for Magic Loop. Use a needle 1–2 sizes smaller than the yarn label recommends so the fabric is tight and stuffing does not show.
Notions:
- Polyester fiberfill, about 3½ oz (100 g)
- Stitch marker
- Tapestry needle
- Small sharp scissors
- Optional: white felt for eye lenses instead of knitted lenses; sewing thread to match MC and CC3
- Optional: 9–12 mm safety eyes only if the toy is for ages 3+ and will sit under the white lenses (this pattern is written for sewn/embroidered features)
Safety note: For children under 3 years, use only embroidered or sewn features. Do not use safety eyes, buttons, or other small parts.
Gauge
22 sts and 28 rnds = 4 in (10 cm) in stockinette stitch in the round, stuffed slightly.
Work a 5 in (12.5 cm) swatch in the round, measure the center 4 in (10 cm), then stuff the swatch lightly and re-measure. You want a firm, even fabric with no visible gaps. If stuffing shows, go down a needle size. Exact stitch count is less important than density.
Abbreviations (US)
| Abbrev. | Meaning |
|---|---|
| BO | bind off |
| CC | contrast color |
| CO | cast on |
| k | knit |
| kfb | knit into front and back of stitch (1 stitch increased) |
| k2tog | knit 2 together (1 stitch decreased) |
| MC | main color |
| p | purl |
| rem | remain(ing) |
| rnd(s) | round(s) |
| RS | right side |
| ssk | slip, slip, knit (1 stitch decreased) |
| st(s) | stitch(es) |
| St st | stockinette stitch (knit every rnd in the round; knit RS / purl WS flat) |
| WS | wrong side |
Pattern notes
- All pieces except the eye lenses are worked in the round in stockinette (knit every round).
- Join to work in the round, being careful not to twist. Place a marker for the beginning of the round.
- Stuff as directed, a little at a time, pushing fill into the crown, gloves, and boots so there are no hollow corners. Firm stuffing, not packed so hard that stitches flare.
- Carry no long floats inside stuffed pieces. For optional stranded webs, trap floats every 3–4 stitches; otherwise embroider webs after knitting (recommended).
- Color changes: on the last stitch of the old color, knit it; join the new color and knit the next round. Tie a small square knot on the wrong side and weave both tails into the stuffing later.
- The web motif on the mask (and optionally the red chest) is a set of radiating spokes with connecting arcs, worked in black. The chest emblem is a compact eight-legged spider, centered on the red torso. Work both in duplicate stitch or surface embroidery after assembly so you can aim the lines on the stuffed shape. The written placement below is complete on its own; if a motif chart is supplied with this pattern, use it for stitch-by-stitch placement of the spider and/or web, keeping the same colors (black on red).
- Leave long tails (12–18 in / 30–45 cm) at cast-on and bind-off of every piece for seaming.
Head (make 1 — MC, red)
Worked from the crown down. Leave the neck open to match the body.
CO 8 sts. Divide evenly on DPNs (or Magic Loop), join to work in the round, and place marker.
Rnd 1: *kfb; rep from * to end. (8 increases → 8 + 8 = 16 sts ✓)
Rnd 2: Knit.
Rnd 3: *k1, kfb; rep from * to end. (8 increases → 16 + 8 = 24 sts ✓)
Rnd 4: Knit.
Rnd 5: *k2, kfb; rep from * to end. (8 increases → 24 + 8 = 32 sts ✓)
Rnd 6: Knit.
Rnd 7: *k3, kfb; rep from * to end. (8 increases → 32 + 8 = 40 sts ✓)
Rnd 8: Knit.
Rnd 9: *k4, kfb; rep from * to end. (8 increases → 40 + 8 = 48 sts ✓)
Rnd 10: Knit.
Rnd 11: *k5, kfb; rep from * to end. (8 increases → 48 + 8 = 56 sts ✓)
Rnds 12–20: Knit. (9 rnds even; 56 sts)
These even rounds are the equator of the mask. Plan the eyes so the top of each lens sits near Rnd 13 and the bottom near Rnd 20, with the inner corners about 3 sts apart at the bridge of the “nose.”
Rnd 21: *k5, k2tog; rep from * to end. (8 decreases → 56 − 8 = 48 sts ✓)
Rnd 22: Knit.
Rnd 23: *k4, k2tog; rep from * to end. (8 decreases → 48 − 8 = 40 sts ✓)
Rnd 24: Knit.
Rnd 25: *k3, k2tog; rep from * to end. (8 decreases → 40 − 8 = 32 sts ✓)
Rnd 26: Knit.
Stuff the crown firmly now, filling the top so it is smoothly rounded.
Rnd 27: *k2, k2tog; rep from * to end. (8 decreases → 32 − 8 = 24 sts ✓)
Stuff the rest of the head, leaving the last ½ in (1.5 cm) of the neck lightly filled so you can sew it to the body. BO all 24 sts. Break yarn, leaving an 18 in (45 cm) tail.
Head is about 3¾ in (9.5 cm) tall before seaming.
Body (make 1 — MC red, then CC1 blue)
Worked from the neck down.
With MC, CO 24 sts. Join to work in the round, place marker.
Rnds 1–2: Knit.
Rnd 3: *k2, kfb; rep from * to end. (8 increases → 24 + 8 = 32 sts ✓)
Rnd 4: Knit.
Rnd 5: *k3, kfb; rep from * to end. (8 increases → 32 + 8 = 40 sts ✓)
Rnd 6: Knit.
Rnd 7: *k4, kfb; rep from * to end. (8 increases → 40 + 8 = 48 sts ✓)
Rnds 8–16: Knit in MC. (9 rnds; 48 sts)
This red block is the chest. Center the spider emblem on Rnds 10–15, on the front half of the round (stitches 1–24 if Rnd 1 began at the left side of the body; adjust so the motif sits dead center on the chest).
Break MC. Join CC1.
Rnds 17–28: Knit in CC1. (12 rnds; 48 sts)
Rnd 29: *k4, k2tog; rep from * to end. (8 decreases → 48 − 8 = 40 sts ✓)
Rnd 30: Knit.
Rnd 31: *k3, k2tog; rep from * to end. (8 decreases → 40 − 8 = 32 sts ✓)
Rnd 32: Knit.
Stuff the body firmly, keeping the chest rounded and the neck open enough to receive the head.
Rnd 33: *k2, k2tog; rep from * to end. (8 decreases → 32 − 8 = 24 sts ✓)
Rnd 34: *k1, k2tog; rep from * to end. (8 decreases → 24 − 8 = 16 sts ✓)
Rnd 35: *k2tog; rep from * to end. (8 decreases → 16 − 8 = 8 sts ✓)
Break yarn, thread through the remaining 8 sts, pull tight, and fasten off on the inside. Add a last pinch of stuffing before the hole closes if needed.
Arms (make 2)
Worked from the glove up. Start in MC (red glove), change to CC1 (blue sleeve).
With MC, CO 8 sts. Join to work in the round, place marker.
Rnd 1: *kfb; rep from * to end. (8 increases → 8 + 8 = 16 sts ✓)
Rnds 2–7: Knit. (6 rnds even in red)
Break MC. Join CC1.
Rnds 8–23: Knit. (16 rnds in blue; 16 sts)
Stuff the glove firmly and the rest of the arm moderately — slightly softer at the top so it sews flat to the body. BO all 16 sts. Break yarn, leaving a 14 in (35 cm) tail.
Each arm is about 3¼ in (8.5 cm) long.
Legs (make 2)
Worked from the boot up. Start in MC (red boot), change to CC1 (blue leg).
With MC, CO 8 sts. Join to work in the round, place marker.
Rnd 1: *kfb; rep from * to end. (8 increases → 8 + 8 = 16 sts ✓)
Rnd 2: *k1, kfb; rep from * to end. (8 increases → 16 + 8 = 24 sts ✓)
Rnds 3–9: Knit. (7 rnds even in red)
Break MC. Join CC1.
Rnds 10–26: Knit. (17 rnds in blue; 24 sts)
Stuff the boot firmly and the leg evenly. BO all 24 sts. Break yarn, leaving an 18 in (45 cm) tail.
Each leg is about 3¾ in (9.5 cm) long.
Eye lenses (make 2 — CC3, white)
Worked flat in stockinette to a pointed oval (classic mask lens). Knit RS rows, purl WS rows.
CO 3 sts.
Row 1 (RS): kfb, k1, kfb. (2 increases → 3 + 2 = 5 sts ✓)
Row 2 (WS): Purl.
Row 3: kfb, k3, kfb. (2 increases → 5 + 2 = 7 sts ✓)
Row 4: Purl.
Row 5: kfb, k5, kfb. (2 increases → 7 + 2 = 9 sts ✓)
Row 6: Purl.
Rows 7–10: Work 4 rows St st, starting with a knit row.
Row 11: ssk, k5, k2tog. (2 decreases → 9 − 2 = 7 sts ✓)
Row 12: Purl.
Row 13: ssk, k3, k2tog. (2 decreases → 7 − 2 = 5 sts ✓)
Row 14: Purl.
Row 15: ssk, k1, k2tog. (2 decreases → 5 − 2 = 3 sts ✓)
BO remaining 3 sts.
Weave in the CO tail on the WS. Leave the BO tail for sewing, or use matching white thread.
Felt option: Cut two almond/teardrop shapes about 1¾ in (4.5 cm) long and 1¼ in (3 cm) at the widest point, with a gentle point at each end. No knitted lenses needed if you use felt.
Embroidery and colorwork motifs
Do this after the head is stuffed and the lenses are pinned in place, but you may embroider the chest spider before or after the head is sewn on. Use CC2 (black) and a tapestry needle. Do not pull so tight that the fabric puckers.
White lenses and black rims
Pin the two white lenses onto the face:
- Inner points (toward the nose) sit about 2–3 sts apart.
- Outer points angle up and out toward the sides of the head.
- Top edges sit on the upper third of the even section (near Rnd 13); bottom edges sit near Rnd 19–20.
- They should look large — they are the main feature of the mask.
Sew each lens down with small stitches in CC3 around the very edge. Then, with CC2, work a bold backstitch (or chain stitch) outline just outside the white, 1 stitch wide, all the way around each lens. Classic lenses have no pupils — leave the white empty.
Mask web
On the red head, work a web in CC2:
- Center: a point on the forehead, centered between the lenses and about 2 rnds above the inner corners.
- Spokes: 6 to 8 straight stitches radiating from that center over the crown, down the sides, and toward the chin, stopping at the bind-off. Keep spokes evenly spaced. Do not run spokes across the white lenses; stop at the black rims.
- Arcs: 2 or 3 curved rows of running stitch or backstitch connecting the spokes, like a spiderweb, spaced about ½–¾ in (1.5–2 cm) apart. Follow the curve of the stuffed head.
Optional: add a few short web spokes on the red gloves, red boots, and red chest, using the same spoke-and-arc idea at a smaller scale.
If working the web in stranded colorwork instead of embroidery, knit the head (and red chest) with black lines on a red ground, trapping floats every 3–4 sts, and skip the duplicate-stitch spokes. Keep the same visual: radial lines plus connecting arcs, black on red, clear of the eye area.
Chest spider
Centered on the red chest (Rnds 10–15 of the body, front):
- A small oval or teardrop body about ½ in (1.5 cm) tall, filled with satin stitch or duplicate stitch, slightly above the red/blue color change.
- A tiny round head just above the body, toward the neck.
- Eight legs: four on each side, slightly bent, reaching toward the sides of the chest. Backstitch, each leg about ½–¾ in (1.5–2 cm) long.
- Optional: a small filled triangle pointing up from the head toward the neck (the classic chest glyph).
Keep the whole emblem inside the red section; it should not spill onto the blue.
Assembly
Use mattress stitch unless noted. Hide all knots and tails inside the stuffed pieces.
1. Head to body.
Match the 24-st head bind-off to the 24-st body cast-on, RS facing out. The face looks forward over the spider emblem. Mattress-stitch all the way around, adding a little stuffing at the neck as you close so the head sits firmly and does not wobble. (24 sts to 24 sts ✓)
2. Arms.
Sew one arm to each side of the body, centered on the red shoulder area (about Rnds 4–8 of the body). The red glove hangs down. Align the arm bind-off along a vertical line of body stitches, about 1 in (2.5 cm) of seam. Check both arms from the front so they sit at the same height and angle before fastening off.
3. Legs.
Sew the legs to the lower blue torso, one on each side of the gathered base, so the toy stands (or sits with legs forward). The red boots point forward. Place the inner edges of the legs close together at the center base and the outer edges on the sides of Rnds 24–28 of the body. Use the full 24-st bind-off as the hip seam. Add a pinch of stuffing in the hip if the join looks hollow.
4. Stance.
Sit the toy on a table. Adjust limb angles before weaving in the last tails: arms slightly out, legs slightly apart, head facing forward.
5. Weave in ends.
Thread every remaining tail into the body cavity and snip. Do not leave ends under a single layer of fabric where they can work out.
Finishing
- Steam-block the eye lenses only (flat, under a cloth) if they curl; do not wet-block stuffed pieces.
- Check that no stuffing shows. If a gap appears, take a few extra mattress stitches or push the fill away from that spot.
- Trim any embroidery whiskers.
- Optional: a single tiny stitch in CC2 at each “wrist” and “ankle” (the color-change round) to look like a glove or boot edge.
Care: Surface-clean with a damp cloth. If the yarn is machine-washable, wash on gentle in a mesh bag and air-dry; expect some fuzzing of the embroidery.
Quick reference — stitch counts
| Piece | Color path | Max sts | Open/close |
|---|---|---|---|
| Head | MC throughout | 56 | CO 8 → BO 24 |
| Body | MC to Rnd 16, CC1 from Rnd 17 | 48 | CO 24 → close 8 |
| Arm (×2) | MC Rnds 1–7, CC1 Rnds 8–23 | 16 | CO 8 → BO 16 |
| Leg (×2) | MC Rnds 1–9, CC1 Rnds 10–26 | 24 | CO 8 → BO 24 |
| Eye (×2) | CC3, worked flat | 9 | CO 3 → BO 3 |
You should now have a firm, 11-inch red-and-blue hero with a webbed mask, white lenses, and a spider on its chest.
Disclaimer: This pattern was generated by AI and should be reviewed for accuracy before use. While we strive for quality, AI-generated content may contain errors. Please verify measurements, stitch counts, charts, and instructions before beginning your project. Generated by purlJam.uk
Love this pattern?
Save this pattern to your free PurlJam libraryAccess your pattern anytime
Bookmark this page to access your pattern anytime