Type
Knitting
Difficulty
intermediate
Category
amigurumi
AI Thinking Process
Planning
Verification
Pattern
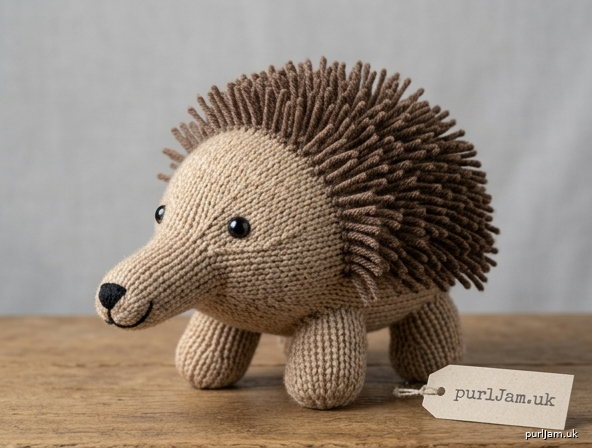
Spike the Echidna
Simple Knitted Amigurumi Pattern
A cute, huggable echidna soft toy with a rounded body, long snout, stubby legs, and signature spiny back. Perfect first amigurumi project — all stockinette in the round, no complex shaping.
Difficulty: Beginner
Finished Size: Approximately 6 inches (15 cm) long × 3.5 inches (9 cm) wide (excluding spines)
Materials
- Worsted weight yarn (MC): 100 yards (91 m) gray, brown, or tan
- Worsted weight yarn (CC): 25 yards (23 m) darker brown or black (for spines)
- US 5 (3.75 mm) double-pointed needles (DPNs) or 32-inch circular needle for Magic Loop
- Polyester fiberfill stuffing: approximately 2 oz (55 g)
- 9 mm safety eyes (1 pair)
- Black embroidery floss or scrap yarn (nose and mouth)
- Tapestry needle
- Stitch marker
- Scissors
- Optional: crochet hook size E-4 (3.5 mm) or latch hook for attaching spines
Gauge
20 sts and 28 rnds = 4 inches (10 cm) in stockinette stitch worked in the round.
Note: Exact gauge is less critical than a firm, even fabric. Use needles 1–2 sizes smaller than the yarn label recommends so stuffing does not show through. Adjust needle size if needed to obtain a dense fabric.
Abbreviations (US)
- BO: bind off
- CC: contrasting color
- CO: cast on
- k: knit
- k2tog: knit 2 stitches together (decrease)
- kfb: knit into front and back of stitch (increase)
- MC: main color
- rnd(s): round(s)
- st(s): stitch(es)
- **: repeat instructions between asterisks
Pattern Notes
- Worked in the round on DPNs or Magic Loop; place marker for beginning of rnd.
- Stockinette stitch (knit every rnd) throughout.
- Stuff each piece firmly as you go, especially before final decreases. Use the blunt end of a knitting needle or chopstick to push stuffing into snout and legs.
- Safety eyes must be inserted before the head is fully closed.
- Spines are simple fringe loops — no special stitches required.
Body
With MC, CO 6 sts. Divide evenly on DPNs (or Magic Loop) and join to work in the rnd, being careful not to twist. Place marker.
Rnd 1: [kfb] 6 times. (12 sts)
Rnd 2: [k1, kfb] 6 times. (18 sts)
Rnd 3: [k2, kfb] 6 times. (24 sts)
Rnd 4: [k3, kfb] 6 times. (30 sts)
Rnd 5: [k4, kfb] 6 times. (36 sts)
Rnds 6–20: Knit. (15 rnds even)
Rnd 21: [k4, k2tog] 6 times. (30 sts)
Rnd 22: Knit.
Rnd 23: [k3, k2tog] 6 times. (24 sts)
Rnd 24: Knit.
Begin stuffing body firmly.
Rnd 25: [k2, k2tog] 6 times. (18 sts)
Rnd 26: Knit.
Continue stuffing.
Rnd 27: [k1, k2tog] 6 times. (12 sts)
Rnd 28: [k2tog] 6 times. (6 sts)
Cut yarn, leaving an 8-inch (20 cm) tail. Thread tail through remaining 6 sts, pull tight to close, and secure. Weave end to inside.
Head & Snout
With MC, CO 6 sts. Join to work in the rnd.
Rnds 1–6: Knit. (snout tube)
Rnd 7: [kfb] 6 times. (12 sts)
Rnd 8: [k1, kfb] 6 times. (18 sts)
Rnd 9: [k2, kfb] 6 times. (24 sts)
Rnd 10: [k3, kfb] 6 times. (30 sts)
Rnds 11–18: Knit. (8 rnds)
Insert safety eyes between Rnds 12 and 13, spaced approximately 8 sts apart and centered on the face.
Rnd 19: [k3, k2tog] 6 times. (24 sts)
Rnd 20: [k2, k2tog] 6 times. (18 sts)
Stuff snout and head firmly, pushing stuffing all the way to the tip of the snout.
Rnd 21: [k1, k2tog] 6 times. (12 sts)
Rnd 22: [k2tog] 6 times. (6 sts)
Cut yarn, leaving a 12-inch (30 cm) tail for seaming. Thread through remaining 6 sts, pull tight to close. Do not weave in yet.
Legs (make 4)
With MC, CO 8 sts. Join to work in the rnd.
Rnds 1–8: Knit.
Stuff lightly. Cut yarn, leaving an 8-inch (20 cm) tail. Do not close; leave live sts or simply leave open end for seaming (preferred). Thread tail onto tapestry needle and set aside.
Assembly
- Head to body: Position the closed end of the head against one end of the body (the flatter “neck” area after body decreases). Using the long head tail and mattress stitch, sew head securely to body. Add a tiny bit more stuffing at the join if needed for a smooth neck, then weave end inside.
- Legs: Pin four legs to the underside of the body — two front legs just behind the neck join, two hind legs near the rear, spaced evenly left/right for symmetry. Using mattress stitch and the leg tails, sew each open end firmly to the body. Weave all ends inside.
- Face embroidery: With black floss, embroider a small triangular or oval nose at the very tip of the snout using satin stitch. Add a short straight or curved mouth line just below the nose if desired. Secure ends inside head.
- Spines:
Cut 45–50 lengths of CC yarn, each 3 inches (7.5 cm) long.
Working on the upper half/back of the body only (leave belly smooth), attach loops as fringe: fold a strand in half, insert crochet hook under a purl bump or stitch on the body, pull the fold through to form a loop, then pull the cut ends through the loop and tighten (latch-hook style).
Place spines in staggered rows about ½ inch (1.25 cm) apart, covering from just behind the head to the rear.
Once all loops are attached, trim the ends evenly to about ¾–1 inch (2–2.5 cm) so they stand up like short spines. Weave any stray ends inside.
Finishing
- Weave in every remaining yarn end securely to the inside of the toy so nothing can snag or pull out.
- Roll the finished echidna gently between your hands to even out the stuffing and shape.
- Check that safety eyes are locked and all seams are tight.
- Optional: lightly steam-block (do not press) if yarn blooms, keeping spines upright.
Your echidna is ready for adventures!
(Pattern math validated: all increase rounds add exactly 6 sts; all decrease rounds subtract exactly 6 sts; final closes reach 6 sts cleanly.)
Disclaimer: This pattern was generated by AI and should be reviewed for accuracy before use. While we strive for quality, AI-generated content may contain errors. Please verify measurements, stitch counts, charts, and instructions before beginning your project. Generated by purlJam.uk
Love this pattern?
Save this pattern to your free PurlJam libraryAccess your pattern anytime
Bookmark this page to access your pattern anytime