Type
Machine Knitting
Difficulty
intermediate
Category
custom
AI Thinking Process
Planning
Verification
Pattern
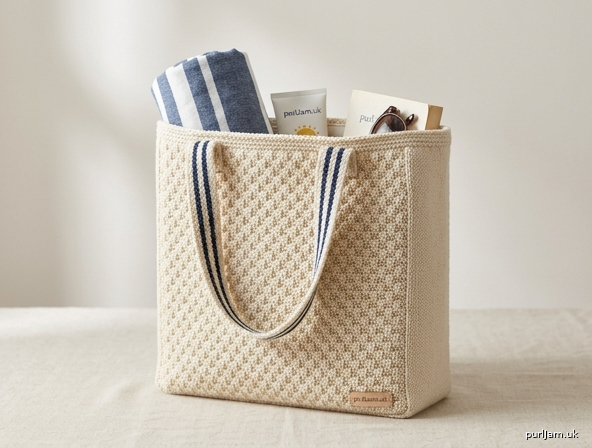
Square Beach Tote Bag
Machine Knitting Pattern – Beginner
A sturdy, square-shaped beach tote approximately 14" × 14" × 4" (35.5 × 35.5 × 10 cm). Simple all-over tuck texture on front and back panels gives visual interest without complexity; plain stockinette elsewhere. Designed to hold towels, sunscreen, and beach essentials. Knit entirely flat on a standard-gauge (4.5 mm) machine; no ribber required. Suitable for punchcard or electronic machines (or manual needle selection).
Materials
- Yarn: Worsted weight (category 4), approx. 550 yd (500 m) main color (MC). Cotton, cotton-blend, or sturdy acrylic recommended for beach use and easy care. Optional 50 yd (45 m) contrast color (CC) for handle stripes or base accent.
- Machine: Standard gauge (4.5 mm) knitting machine (Brother, Knitmaster/Silver Reed, etc.). Punchcard or electronic preferred for tuck; manual selection also works.
- Tools: Cast-on comb, weights (or claw weights), ravel cord, transfer tool, latch tool, tapestry needle, scissors, steam iron or blocking wires, stitch markers or clip-on markers.
- Notions: 2 yd (2 m) cotton webbing or twill tape (optional, for handle reinforcement), sewing needle and matching thread if using webbing.
Tension / Gauge
- Tension dial: T7 (MC stockinette and tuck).
- Gauge: 20 stitches and 28 rows = 4" (10 cm) in stockinette stitch after steaming.
- Tuck gauge: Approximately the same; fabric is slightly thicker and denser. Always knit a 40-st × 40-row swatch, steam, and measure. Adjust tension dial up or down by ½ point if needed to hit gauge. Firm fabric is essential so the bag holds its square shape when loaded.
Finished Measurements
- One size: 14" wide × 14" tall × 4" deep (35.5 × 35.5 × 10 cm), excluding handles.
- Handles: 1.5" wide × 18" long (4 × 45 cm) each, sewn on with 2" overlap.
Abbreviations & Machine Terms
- COL / COR = carriage on left / carriage on right
- RC = row counter
- T# = tension dial setting
- NSS = needle selection system (punchcard, electronics, or manual)
- WP = working position
- NWP = non-working position
- HP = holding position
- BO = bind off
- CO = cast on
- st(s) = stitch(es)
- rnd(s) = round(s) (used only in finishing notes)
- MC = main color
- CC = contrast color (optional)
Pattern Notes
- Front and back are identical and use a simple 2×2 tuck pattern (beginner-friendly). Sides, base, and handles are plain stockinette.
- Tuck pattern: every 2 rows, select every other pair of needles to tuck (or use a standard 2×2 tuck punchcard / electronic motif). Manual method given below.
- Always use enough weight for even stitches, especially on tuck sections. Re-hang hem or add claw weights as fabric grows.
- Row counter (RC) is reset at the start of each piece. Carriage direction is noted at every checkpoint.
- Seaming is done with mattress stitch for invisible side seams; base is whip-stitched or mattress-stitched for strength.
- Steam-block all pieces lightly before assembly; do not stretch aggressively.
- Optional: line the finished bag with cotton fabric for extra durability and to hide seams.
Machine Setup (all pieces)
- Clean and oil machine. Set tension dial to T7.
- Bring required needles to WP. All other needles remain in NWP.
- Carriage: both Part (slip) levers and Tuck levers at N (normal) unless otherwise stated. Cam buttons normal for stockinette; set for tuck when instructed.
- Cast-on method: closed CO with waste yarn and ravel cord, or e-wrap CO directly in MC if preferred. Hang cast-on comb and weights immediately.
FRONT PANEL (make 1)
Needle arrangement: 70 needles in WP centered on the needle bed (e.g., L35 to R35).
- CO 70 sts with waste yarn. Knit 6–8 rows waste. Insert ravel cord and knit 1 row. Change to MC.
- RC 000. COR. Knit 2 rows stockinette (T7) to establish.
- Begin tuck pattern (RC 002, COR):
- Set carriage for tuck (Tuck levers to T, or select tuck cam).
- Manual 2×2 tuck (if no card): On next pass, bring needles 1-2, 5-6, 9-10… to HP (or select via pushers/card). Knit 1 row (selected needles tuck).
- Next row: return those needles to WP manually or via card; select the alternate pairs (3-4, 7-8, 11-12…) and tuck.
- Continue alternating the 2-st tuck groups every 2 rows.
- Electronic/punchcard: load a simple 2×2 or checker tuck card; set for all-over repeat. Advance card every 2 rows as usual.
- Continue in tuck pattern until RC 098 (14" from CO edge). End COR.
- Cancel tuck (return levers to N). Knit 2 rows plain stockinette.
- BO all 70 sts loosely with latch-tool bind-off or transfer to waste yarn. Remove from machine. Mark top edge with a scrap of contrasting yarn.
Inline check: 70 sts × 5 sts/in = 14" width ✓; 98 rows tuck + 4 plain ≈ 14" length at 7 rows/in ✓.
BACK PANEL (make 1)
Work exactly as Front Panel. RC checkpoints identical. Both pieces must match exactly for square shape.
SIDE PANELS (make 2)
Needle arrangement: 20 needles in WP.
- CO 20 sts with waste yarn + ravel cord. Change to MC.
- RC 000. COR. T7, stockinette (no tuck).
- Knit to RC 098. End COR.
- BO loosely. Mark top edge.
Inline check: 20 sts = 4" depth ✓; 98 rows = 14" height ✓.
BASE (make 1)
Needle arrangement: 70 needles in WP.
- CO 70 sts with waste yarn + ravel cord. Change to MC (or CC for accent).
- RC 000. COR. T7, stockinette.
- Knit to RC 028 (exactly 4"). End COR.
- BO loosely.
Inline check: 70 sts = 14" ✓; 28 rows = 4" ✓.
HANDLES (make 2)
Needle arrangement: 8 needles in WP.
- CO 8 sts with waste yarn + ravel cord. Change to MC.
- RC 000. COR. T6 (one half-point tighter for firmer strap). Stockinette.
- Optional stripe: knit 4 rows MC, 2 rows CC, repeat, or solid MC.
- Knit to RC 120 (approx. 18" + seam allowance). End COR.
- BO loosely.
- Optional reinforcement: cut webbing 18" long and sew to wrong side of each handle after blocking.
Inline check: 8 sts ≈ 1.5" width at tighter tension ✓; 120 rows ≈ 18" ✓.
Finishing
- Block: Steam each piece lightly on wrong side to measurements. Pin square corners. Allow to dry completely. Do not over-steam tuck fabric or it will lose texture.
- Assemble body:
- With right sides facing, mattress-stitch one Side Panel to the right edge of Front Panel (match RC 000 to RC 000 and top edges).
- Attach second Side Panel to left edge of Front.
- Attach Back Panel to the remaining edges of the two Side Panels. You now have a square tube 14" tall.
- Pin Base to the bottom opening, matching 70-st edges to Front/Back and 20-st edges to Sides. Whip-stitch or mattress-stitch firmly all around. Reinforce corners with extra stitches.
- Handles:
- Position each handle end 3" in from the side seams on Front and Back top edges (so handles sit centered on the 14" width with ~8" between attachment points).
- Overlap 2" of handle onto the inside top edge. Back-stitch securely by hand (or machine-sew) through all layers. If using webbing, catch it in the stitching.
- Repeat for all four ends. Try the bag on your shoulder and adjust placement if desired before final stitching.
- Top edge finish (optional but recommended): Rehang the entire top edge (Front + Sides + Back = 180 sts) onto the machine wrong-side facing, picking up every stitch. T7, knit 4 rows. BO loosely with latch tool. This creates a clean, slightly rolled facing. Or simply crochet one round of single crochet by hand for a polished edge.
- Final: Weave in all ends. Give the finished bag a light steam. Optional: add a fabric lining sewn by hand or machine, or attach a magnetic snap or button closure.
Care
Machine wash cold gentle cycle (cotton) or hand wash; lay flat to dry. Re-steam if needed to restore shape.
Enjoy your sturdy square beach tote – perfect for carrying towels and beach-day essentials!
Disclaimer: This pattern was generated by AI and should be reviewed for accuracy before use. While we strive for quality, AI-generated content may contain errors. Please verify measurements, stitch counts, charts, and instructions before beginning your project. Generated by purlJam.uk
Love this pattern?
Save this pattern to your free PurlJam libraryAccess your pattern anytime
Bookmark this page to access your pattern anytime