Type
Crochet
Difficulty
beginner
Category
amigurumi
AI Thinking Process
Planning
Verification
Pattern
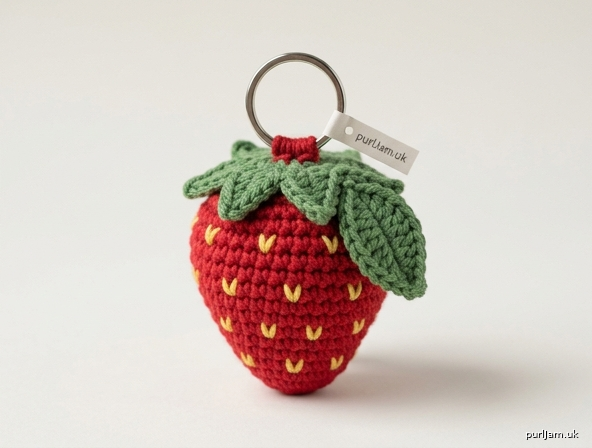
Strawberry Crochet Keychain
Beginner Amigurumi Pattern
Skill Level: Beginner
Finished Size: Approximately 2.5 inches (6.5 cm) tall × 2 inches (5 cm) wide (excluding keychain ring)
Yarn Weight: Chunky (5)
A sweet, quick-to-make crochet strawberry keychain worked in basic single crochet. Perfect for beginners learning amigurumi shaping, embroidery details, and simple assembly. Uses only magic ring, sc, inc, dec, and chain stitches.
Materials
- Yarn (Chunky / Category 5):
- Red: 20 yards (18 m) – strawberry body
- Green: 15 yards (14 m) – leafy cap + decorative leaf
- Yellow: 2 yards (2 m) – seeds (or yellow embroidery floss)
- Hook: US 7 / 4.5 mm (or size needed to obtain gauge; go down for tighter fabric)
- Notions:
- Polyester fiberfill stuffing
- Yarn / tapestry needle
- Stitch marker
- Embroidery scissors
- Silver keychain ring / lobster clasp (1 inch / 25 mm)
- Optional: stuffing tool or chopsticks
Gauge:
4 sc × 4 rnds = 1 inch (2.5 cm) in continuous sc rounds with 4.5 mm hook.
Work tightly so stuffing does not show. Adjust hook size if needed.
Abbreviations (US Terms)
| Abbrev. | Meaning |
|---|---|
| ch | chain |
| sc | single crochet |
| inc | increase (2 sc in same st) |
| dec | invisible decrease (insert hook in front loop only of next 2 sts, yo, pull through both, yo, pull through 2 loops) |
| sl st | slip stitch |
| st(s) | stitch(es) |
| rnd(s) | round(s) |
| MR | magic ring |
| FO | fasten off |
| [ ] | stitch count at end of rnd |
| ( ) | work instructions in parentheses as a set |
Notes:
- Work in continuous spiral rounds unless stated. Do not join or turn.
- Place stitch marker in first st of each rnd and move up.
- Use invisible decrease for smooth surface.
- Stuff firmly as directed for classic strawberry shape.
Pattern Instructions
Strawberry Body (Red)
Make 1.
Rnd 1: 6 sc in MR. [6]
Rnd 2: inc in each st around. [12] (6 increases → 6 + 6 = 12 ✓)
Rnd 3: (sc, inc) around. [18] (6 increases → 12 + 6 = 18 ✓)
Rnds 4–7: sc in each st around. [18]
Rnd 8: (sc, dec) around. [12] (6 decreases → 18 – 6 = 12 ✓)
Stuff firmly with fiberfill. Shape into a plump berry (wider at top, gently tapered). Add more stuffing as needed before closing.
Rnd 9: dec around. [6] (6 decreases → 12 – 6 = 6 ✓)
FO, leaving a 8-inch (20 cm) tail. Thread tail onto tapestry needle. Weave through front loops of remaining 6 sts and pull tight to close hole. Weave in end securely inside body. (6 sts closed ✓)
Leafy Cap (Green)
Make 1.
Rnd 1: 5 sc in MR, pull tight. Do not join. [5]
Leaves:
Ch 5,
working back down the chain: sc in 2nd ch from hook, hdc in next ch, dc in next ch, hdc in last ch,
sl st in next sc of Rnd 1.
Repeat from * to * 4 more times (5 leaves total). (5 leaves ✓)
FO, leaving a 12-inch (30 cm) tail for sewing. Weave starting tail into center and hide.
Decorative Leaf (Green)
Make 1.
Ch 8.
Row 1: sc in 2nd ch from hook, sc in next ch, hdc in next 2 ch, dc in next 2 ch, (hdc, sc, ch 2, sc, hdc) in last ch.
Rotate to work along opposite side of foundation chain: dc in next 2 ch, hdc in next 2 ch, sc in next 2 ch, sl st to first sc.
FO, leaving a 8-inch (20 cm) tail for sewing. Weave in starting tail.
Assembly
-
Attach Leafy Cap
Position leafy cap on the wider (closed) end of the strawberry body, centered. Using the long green tail and tapestry needle, sew securely through the center of the cap and into the body with small whip stitches. Anchor each leaf base with an extra stitch if desired. Weave in end. -
Embroider Seeds
Thread yellow yarn (or 3 strands of embroidery floss) onto tapestry needle. Embroider 10–14 small straight stitches or tiny V-shaped seeds evenly spaced around the red body. Keep stitches short (about ¼ inch / 6 mm) and angled slightly for a natural look. Secure ends inside body. -
Attach Decorative Leaf
Sew the base of the decorative leaf to one side of the leafy cap (or slightly under the cap edge) with 3–4 firm stitches. Angle it naturally. Weave in end. -
Attach Keychain Ring
Thread a 10-inch (25 cm) length of matching green or red yarn onto tapestry needle. Position keychain ring at the center top of the leafy cap. Sew through the ring and firmly into the cap and body several times (at least 6–8 strong stitches). Knot securely and hide ends inside. Reinforce so the ring cannot pull free. -
Final Finishing
Weave in any remaining ends. Gently steam or finger-shape leaves if needed. Trim stray fibers. Inspect for loose stitches or gaps; close any openings with matching yarn.
Care Instructions
- Spot clean with mild soap and cool water.
- Do not machine wash or tumble dry.
- Reshape and air dry flat.
- Store away from direct sunlight to prevent fading.
- Keep out of reach of pets and small children if used as a toy (keychain ring is a potential hazard).
Congratulations!
You’ve finished your handmade strawberry keychain!
Enjoy your cheerful new accessory or gift it to a fellow crochet lover.
Thank you for stitching with this pattern.
Happy crocheting!
Pattern Notes for Success
- Tighter stitches = neater amigurumi. If stuffing shows, drop hook size.
- Count stitches every round until the shape is established.
- Pin the leafy cap in place before sewing for perfect centering.
- For a slightly larger berry, add one extra even round after Rnd 7.
(End of pattern)
Disclaimer: This pattern was generated by AI and should be reviewed for accuracy before use. While we strive for quality, AI-generated content may contain errors. Please verify measurements, stitch counts, charts, and instructions before beginning your project. Generated by purlJam.uk
Love this pattern?
Save this pattern to your free PurlJam libraryAccess your pattern anytime
Bookmark this page to access your pattern anytime