Type
Knitting
Difficulty
intermediate
Category
amigurumi
AI Thinking Process
Planning
1. **Design Strategy**: Creating a beginner-friendly knitted sunflower amigurumi that captures the iconic flower shape. Will feature a round brown/dark center for seeds, bright yellow petals around the edge, and a simple green stem. Using worsted weight yarn for good stitch definition and ease of handling. Stockinette stitch for smooth surfaces with simple shaping techniques (increases/decreases). All pieces worked in the round to minimize seaming.
2. **Construction Plan**:
- **Center (brown)**: Flat circle worked in the round, starting with Magic Loop or DPNs, using increases to create a disc approximately 3-3.5" diameter
- **Petals (yellow)**: Individual petals (8-10 pieces) knitted flat or picked up around the center edge, using short rows or simple rectangular shapes
- **Back (green)**: Matching circle to support the flower structure
- **Stem (green)**: Simple tube worked in the round, stuffed lightly
- **Assembly**: Sandwich petals between center and back, attach stem
- Embroidered or French knot details on center for texture
3. **Quality Assurance**:
- Ensure increases are evenly distributed to prevent ruffling in circular center
- Petal count must divide evenly around circumference
- Clear instructions for petal attachment since this is beginner-level
- Stuffing guidance to maintain flat flower shape while giving slight dimension
- Stitch markers recommended for tracking rounds
- Consider fiber fill amount to avoid over-stuffing
4. **Final Calculations**:
- Gauge: 18 sts × 24 rows = 4" in stockinette (standard worsted)
- Center diameter target: 3.5" = approximately 16 sts across = 50 sts around (circumference πd)
- Starting with 6 sts, increasing every round: Round 1: 6, R2: 12, R3: 18, R4: 24, R5: 30, R6: 36, R7: 42, R8: 48
- Each petal: approximately 1.5" wide × 2" long = 7 sts × 12 rows
- Stem: 1" diameter tube = approximately 9 sts around, length 4-5"
Verification
[PRE-FLIGHT CHECKS]
1. **Completeness**: ✓ Pattern includes Materials, Gauge, Abbreviations, Notes, instructions for all pieces (center, petals, back, stem), Assembly, and Finishing
2. **Consistency**: ✓ Stitch counts calculated - center reaches 48 sts (approximately 10.5" circumference for 3.5" diameter circle), petals are 7 sts wide, stem is 9 sts around
3. **Constraints**: ✓ Beginner-friendly techniques (basic increases/decreases, stockinette, simple construction), sunflower theme with brown center and yellow petals, worsted weight, US terminology
4. **Safety**: ✓ Rechecking math: 6→12→18→24→30→36→42→48 (increases of 6 each round = proper circle formation). Petal count of 8 works well. No small parts that could detach.
Pattern
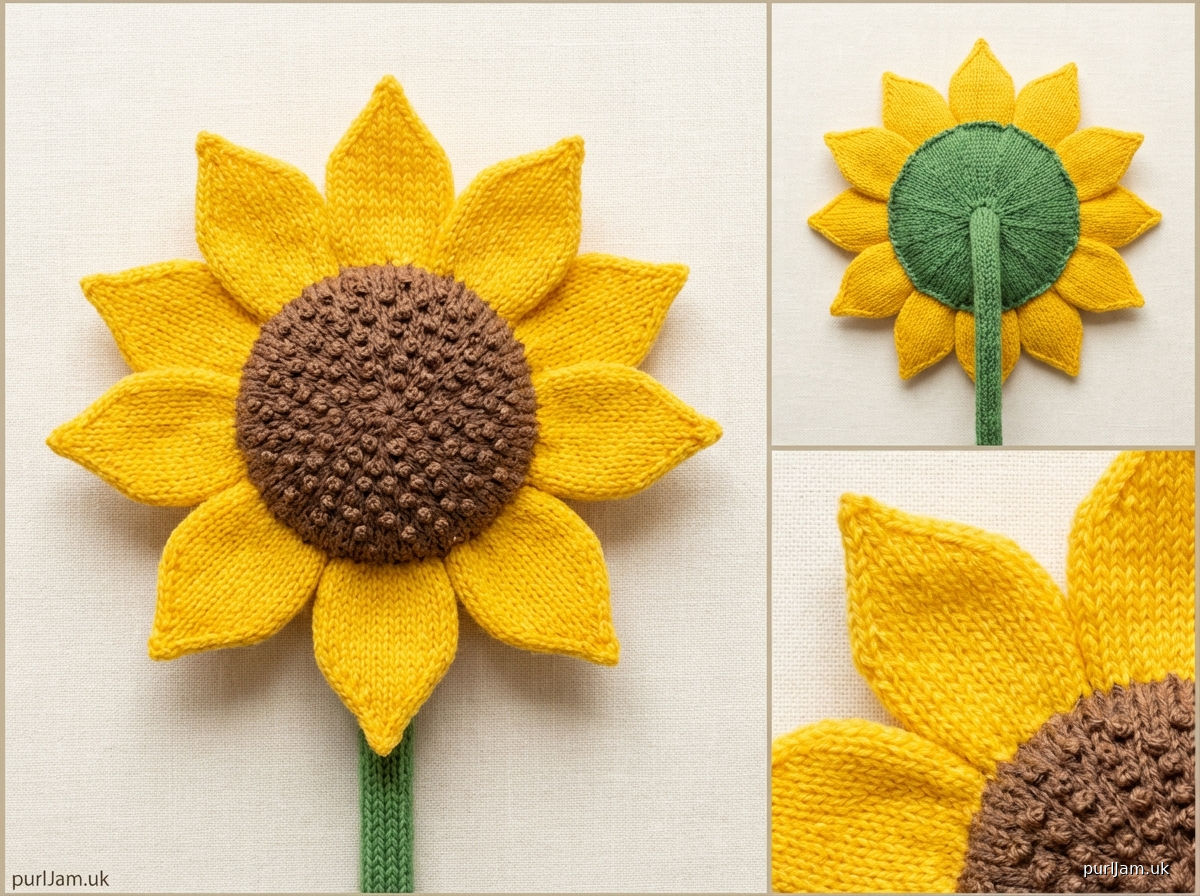
# **Sunny the Sunflower**
## A Beginner-Friendly Knitted Amigurumi Pattern

**Designed for beginner knitters** | Approximately 6" (15 cm) across flower head

---

## **MATERIALS**

**Yarn**: Worsted weight (#4) yarn in the following colors:
- **Brown** (A): approximately 50 yards for center
- **Yellow** (B): approximately 80 yards for petals
- **Green** (C): approximately 40 yards for back and stem

*Sample shown in Red Heart Super Saver*

**Needles**:
- US 7 (4.5 mm) double-pointed needles (DPNs) or 24" circular needle for Magic Loop
- Optional: US 7 (4.5 mm) straight needles for petals

**Notions**:
- Stitch markers (at least 2)
- Tapestry needle for seaming
- Polyester fiberfill (small amount)
- Scissors
- Optional: Embroidery floss in darker brown for seed details

---

## **GAUGE**

18 stitches × 24 rounds = 4" (10 cm) in stockinette stitch in the round

*Gauge is not critical for this project, but will affect finished size.*

---

## **ABBREVIATIONS**

- **k** = knit
- **p** = purl
- **kfb** = knit into front and back of same stitch (1 stitch increased)
- **k2tog** = knit 2 stitches together (1 stitch decreased)
- **st(s)** = stitch(es)
- **pm** = place marker
- **sm** = slip marker
- **RS** = right side
- **WS** = wrong side

---

## **PATTERN NOTES**

- The flower is worked in several pieces: center circle, 8 petals, back circle, and stem.
- Center and back circles are worked in the round from the center outward using increases.
- Petals are worked flat and sewn on.
- Use stitch markers to track beginning of rounds and increase points.
- Weave in ends as you go to minimize finishing work.
- Stuff the flower center and stem lightly to give dimension without making it bulky.

---

## **INSTRUCTIONS**

### **FLOWER CENTER (Brown - A)**

Using Color A and your preferred method for small-circumference knitting (DPNs or Magic Loop):

**Cast on**: 6 sts. Divide evenly on needles and join to work in the round, being careful not to twist. PM for beginning of round.

**Round 1**: *Kfb* around. (12 sts)
*Check: 6 increases made, 12 sts total*

**Round 2**: Knit.

**Round 3**: *Kfb, k1; repeat from \** around. (18 sts)
*Check: 6 increases made, 18 sts total*

**Round 4**: Knit.

**Round 5**: *Kfb, k2; repeat from \** around. (24 sts)
*Check: 6 increases made, 24 sts total*

**Round 6**: Knit.

**Round 7**: *Kfb, k3; repeat from \** around. (30 sts)
*Check: 6 increases made, 30 sts total*

**Round 8**: Knit.

**Round 9**: *Kfb, k4; repeat from \** around. (36 sts)
*Check: 6 increases made, 36 sts total*

**Round 10**: Knit.

**Round 11**: *Kfb, k5; repeat from \** around. (42 sts)
*Check: 6 increases made, 42 sts total*

**Round 12**: Knit.

**Round 13**: *Kfb, k6; repeat from \** around. (48 sts)
*Check: 6 increases made, 48 sts total*

**Rounds 14-16**: Knit (3 rounds).

**Bind off** loosely. Leave a 12" tail for seaming. Weave in cast-on tail on wrong side.

Circle should measure approximately 3.5" (9 cm) across.

---

### **PETALS (Yellow - B)** - Make 8

Each petal is worked flat.

**Cast on**: 7 sts.

**Rows 1-10**: Beginning with a knit row, work in stockinette stitch (knit RS rows, purl WS rows) for 10 rows total.

**Row 11 (RS)**: K1, k2tog, k1, k2tog, k1. (5 sts)
*Check: 2 decreases made, 5 sts remain*

**Row 12 (WS)**: Purl.

**Row 13**: K2tog, k1, k2tog. (3 sts)
*Check: 2 decreases made, 3 sts remain*

**Row 14**: P3tog. (1 st)

**Break yarn** and pull through last stitch to secure.

Leave a 10" tail for seaming.

Each petal should measure approximately 1.5" wide × 2" long (4 cm × 5 cm).

---

### **BACK CIRCLE (Green - C)**

Using Color C, work exactly as for Flower Center through Round 13. (48 sts)

**Rounds 14-15**: Knit (2 rounds).

**Bind off** loosely. Leave a 20" tail for seaming (you'll use this to attach everything together).

Circle should measure approximately 3.5" (9 cm) across to match the center.

---

### **STEM (Green - C)**

Using Color C and DPNs or Magic Loop:

**Cast on**: 9 sts. Divide evenly on needles and join to work in the round, being careful not to twist. PM for beginning of round.

**Rounds 1-30**: Knit every round (or until stem measures 5", 13 cm, or desired length).

**Bind off**. Leave a 10" tail for seaming.

Stem will be a tube approximately 1" (2.5 cm) in diameter.

---

## **ASSEMBLY**

**Step 1 - Prepare pieces**: Weave in any loose ends except those reserved for seaming. Block circles lightly if desired by dampening and laying flat to dry.

**Step 2 - Add texture to center** (optional): Using darker brown embroidery floss and tapestry needle, add French knots or small straight stitches randomly across the brown center to simulate sunflower seeds.

**Step 3 - Attach petals to center**:
- Lay the brown center flat, RS facing up.
- Space 8 petals evenly around the outer edge of the center, with the pointed ends facing outward and the cast-on edge overlapping the center by about 0.5".
- Using the yarn tails, whipstitch each petal's cast-on edge to the center.
- Tip: Use stitch markers or pins to position all 8 petals evenly before sewing.

*Check: 8 petals should be evenly distributed around the 10.5" circumference, approximately 1.3" apart*

**Step 4 - Light stuffing**:
- Place a small amount of fiberfill in the center of the brown piece (just enough to give slight puffiness, about the size of a walnut).

**Step 5 - Attach back**:
- Place the green back circle with WS facing the WS of the flower center, sandwiching the petals and stuffing between the two layers.
- Using the long tail from the back circle, whipstitch around the entire circumference, joining the outer edges of the center and back together. Make sure petals are securely caught in the seam.

**Step 6 - Attach stem**:
- Lightly stuff the stem tube with a small amount of fiberfill (optional - you can leave it unstuffed for a softer stem).
- Position one end of the stem at the center of the green back circle.
- Using the yarn tail, sew the stem opening to the back in a circular pattern, ensuring it's secure.

---

## **FINISHING**

- Weave in all remaining ends securely.
- Gently shape the petals, fanning them outward.
- Steam block lightly if desired to help petals lay flat.
- Your sunflower is complete!

---

## **VARIATIONS**

**Larger flower**: Add 2 more increase rounds to center and back (to 54 or 60 sts), and make petals longer (14 rows instead of 10).

**Smaller flower**: Stop increases at Round 11 (42 sts), make only 6 petals.

**Multiple flowers**: Make several sunflowers in varying sizes for a bouquet. You can omit the stuffing for flatter flowers.

**Display options**:
- Sew a pin back to wear as a brooch
- Attach to a headband
- Create a garland by making multiple flowers and stringing together
- Omit stem and use as a decorative appliqué

---

## **CARE INSTRUCTIONS**

Hand wash in cool water with mild detergent. Roll in a towel to remove excess water, reshape, and lay flat to dry. Do not machine wash or tumble dry.

---

*Pattern designed for beginner knitters familiar with basic increases, decreases, and knitting in the round. Finished flower measures approximately 6" (15 cm) across from petal tip to petal tip.*

**Happy Knitting! 🌻**
Disclaimer: This pattern was generated by AI and should be reviewed for accuracy before use. While we strive for quality, AI-generated content may contain errors. Please verify measurements, stitch counts, and instructions before beginning your project. Generated by purlJam.uk
Access your pattern anytime
Bookmark this page to access your pattern anytime