Type
Crochet
Difficulty
beginner
Category
amigurumi
AI Thinking Process
Planning
Verification
Pattern
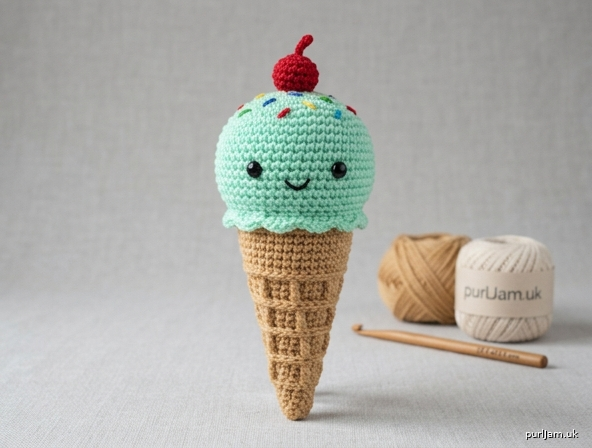
Sweet Scoop Amigurumi Ice Cream Cone
Beginner Crochet Toy Pattern (Simple Shapes)
A cute, huggable ice-cream cone worked entirely in single crochet. Perfect first amigurumi: only magic rings, sc, inc, dec, and one seam. Finished size approximately 4½–5 inches (11–13 cm) tall.
Materials
- Worsted weight (4) yarn:
- Cone: 30 yd (27 m) tan or light brown
- Scoop: 25 yd (23 m) any “flavor” color (pink, mint, chocolate, etc.)
- Optional drip/embellishment: small amount contrasting color
- Crochet hook: US E-4 (3.5 mm) — go down 1–2 sizes from yarn label for tight fabric
- Polyester fiberfill stuffing
- Yarn needle
- Stitch marker
- Optional: 6 mm safety eyes or black embroidery floss, small amount of felt for sprinkles
Gauge
5 sc × 5 rnds = 1 inch (2.5 cm) in continuous rounds with E-4 hook.
Exact gauge is not critical, but work tightly so stuffing does not show.
Abbreviations (US Terms)
- ch: chain
- sc: single crochet
- inc: 2 sc in same stitch
- dec: invisible decrease (insert hook in front loop only of next 2 sts, yarn over, pull through both, yarn over, pull through 2 loops)
- MR: magic ring
- rnd: round
- st(s): stitch(es)
- BLO: back loop only
- FO: fasten off
- [ ]: stitch count at end of round
Pattern Notes
- Work in continuous spirals; do not join rounds. Mark first st of each rnd and move marker up.
- Stuff as directed—cone lightly, scoop firmly.
- Invisible decrease keeps surface smooth.
- Parenthetical math confirms counts (e.g., 6 inc → 12 + 6 = 18 ✓).
Cone (tan/brown)
Worked from tip upward.
Rnd 1: 4 sc in MR. [4]
Rnd 2: (sc, inc) around. [6] (2 inc → 4 + 2 = 6 ✓)
Rnd 3: sc around. [6]
Rnd 4: (2 sc, inc) around. [8] (2 inc → 6 + 2 = 8 ✓)
Rnd 5: sc around. [8]
Rnd 6: (3 sc, inc) around. [10] (2 inc → 8 + 2 = 10 ✓)
Rnd 7: sc around. [10]
Rnd 8: (4 sc, inc) around. [12] (2 inc → 10 + 2 = 12 ✓)
Rnd 9: sc around. [12]
Rnd 10: (5 sc, inc) around. [14] (2 inc → 12 + 2 = 14 ✓)
Rnd 11: sc around. [14]
Rnd 12: (6 sc, inc) around. [16] (2 inc → 14 + 2 = 16 ✓)
Rnd 13: sc around. [16]
Rnd 14: (7 sc, inc) around. [18] (2 inc → 16 + 2 = 18 ✓)
Rnds 15–17: sc around. [18]
FO, leaving 12-inch (30 cm) tail for sewing. Lightly stuff cone, keeping tip firm and top slightly softer so scoop sits nicely. Do not overstuff or the cone will bulge.
(Optional waffle texture: on Rnds 9, 11, 13, 15 work all sts in BLO.)
Scoop (flavor color)
Standard sphere.
Rnd 1: 6 sc in MR. [6]
Rnd 2: inc in each st around. [12] (6 inc → 6 + 6 = 12 ✓)
Rnd 3: (sc, inc) around. [18] (6 inc → 12 + 6 = 18 ✓)
Rnd 4: (2 sc, inc) around. [24] (6 inc → 18 + 6 = 24 ✓)
Rnds 5–8: sc around. [24]
Rnd 9: (2 sc, dec) around. [18] (6 dec → 24 – 6 = 18 ✓)
Stuff firmly, shaping into a round scoop.
Rnd 10: (sc, dec) around. [12] (6 dec → 18 – 6 = 12 ✓)
Rnd 11: dec around. [6] (6 dec → 12 – 6 = 6 ✓)
FO, leaving 8-inch (20 cm) tail. Thread tail through front loops of remaining 6 sts and pull tight to close hole. Weave in end.
Assembly
- Pin scoop centered on open top of cone.
- Using cone’s long tail and yarn needle, whip-stitch scoop to cone through both layers, adding a tiny bit more stuffing at the join if needed for a smooth ice-cream look.
- Weave in all ends securely.
Optional Embellishments (beginner-friendly)
- Eyes: Insert 6 mm safety eyes between Rnds 6–7 of scoop, about 4 sts apart, before closing scoop; or embroider small French-knot or satin-stitch eyes with black floss after assembly.
- Smile: With black floss, embroider a small curved smile under eyes using backstitch.
- Drips: With contrasting yarn, surface-slip-stitch 2–3 short drips down the side of the scoop onto the cone.
- Sprinkles: Cut tiny felt rectangles or embroider French knots in bright colors on top of scoop.
- Cherry: Make a tiny 6-sc sphere in red, FO, and sew to top center of scoop.
Finishing & Care
- Steam-block lightly if desired (do not press flat).
- Spot clean only; do not machine wash.
- For a stress-ball version, stuff both pieces extra firmly.
Size Adjustments
- Larger (6–7"): Use bulky (5) yarn and US G-6 (4 mm) hook; add 2 extra even rounds on cone after Rnd 17 and 2 extra even rounds on scoop after Rnd 8.
- Keychain (3"): Use DK yarn and US B-1 (2.25 mm); stop cone increases at 12 sts and scoop at 18 sts; attach keychain finding to top of scoop.
Enjoy your sweet new amigurumi friend!
(Pattern tested for stitch-count accuracy and beginner clarity.)
Disclaimer: This pattern was generated by AI and should be reviewed for accuracy before use. While we strive for quality, AI-generated content may contain errors. Please verify measurements, stitch counts, charts, and instructions before beginning your project. Generated by purlJam.uk
Love this pattern?
Save this pattern to your free PurlJam libraryAccess your pattern anytime
Bookmark this page to access your pattern anytime