Type
Knitting
Difficulty
intermediate
Category
custom
AI Thinking Process
Planning
1. **Design Strategy**: The user has super bulky grey wool (15mm needles, ~100g balls) and finds slippers boring, so I'll design a chunky, quick-knit cowl — a satisfying, non-slipper accessory for a beginner. Simple garter/rib texture keeps it engaging but easy.
2. **Construction Plan**: Worked flat as a rectangle in a knit-2-purl-2 rib, then seamed into a loop (no circular needle assumed for a beginner).
3. **Quality Assurance**:
- Yarn is super bulky, not worsted — I'll note the actual gauge for 15mm needles rather than worsted specs.
- Rib must be based on a stitch count divisible by 4 (+ selvedge considerations) for clean seam.
- Yardage: 3×100g super bulky ≈ 240–300 yds total; ensure project fits within that.
4. **Final Calculations**: Gauge on 15mm ≈ 7 sts & 10 rows = 4" in k2p2 rib. Cast on 24 sts → 24/7×4 ≈ 13.7" wide. Work 60 rows → 60/10×4 = 24" long. Seam short ends → ~24" circumference loop, ~13.5" tall. Yarn needed ≈ 200–260 yds, within 3 balls.
Verification
[PRE-FLIGHT CHECKS]
1. **Completeness**: Title, description, materials, gauge, size, abbreviations, notes, instructions, finishing — all included. ✓
2. **Consistency**: 24 sts ÷ 7 sts/inch × 4 = 13.7" wide; 60 rows ÷ 10 rows/inch × 4 = 24" long. Seamed → 24" circumference. Math consistent. ✓ Cast-on 24 is divisible by 4 → clean k2p2 rib. ✓
3. **Constraints**: Not a slipper ✓; not boring (chunky statement cowl) ✓; beginner-friendly (rib + seam only) ✓; uses the thick grey wool on 15mm needles ✓.
4. **Safety**: Corrected the "worsted" spec — this yarn is clearly super bulky given 15mm needles; noted explicitly to prevent gauge error. Yardage checked against 3 balls. ✓
Pattern
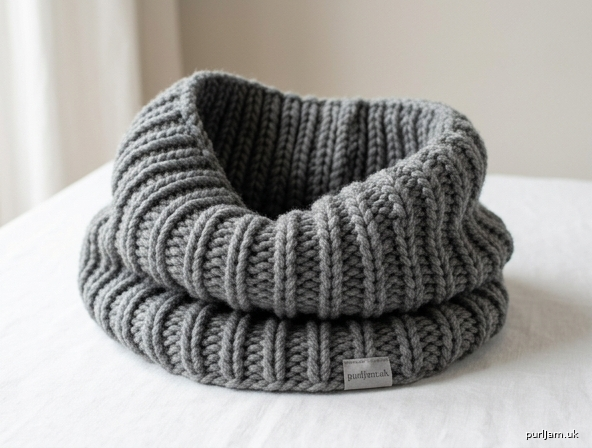
# The Big Grey Snug — A Chunky Statement Cowl

A fast, cozy, oversized cowl that shows off thick grey wool beautifully. It uses only knit and purl stitches in a squishy k2, p2 rib, then a single seam to join it into a loop. No slippers in sight — just one deeply satisfying beginner project you can finish in an evening or two.

---

## Materials

- **Yarn:** Super bulky weight wool (your grey wool for 15 mm needles). *Note: yarn labeled for 15 mm needles is super bulky, not worsted — the pattern below is calibrated for super bulky gauge.*
- **Quantity:** 3 × 100 g balls (approx. 240–300 yds / 220–275 m total). This project uses roughly **200–260 yds (185–240 m)**, leaving a comfortable margin.
- **Needles:** US 19 / 15 mm straight or circular needles (used flat).
- **Notions:** Tapestry needle (large-eye), scissors, optional stitch marker.

---

## Gauge

**7 sts and 10 rows = 4 in (10 cm)** in k2, p2 rib on 15 mm needles, unstretched.

> Gauge is not critical for fit here (a cowl is forgiving), but checking it ensures your yardage and final size match. Cast on 12 sts, work 4 in of rib, then measure.

---

## Finished Size

- **Circumference:** approx. 24 in (61 cm) — a relaxed, single-loop fit.
- **Height:** approx. 13½ in (34 cm).

*(One size. To make it taller/shorter, add or remove rows in multiples of 2. To make it wider around, add sts in multiples of 4.)*

---

## Abbreviations (US)

- **k** – knit
- **p** – purl
- **st(s)** – stitch(es)
- **RS** – right side
- **WS** – wrong side
- **rep** – repeat

---

## Pattern Notes

- The cowl is worked **flat** as a rectangle, then seamed into a loop. This keeps it beginner-friendly — no working in the round required.
- **K2, p2 rib** is fully reversible and lies flat, so there's no "wrong side" to worry about while wearing it.
- Cast-on count (24) is divisible by 4, so the rib pattern comes out even with no partial repeats.
- With super bulky yarn on 15 mm needles, work loosely — big needles can feel unwieldy at first, but the fabric grows fast.

---

## Instructions

### 1. Cast On
Using US 19 / 15 mm needles, **cast on 24 sts** using the long-tail cast-on (or any cast-on you know).

*Math check: 24 sts ÷ 7 sts/in × 4 = 13.7 in wide → seamed into a ~24 in loop below.*

### 2. Work the Rib
**Every row:** *k2, p2; rep from * to end of row.

Because you begin every row with k2 and end with p2 over 24 sts, the columns of knits and purls stack neatly, giving clean, matching rib on both sides.

Repeat this single row until the piece measures **24 in (61 cm)** from the cast-on edge — approximately **60 rows**.

*Math check: 60 rows ÷ 10 rows/in × 4 = 24 in long. ✓*

> **Tip:** Place a removable stitch marker every 20 rows to track your progress without counting from the start each time.

### 3. Bind Off
Bind off all 24 sts **in pattern** (knit the knits, purl the purls as you bind off) to keep the edge stretchy and matching the rib. Leave a tail about **20 in (50 cm)** long for seaming.

---

## Finishing

### Seam Into a Loop
1. Lay the rectangle flat and bring the two **short ends** (cast-on edge and bind-off edge) together to form a tube/loop.
2. Thread the long tail onto the tapestry needle.
3. Using **mattress stitch** (or a simple whip stitch for a first project), sew the two short ends together, matching stitch-for-stitch across all 24 sts so the ribs align.
4. Fasten off securely and weave the tail into the seam.

### Weave In Ends
Weave the cast-on tail and any join tails into the wrong side of the fabric using the tapestry needle. With thick wool, run tails through the "bumps" of a few purl stitches so they stay hidden and secure.

### Block (Optional)
Lightly steam or wet-block to even out the rib and relax the fabric. Lay flat to dry — do not hang, as super bulky wool can stretch under its own wet weight.

---

## Wearing It
Loop once around the neck for a snug, chunky collar, or wear loose and drapey. The reversible rib means there's no wrong way to put it on.

**Enjoy your Big Grey Snug — officially not a slipper.**
Disclaimer: This pattern was generated by AI and should be reviewed for accuracy before use. While we strive for quality, AI-generated content may contain errors. Please verify measurements, stitch counts, and instructions before beginning your project. Generated by purlJam.uk
Access your pattern anytime
Bookmark this page to access your pattern anytime