Type
Crochet
Difficulty
intermediate
Category
custom
AI Thinking Process
Planning
Verification
Pattern
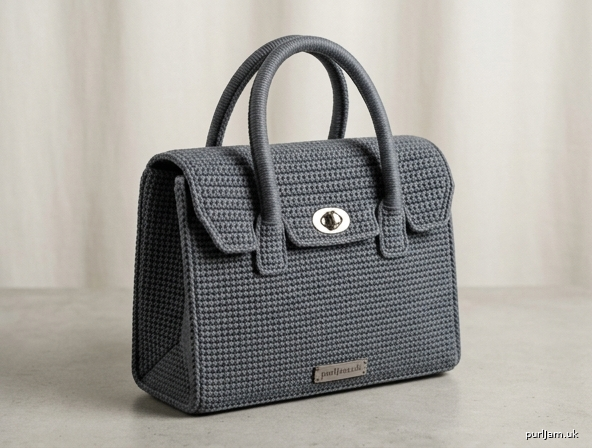
The Structured Satchel — A Birkin-Inspired Crochet Handbag
A firm, architectural tote worked in tight single crochet to mimic the iconic boxy silhouette of a structured leather handbag. Features a rectangular flat base, clean squared corners, a fold-over front flap with a turn-lock closure, and two rolled top handles. Rated advanced for its multi-piece construction, structural shaping, and hardware installation.
Finished Dimensions: approximately 12 in wide × 10 in tall × 5 in deep (30.5 × 25.5 × 12.5 cm), excluding handles.
Materials
- Yarn: Worsted weight (Category 4), 100% cotton recommended for structure. Approx. 900 yd (825 m) in main color (MC).
- Hook: US H/8 (5 mm) — or one size smaller than the yarn band recommends, to achieve a firm fabric.
- Notions:
- Tapestry needle
- Stitch markers (at least 6)
- 1 turn-lock (twist-lock) purse clasp set with screws/prongs
- Plastic canvas sheet (7-mesh) cut to base and side dimensions, OR heavy fusible interfacing (optional but recommended for structure)
- Sew-in magnetic snap (optional secondary closure)
- Sharp scissors
- Small screwdriver (if hardware is screw-mounted)
- Sewing thread + needle for hardware
Gauge
18 sc × 20 rows = 4 in (10 cm) in single crochet, worked tightly.
Gauge is critical. A loose fabric will sag and lose the structured shape. If your gauge is loose, drop a hook size. Check gauge on a 4 in swatch before beginning.
Size
One size, as listed in Finished Dimensions. Bag can be scaled by adjusting the base foundation chain (see Pattern Notes).
Abbreviations (US Terms)
- ch — chain
- sc — single crochet
- sc2tog — single crochet 2 together (decrease)
- st(s) — stitch(es)
- sl st — slip stitch
- BLO — back loop only
- rep — repeat
- rnd(s) — round(s)
- RS / WS — right side / wrong side
Pattern Notes
- The bag is worked in single crochet throughout for a dense, structured fabric.
- The base is worked flat as a rectangle. Sides are worked in joined rounds (sl st join each round, ch 1 does NOT count as a stitch).
- Do not turn between side rounds — work with RS always facing.
- The ch 1 at the start of each round does not count as a stitch; work your first sc into the same stitch as the join unless noted.
- Stitch counts are given in parentheses at the end of each round/row.
- Scaling: Each 1 in of base width = 4.5 sts (rounded). Adjust the foundation chain and recalculate the perimeter accordingly.
- Work into both loops unless BLO is specified. Working the first side round in BLO creates a crisp fold line where the base meets the walls.
Special Stitches
- Corner (3-sc corner): Work 3 sc into a single stitch to turn a 90° corner and establish a squared edge.
Instructions
Part 1 — The Base (worked flat)
Ch 55.
Row 1 (RS): Sc in 2nd ch from hook and in each ch across. Turn. (54 sc)
Validation: 55 ch − 1 (skipped) = 54 sc ✓
Rows 2–22: Ch 1 (does not count), sc in each st across. Turn. (54 sc each row)
The base now measures 12 in × 5 in (54 sts ÷ 4.5 = 12 in wide; 22 rows ÷ 5 = 4.4 in — blocks to ~5 in). Fasten off. Do not cut a long tail.
If using plastic canvas, cut a 12 × 5 in rectangle now and set aside.
Part 2 — Establishing the Sides (Round 1)
With RS facing, rejoin yarn at any corner to work around the entire perimeter of the base rectangle. You will work in BLO for this round to create the fold line.
Working around the base:
- Along each long edge (row of 54 sts): 54 sc
- Along each short edge (22 row-ends): 22 sc
- Work 3 sc into each of the 4 corners — but to keep the total even, we place corner increases as follows:
Round 1 (BLO): Ch 1. Beginning at one corner: sc in each of 54 sts along first long edge, place marker in center corner st worked, sc 22 sts up the short edge, sc 54 along second long edge, sc 22 down the second short edge. Join with sl st to first sc. (54 + 22 + 54 + 22 = 152 sc)
Validation: (54 × 2) + (22 × 2) = 108 + 44 = 152 sc ✓
Tip: For crisp corners, ensure the 4 corner sts sit exactly at the rectangle corners; place a marker in each corner st and keep them aligned as you build the walls.
Part 3 — The Walls (worked in joined rounds)
Rounds 2–50: Ch 1, sc in each st around, join with sl st to first sc. (152 sc each round)
Do NOT turn — keep RS facing throughout.
After Round 50, the walls measure: 49 rounds worked above Round 1 ≈ 50 rounds total × (4 in ÷ 20 rounds) = 10 in tall. ✓
Fasten off and weave in ends.
Part 4 — The Front Flap (worked flat)
The flap is worked off the back long edge of the bag opening. Identify one long side (54 sts) as the back.
With RS facing, join yarn to the first st of the back top edge.
Row 1 (RS): Ch 1, sc in each of 54 sts across the back edge. Turn. (54 sc)
Rows 2–28: Ch 1, sc in each st across. Turn. (54 sc each row)
28 rows ÷ 20 rows-per-4-in = 5.6 in; blocks to ~6 in flap depth. ✓
Flap Taper (Rows 29–34): Shape a gently rounded flap edge.
- Row 29: Ch 1, sc2tog, sc to last 2 sts, sc2tog. Turn. (52 sc)
- Row 30: Ch 1, sc2tog, sc to last 2 sts, sc2tog. Turn. (50 sc)
- Row 31: Ch 1, sc2tog, sc to last 2 sts, sc2tog. Turn. (48 sc)
- Row 32: Ch 1, sc2tog, sc to last 2 sts, sc2tog. Turn. (46 sc)
- Row 33: Ch 1, sc2tog, sc to last 2 sts, sc2tog. Turn. (44 sc)
- Row 34: Ch 1, sc2tog, sc to last 2 sts, sc2tog. Turn. (42 sc)
Validation: 54 − (2 × 6 rows) = 54 − 12 = 42 sc ✓
Fasten off. Weave in ends.
Flap Edging (optional): Join yarn at a bottom corner of the flap and work 1 round of sc evenly around all three flap edges, working 3 sc in each of the 2 lower corners for a clean finish. Fasten off.
Part 5 — Handles (make 2)
Each handle is a rolled, firm strap.
Ch 61.
Row 1: Sc in 2nd ch from hook and in each ch across. Turn. (60 sc)
61 − 1 = 60 sc ✓. 60 sts ÷ 4.5 = ~13.3 in long.
Rows 2–6: Ch 1, sc in each st across. Turn. (60 sc each row)
Fasten off, leaving a long tail (~24 in) for seaming.
Roll & Seam: Fold the strip lengthwise into thirds (or roll tightly) to form a firm rounded handle. Using the long tail and a tapestry needle, whipstitch the long edge closed along the entire length. For extra rigidity, insert a length of cording or rolled plastic canvas before seaming. Repeat for the second handle.
Finishing
1. Insert Structure (recommended)
Slip the cut plastic canvas base into the bottom of the bag. If desired, cut and insert plastic canvas panels for the four walls (two 12 × 10 in, two 5 × 10 in), tacking them lightly in place with a few whipstitches so they don't shift. This gives the true boxy Birkin-style rigidity.
2. Attach Handles
On the front wall, mark two points 3 in in from each side corner (centered, ~2 in below the top edge). Repeat on the back wall. Position handle ends at these marks.
Validation: front width 12 in, handles 3 in from each corner → handle span = 12 − (3 + 3) = 6 in between attachment points, symmetric ✓.
Securely whipstitch each handle end to the inside of the wall using doubled yarn, sewing through several stitches for strength. Reinforce with a square-stitch pattern for durability.
3. Install the Turn-Lock Closure
- Base (female) half: Center on the front wall, approximately 2 in below the top edge. Mark the screw/prong holes, pierce the fabric, insert prongs/screws, and secure the backing plate on the wrong side.
- Twist (male) half: Lay the flap down in its closed position and mark where it meets the base half. Install the twist half on the underside of the flap at that mark.
- Test the closure; adjust flap length by adding/removing edging rounds if alignment is off.
4. Optional Magnetic Snap
For a softer secondary closure, install a sew-in magnetic snap centered under the flap and on the front wall, ~1 in above the turn-lock.
5. Block & Shape
Lightly steam-block the assembled bag over a firm form or a box wrapped in a towel to set the square corners and crisp walls. Allow to dry fully before use.
6. Weave in all remaining ends.
Structural Tips (Advanced)
- Firmness first: If the walls flare, you likely need a smaller hook or plastic canvas inserts. Cotton yarn holds shape far better than wool for this project.
- Corner integrity: Keep the four base corners squared during blocking; pin them into 90° angles.
- Handle reinforcement: Rolled handles carry weight — always sew through a plastic canvas or leather patch behind the attachment points if you plan to carry heavy loads.
- Lining (optional): For a truly polished, boutique finish, cut a fabric lining to the bag's inner dimensions (12 × 5 in base, 10 in walls) plus ½ in seam allowance, sew into a box shape, and hand-stitch inside the top edge.
Enjoy your structured, made-by-hand statement bag!
Disclaimer: This pattern was generated by AI and should be reviewed for accuracy before use. While we strive for quality, AI-generated content may contain errors. Please verify measurements, stitch counts, and instructions before beginning your project. Generated by purlJam.uk
Access your pattern anytime
Bookmark this page to access your pattern anytime