Type
Crochet
Difficulty
beginner
Category
amigurumi
AI Thinking Process
Planning
Verification
Pattern
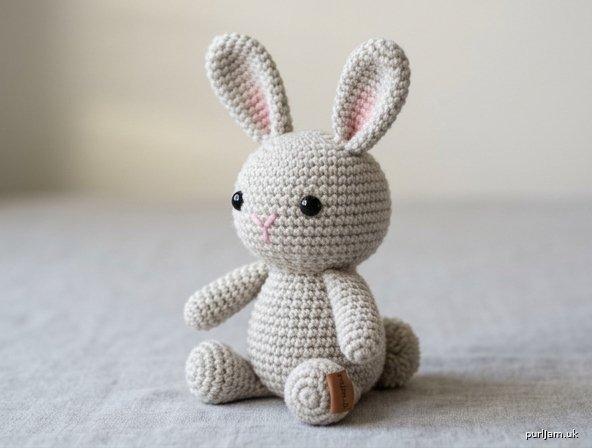
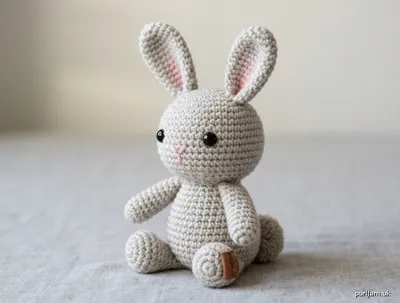
Tiny Cute Rabbit Amigurumi
Beginner Simple-Shapes Crochet Toy Pattern
A small, huggable rabbit worked entirely from basic amigurumi shapes (sphere head, rounded body, flat oval ears, short limb tubes, tiny tail sphere). Finished size is approximately 4½ inches (11.5 cm) tall when seated—perfect for a first stuffed animal.
Skill Level: Beginner
Techniques: Magic ring, single crochet, increase, invisible decrease, sewing pieces together
Materials
- Worsted weight (4) yarn:
- Main color (MC): approx 50 yd (46 m) – soft gray, cream, light brown, or pastel
- Contrast (CC): small amount for inner ear and nose (pink or white)
- US E-4 / 3.5 mm or US F-5 / 3.75 mm crochet hook (go down 1–2 sizes from yarn label for tight fabric)
- Polyester fiberfill stuffing
- 6 mm or 8 mm safety eyes (or black embroidery floss)
- Yarn needle
- Stitch marker
- Scissors
- Optional: pink embroidery floss for nose/mouth, small pom-pom maker or fork for tail alternative
Gauge
5 sc × 5 rnds = 1 inch (2.5 cm) worked tightly in continuous rounds.
Exact gauge is less critical than firm fabric; stuffing should not show through stitches.
Finished rabbit: approx 4½" (11.5 cm) tall seated, 3" (7.5 cm) wide.
Abbreviations (US Terms)
- ch: chain
- sc: single crochet
- inc: 2 sc in same stitch (increase)
- dec: invisible decrease (insert hook in front loops of next 2 sts, yarn over, pull through both, yarn over, pull through 2 loops)
- st(s): stitch(es)
- rnd(s): round(s)
- MR: magic ring
- FO: fasten off
- [ ]: total stitch count at end of round
- (…): repeat instructions in parentheses the stated number of times
Work in continuous spiral rounds unless noted. Do not join or turn. Place stitch marker in first stitch of each round and move it up as you go.
Pattern Instructions
Head (sphere – make 1 in MC)
Rnd 1: 6 sc in MR. [6]
Rnd 2: inc in each st around. [12] (6 increases → 6 + 6 = 12 ✓)
Rnd 3: (sc, inc) around. [18] (6 increases → 12 + 6 = 18 ✓)
Rnd 4: (2 sc, inc) around. [24] (6 increases → 18 + 6 = 24 ✓)
Rnds 5–9: sc in each st around. [24] (5 plain rounds)
Insert safety eyes between Rnds 6 and 7, spaced about 5 sts apart. (If embroidering eyes, wait until after stuffing.)
Rnd 10: (2 sc, dec) around. [18] (6 decreases → 24 – 6 = 18 ✓)
Rnd 11: (sc, dec) around. [12] (6 decreases → 18 – 6 = 12 ✓)
Stuff head firmly, shaping into a smooth ball.
Rnd 12: dec around. [6] (6 decreases → 12 – 6 = 6 ✓)
FO, leaving 8" (20 cm) tail. Thread tail through front loops of remaining 6 sts and pull tight to close. Weave in end.
Body (rounded oval-sphere – make 1 in MC)
Rnd 1: 6 sc in MR. [6]
Rnd 2: inc in each st around. [12]
Rnd 3: (sc, inc) around. [18]
Rnd 4: (2 sc, inc) around. [24]
Rnd 5: (3 sc, inc) around. [30] (6 increases → 24 + 6 = 30 ✓)
Rnds 6–11: sc in each st around. [30] (6 plain rounds for height)
Rnd 12: (3 sc, dec) around. [24] (6 decreases → 30 – 6 = 24 ✓)
Rnd 13: (2 sc, dec) around. [18]
Stuff body firmly, more stuffing toward the bottom for a stable seated shape.
Rnd 14: (sc, dec) around. [12]
Rnd 15: dec around. [6]
FO, leaving long tail for sewing. Close hole as for head. Do not weave in—use tail to attach head later.
Ears (flat oval – make 2 in MC)
Rnd 1: 6 sc in MR. [6]
Rnd 2: (sc, inc) around. [9]
Rnd 3: (2 sc, inc) around. [12]
Rnds 4–10: sc in each st around. [12] (7 plain rounds – long cute ears)
Rnd 11: (2 sc, dec) around. [9]
Rnd 12: (sc, dec) around. [6]
Do not stuff. Flatten ear. FO, leaving 8" (20 cm) tail for sewing.
Optional inner ear (make 2 in CC):
Ch 6. Sc in 2nd ch from hook and next 3 ch, 3 sc in last ch; working other side of chain, sc in next 3 ch, 2 sc in last ch. [12]
FO, leave tail, sew centered on front of each MC ear.
Arms (short cylinder – make 2 in MC)
Rnd 1: 6 sc in MR. [6]
Rnd 2: (sc, inc) around. [9]
Rnds 3–6: sc in each st around. [9]
Lightly stuff tip only.
Flatten opening and sc across through both layers (4–5 sc) to close. FO, leaving tail for sewing.
Legs (short cylinder – make 2 in MC)
Rnd 1: 6 sc in MR. [6]
Rnd 2: inc in each st around. [12]
Rnds 3–5: sc in each st around. [12]
Stuff firmly.
Rnd 6: (sc, dec) around. [8]
Flatten and sc across through both layers to close. FO, leaving tail for sewing.
Tail (tiny sphere – make 1 in MC or fluffy CC)
Rnd 1: 6 sc in MR. [6]
Rnd 2: inc in each st around. [12]
Rnd 3: sc in each st around. [12]
Rnd 4: dec around. [6]
Stuff lightly. FO, close hole, leave tail for sewing.
(Alternative: make a 1" yarn pom-pom and sew on.)
Assembly
- Head to body: Pin head centered on top of body (closed ends together). Sew securely all around with body yarn tail, adding a tiny bit more stuffing in the neck join if needed for a smooth transition.
- Ears: Pin ears to top of head, slightly angled outward and backward, about 2–3 sts apart. Sew along the flattened base. They should stand up.
- Arms: Pin arms to sides of body just below the head join, angled slightly forward. Sew securely.
- Legs: Pin legs to bottom front of body so rabbit sits stably. Sew firmly; legs should splay a little for balance.
- Tail: Sew tail to lower back center.
- Face:
- If using safety eyes, they are already placed.
- Embroider a small triangular or “Y” nose with pink yarn/floss between and just below the eyes (over Rnds 7–8).
- Add a tiny straight or smiling mouth stitch below nose.
- Optional: two small freckle dots or eyebrow stitches.
Weave in every remaining end securely inside the toy.
Finishing & Care
- Roll the finished rabbit gently between your hands to even out stuffing and round the shapes.
- Spot clean only; do not machine wash.
- For extra cuteness: blush cheeks lightly with pink crayon or makeup (adult supervision) or add a tiny bow.
Size Notes
- This version uses max 30 sts → handheld ~4½" (11.5 cm).
- Want even smaller (keychain ~3"): stop head/body increases at 18 sts and shorten plain rounds by 2.
- Larger: add one more increase round (to 36) and 2 extra plain rounds on body; switch to bulky yarn + larger hook.
Tips for Success
- Work tightly—amigurumi fabric must be dense.
- Count every round; use the marker.
- Stuff as you go; it is hard to fill later.
- Pin first, sew second—symmetry makes it cute.
- Invisible decreases keep the surface smooth.
Enjoy your tiny cute rabbit! Once you finish one, try color variations (white with pink ears, speckled yarn, etc.). Happy crocheting!
Disclaimer: This pattern was generated by AI and should be reviewed for accuracy before use. While we strive for quality, AI-generated content may contain errors. Please verify measurements, stitch counts, charts, and instructions before beginning your project. Generated by purlJam.uk
Love this pattern?
Save this pattern to your free PurlJam libraryAccess your pattern anytime
Bookmark this page to access your pattern anytime