Type
Crochet
Difficulty
beginner
Category
amigurumi
AI Thinking Process
Planning
Verification
Pattern
Tiny Dragon Keychain
Skill level: Beginner
Construction: Simple amigurumi shapes, sewn assembly
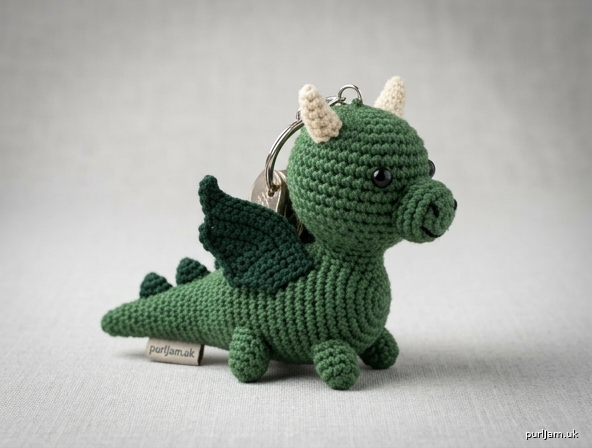
A pocket-size dragon with a round head, stubby horns, little wings, four nubby legs, and a tapered tail. Pieces use only basic stitches and standard sphere / cylinder / cone / flat-wing shapes. Clip it to keys, a zipper, or a bag.
Finished Size
About 2.75 inches (7 cm) long from snout to tail tip and 1.25 inches (3.2 cm) tall including horns, using worsted yarn and the stated gauge. Size will change if you use a different hook or yarn.
Materials
- Worsted weight (4) yarn
- Color A (body, head, legs, snout): forest green — 25 yards (23 m)
- Color B (wings, spikes): dark green or a contrast color — 10 yards (9 m)
- Color C (horns): cream, gold, or white — 5 yards (4.5 m)
- Color D (optional belly): pale yellow or cream — 5 yards (4.5 m)
- Black (and optional white or pink) leftover yarn or embroidery floss for the face
- Crochet hook US E-4 (3.5 mm) — one to two sizes smaller than the yarn label, for a tight fabric with no stuffing gaps
- Polyester fiberfill stuffing
- Yarn needle
- Stitch marker
- Scissors
- 6 mm safety eyes (2), or embroider the eyes
- Keychain finding (split ring, or a small chain with a lobster clasp and jump ring)
- Optional: sewing pins for assembly; pliers for opening the jump ring
Yardage note: One dragon uses well under a standard skein of each color. Colors are suggestions — any dragon palette works.
Gauge
6 sc and 7 rnds = 1 inch (2.5 cm) in single crochet worked tightly in the round.
Gauge is important for a firm keychain that does not show stuffing. If your swatch is larger than 1 inch (2.5 cm), go down a hook size. A small difference in gauge changes the finished size but will not break the stitch counts.
Abbreviations (US)
| Abbrev. | Meaning |
|---|---|
| ch | chain |
| sc | single crochet |
| hdc | half double crochet |
| dc | double crochet |
| inc | increase — 2 sc in the same stitch |
| dec | decrease — single crochet 2 together (invisible decrease preferred) |
| sl st | slip stitch |
| st(s) | stitch(es) |
| rnd(s) | round(s) |
| MR | magic ring (magic circle) |
| FO | fasten off |
| [ ] | stitch count at the end of the round or row |
| ( ) × N | repeat the instructions in parentheses N times |
Special Stitches
Invisible decrease (recommended): Insert the hook under the front loop only of the next stitch, then under the front loop only of the following stitch (2 loops on hook plus the original loop = 3 loops). Yarn over and pull through the 2 front loops. Yarn over and pull through the remaining 2 loops. This sits flatter than a regular sc2tog.
Regular sc2tog (if you prefer): Insert hook in next st, yarn over, pull up a loop; insert hook in following st, yarn over, pull up a loop; yarn over, pull through all 3 loops on the hook.
Pattern Notes
- Work all rounds in a continuous spiral unless the piece says otherwise. Do not join at the end of a round and do not turn. Place a stitch marker in the first stitch of every round and move it up as you go.
- Work tightly. Loose stitches let stuffing show and make a floppy keychain.
- Stuff as you go. It is very hard to stuff the tail after it has tapered.
- Stitch counts are written in [brackets] at the end of each round. Use them.
- If you do not like a magic ring, ch 2 and work all of Rnd 1 into the 2nd ch from the hook, then pull the starting tail to close the hole.
- Safety eyes and metal findings are a choking hazard. Do not give this keychain to children under 3 years. Embroider the eyes if the keychain might be handled by a toddler.
- US terms throughout (sc, hdc, dc). Measurements are inches first, with metric in parentheses.
Head
Color A. Worked as a small sphere.
Rnd 1: 6 sc in MR. [6]
Rnd 2: inc in each st around. [12] (6 increases → 6 + 6 = 12 ✓)
Rnds 3–4: sc in each st around. [12] (2 rounds even)
Eye placement: Insert 6 mm safety eyes between Rnds 3 and 4, about 3 stitches apart, centered on the face. If you are embroidering the eyes, skip this and add them during finishing.
Rnd 5: (sc, dec) around. [8] (4 repeats; 4 sc + 4 dec → 12 − 4 = 8 ✓)
Stuff the head firmly.
Rnd 6: dec around. [4] (4 decreases → 8 − 4 = 4 ✓)
FO, leaving a 8 inch (20 cm) tail. Thread the tail through the remaining 4 stitches, pull closed, and weave in the closing tail. Keep a separate long tail of Color A for sewing the head to the body, or use the snout-sewing tail later.
Snout
Color A. A tiny cylinder sewn onto the face.
Rnd 1: 6 sc in MR. [6]
Rnd 2: sc in each st around. [6]
FO, leaving a 8 inch (20 cm) tail for sewing. Push the starting tail inside for stuffing. Do not close the last round — the open edge is sewn to the head.
Body and Tail (one piece)
Color A. A short cylinder that tapers into a cone. The magic-ring end is the chest / neck. The closed tip is the tail.
Rnd 1: 6 sc in MR. [6]
Rnd 2: inc in each st around. [12] (6 increases → 6 + 6 = 12 ✓)
Rnds 3–6: sc in each st around. [12] (4 rounds even — this is the body)
Begin stuffing the body firmly. Keep stuffing as you decrease.
Rnd 7: (sc, dec) around. [8] (4 repeats; 4 sc + 4 dec → 12 − 4 = 8 ✓)
Rnds 8–10: sc in each st around. [8] (3 rounds even — upper tail)
Rnd 11: (2 sc, dec) around. [6] (2 repeats; each repeat uses 4 sts and makes 3 sts → 8 − 2 = 6 ✓)
Rnds 12–13: sc in each st around. [6] (2 rounds even — mid tail)
Stuff the tail lightly so it stays tapered, not ballooned.
Rnd 14: (sc, dec) around. [4] (2 repeats; each repeat uses 3 sts and makes 2 sts → 6 − 2 = 4 ✓)
FO, leaving a 6 inch (15 cm) tail. Weave through the remaining 4 stitches, pull the tail tip closed, and hide the end inside the tail.
The piece should measure about 2 inches (5 cm) from chest to tail tip.
Horns (make 2)
Color C. Tiny cylinders.
Rnd 1: 4 sc in MR. [4]
Rnd 2: sc in each st around. [4]
FO, leaving a 6 inch (15 cm) tail for sewing. The starting tail is enough “stuffing.” Do not close the open edge — sew that edge to the head.
Legs (make 4)
Color A. Same tiny cylinder as the horns.
Rnd 1: 4 sc in MR. [4]
Rnd 2: sc in each st around. [4]
FO, leaving a 6 inch (15 cm) tail for sewing. Starting tail acts as stuffing. Leave the last round open for sewing.
Wings (make 2)
Color B. Worked flat in rows. Each wing is one shaping row.
Row 1: Ch 7. Sc in the 2nd ch from the hook, hdc in the next ch, dc in each of the next 2 ch, hdc in the next ch, sc in the last ch. [6] (ch 7 gives 6 working stitches: sc + hdc + dc + dc + hdc + sc = 6 ✓)
FO, leaving a 10 inch (25 cm) tail for sewing. The starting-chain edge is the straight edge that sews to the body; the dc stitches sit at the outer curve of the wing.
Spikes (make 3)
Color B. Tiny flat triangles for the spine.
Row 1: Ch 4. Sl st in the 2nd ch from the hook, sc in the next ch, hdc in the last ch. [3] (sl st + sc + hdc along ch 4 = 3 sts ✓)
FO, leaving a 6 inch (15 cm) tail for sewing.
Optional Belly Patch
Color D. Skip this piece if you want a faster project.
Row 1: Ch 4. Sc in the 2nd ch from the hook and in each ch across. [3]
Rows 2–4: Ch 1, turn. Sc in each st across. [3] (3 rows even)
Row 5: Ch 1, turn. Sc2tog, sc in last st. [2] (3 − 1 = 2 ✓)
FO, leaving an 8 inch (20 cm) tail for sewing.
Assembly
Use the yarn tails and a yarn needle. Pin every piece first, then sew. A whip stitch or mattress stitch both work; take small stitches so the seams stay tidy on a keychain.
1. Face. Sew the open edge of the snout to the front of the head, centered, covering the lower part of Rnds 4–6 and sitting just below the eyes. The snout should project forward a little.
2. Horns. Sew the open edge of each horn to the top of the head, slightly toward the back, about 2 stitches apart. Angle them so they tilt outward and a little back.
3. Head to body. The magic-ring end of the body is the chest. Sew the head onto the front and slightly on top of Rnds 1–3 of the body, so the dragon looks up a bit. The head should overlap the chest rather than sit on the tip like a lollipop. Sew around twice for a strong join — this is a keychain and will be tugged.
4. Legs. Sew all four legs to the underside of the body, open edge against the body:
- Two front legs on Rnds 3–4, one on each side of the belly.
- Two back legs on Rnds 6–7, just before the tail taper.
They are short nubs; they do not need to be even enough to stand unaided.
5. Wings. Sew the straight (starting-chain) edge of each wing to the side of the body, starting just behind the head and running along Rnds 3–6. The curved dc edge points up and back. Mirror the second wing on the other side.
6. Spikes. Sew the three spikes in a line along the center of the back, from the base of the head down toward the tail, about 2–3 stitches apart. Sew the chain edge down so the hdc point stands up.
7. Optional belly. Center the belly patch on the underside between the legs and sew around the edge.
8. Face details (Color black, yarn needle).
- If you did not use safety eyes, embroider two small satin-stitch ovals or French knots between Rnds 3 and 4, 3 stitches apart.
- Optional: a tiny white yarn stitch on the outer corner of each eye for a highlight.
- On the snout, two small vertical stitches for nostrils.
- A short curved stitch under the snout for a mouth.
- Optional: a tiny pink stitch on each cheek for blush.
Weave in every remaining end, burying them inside the stuffed pieces.
Finishing — Keychain Finding
Choose one attachment point:
- Head-up hang (recommended): Open the jump ring with pliers and run it through a firm stitch (or two) at the top of the head, between the horns. Close the ring fully. Add the split ring or clasp.
- No metal finding: With Color A, join with a sl st at the same spot, ch 12, sl st back into the same stitch to form a loop. FO and weave in. Clip a split ring through the loop.
Tug the finding gently to confirm the join is solid. If a stitch stretches, sew a second reinforcing stitch over it before clipping on keys.
Size Tweaks
- A little larger: Work the head through Rnd 3 as (sc, inc) around [18] (6 repeats → 12 + 6 = 18 ✓), add one even round, then decrease with (sc, dec) around [12] and finish as written. Add 2 even rounds to the body (extra Rnds after Rnd 6).
- A little smaller: Use DK (3) yarn and a US D-3 (3.25 mm) hook with the same counts.
- Do not go above 18 stitches if you want this to stay keychain size.
Care
Spot clean with a damp cloth. Do not machine wash if you used safety eyes or a metal finding. Reshape and air dry.
You’re done. You should have a tiny dragon about 2.75 inches (7 cm) long, firm enough to handle as a keychain, with a round head, two horns, two wings, four legs, three back spikes, and a tapered tail.
Disclaimer: This pattern was generated by AI and should be reviewed for accuracy before use. While we strive for quality, AI-generated content may contain errors. Please verify measurements, stitch counts, charts, and instructions before beginning your project. Generated by purlJam.uk
Love this pattern?
Save this pattern to your free PurlJam libraryAccess your pattern anytime
Bookmark this page to access your pattern anytime