Type
Crochet
Difficulty
intermediate
Category
custom
AI Thinking Process
Planning
Verification
Pattern
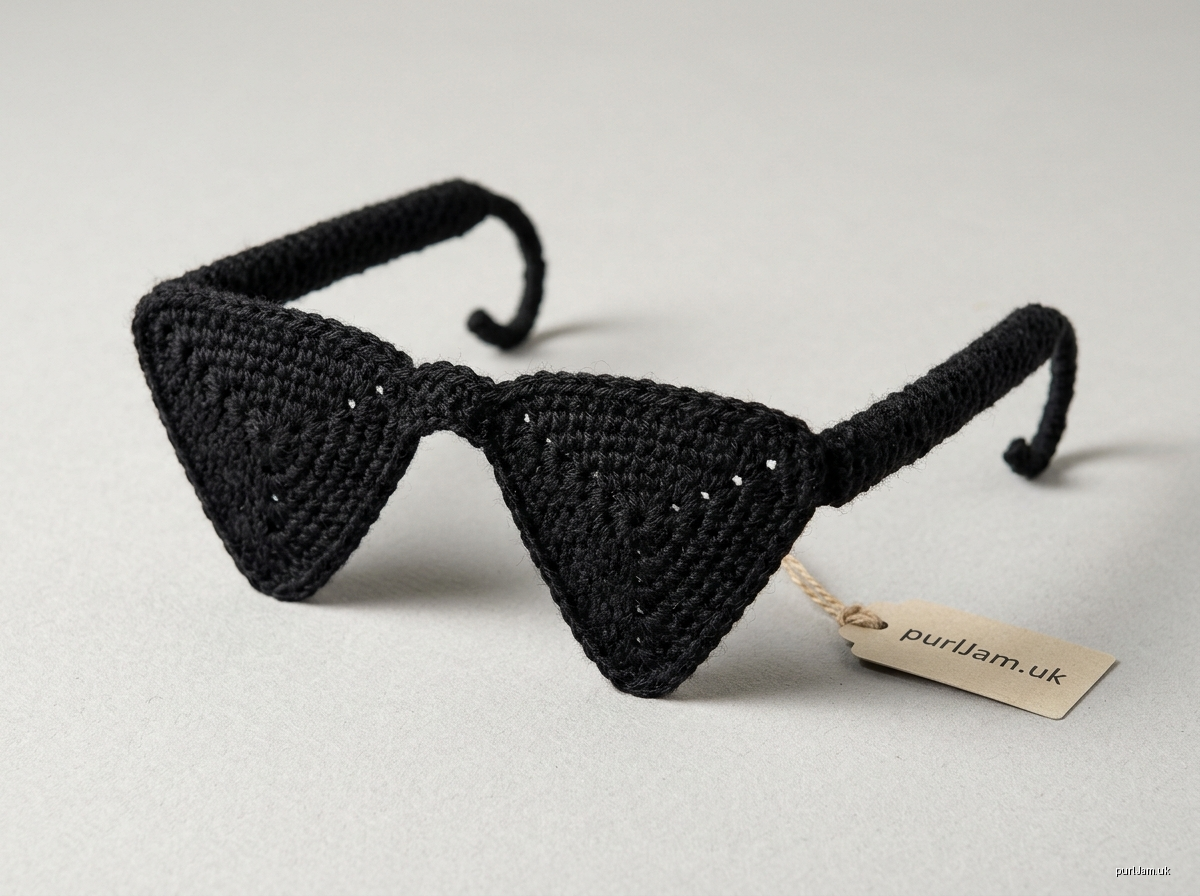
Triangle Shades – Crocheted Black Triangular Sunglasses
These bold triangular "sunglasses" are crocheted in black worsted yarn and shaped with chenille-stem temple arms. They are perfect for costumes, photo props, doll or plush accessories, or retro party wear. The lenses are solid crochet, stiffened for shape.
Important: These are a novelty/costume accessory. Crocheted lenses are opaque, are not designed for vision, and offer no UV protection. Do not wear them while walking, driving, or doing any activity that requires sight.
Skill Level
Intermediate
Finished Size
Fits an average teen/adult head as a costume piece.
- Each lens: approx. 2.75" (7 cm) per side (equilateral triangle)
- Bridge: 1" (2.5 cm) wide
- Total front width: approx. 6.5" (16.5 cm)
- Temple arms: approx. 5.5" (14 cm) each
Materials
- Worsted weight (#4) yarn in Black, approx. 40 yd (37 m). Acrylic or cotton both work; cotton stiffens more crisply.
- Optional: about 5 yd (4.5 m) of black metallic or glossy worsted for the frame round, for a "shiny frame" look.
- US G-6 (4 mm) crochet hook. This is a size smaller than usual for worsted, to give a dense fabric.
- 2 black chenille stems (pipe cleaners), 12" (30 cm) each
- 1 additional chenille stem for the bridge (optional)
- Fabric stiffener, or a 1:1 mix of white glue and water
- Tapestry needle, scissors, stitch marker
- Plastic wrap and pins for blocking
Gauge
16 sc and 18 rows = 4" (10 cm) on the G-6 (4 mm) hook.
Lens gauge check: After Rnd 2 the triangle should measure about 1.75" (4.5 cm) per side. If it is larger, go down a hook size. If it is smaller, go up a hook size.
Abbreviations (US terms)
- ch – chain
- ch-sp – chain space
- dc – double crochet
- sc – single crochet
- sl st – slip stitch
- st(s) – stitch(es)
- Rnd – round
- FO – fasten off
- [ ] – repeat instructions in brackets as directed
Pattern Notes
- Lenses are worked in joined rounds from the center out, with the right side facing. Do not turn.
- The beginning ch-3 counts as 1 dc throughout. Join with a sl st to the top of the beginning ch-3.
- Work in both loops unless stated otherwise.
- Corners are made in each ch-2 space. Each dc round adds 2 sts to every side, one on each side of the corner.
- To start each round at a corner, sl st into the next ch-2 space after joining.
- Stitch counts in parentheses exclude ch-2 corner spaces.
Instructions
Lenses (make 2)
With Black, ch 4 and sl st to the first ch to form a ring.
Rnd 1: Ch 3 (counts as dc), 3 dc in ring, ch 2. [4 dc in ring, ch 2] twice. Join with sl st to top of ch-3. (12 dc: 4 per side, 3 ch-2 corners. Check: 3 × 4 = 12 ✓)
Rnd 2: Sl st in next 3 dc and into the ch-2 sp.
- Ch 3, (1 dc, ch 2, 2 dc) in the same corner sp.
- Dc in each of the next 4 dc.
- [(2 dc, ch 2, 2 dc) in next ch-2 sp, dc in next 4 dc] twice.
- Join with sl st to top of ch-3.
(18 dc: 2 + 4 + 2 = 8 dc between corner chains? No. Per side between corners: 2 + 4 + 2 = 8 is wrong framing. Count sides as corner-to-corner: each side holds 2 dc from one corner + 4 + 2 from the next... see note.)
Use this simple count: Rnd 2 adds 6 sts total (2 per corner × 3 corners). 12 + 6 = 18 dc ✓ (6 per side).
Rnd 3: Sl st in next dc and into the ch-2 sp.
- Ch 3, (1 dc, ch 2, 2 dc) in the same sp.
- Dc in each dc to next corner sp.
- [(2 dc, ch 2, 2 dc) in corner sp, dc in each dc to next corner] twice.
- Join.
(24 dc, 8 per side. Check: 18 + 6 = 24 ✓)
Rnd 4: Repeat Rnd 3. (30 dc, 10 per side. Check: 24 + 6 = 30 ✓)
Lens should now measure about 2.5" per side.
Rnd 5 (Frame round): Change to metallic yarn if desired, or continue in Black.
- Sl st into the next ch-2 corner sp.
- Ch 1 (does not count as a st), 3 sc in the same corner sp.
- Sc in each st to the next corner sp.
- [3 sc in corner sp, sc in each st to next corner] twice.
- Join with sl st to first sc.
Each side now has 10 sc along the edge plus the 3 corner sc, so each corner has 1 center sc and each side 12 sc counted between corner centers. (39 sc. Check: 30 + 9 = 39 ✓)
FO, leaving a 12" tail on the first lens only (for the bridge). Weave in all other ends.
Bridge
Ch 5.
Row 1: Sc in 2nd ch from hook and in each remaining ch. Turn. (4 sc)
Rows 2–4: Ch 1 (does not count as a st), sc in each sc across. Turn. (4 sc)
FO, leaving an 8" tail.
Optional: Before seaming, roll the bridge lengthwise around a 2" piece of chenille stem and whipstitch the long edges closed, so the nose curve holds its shape.
Temple Arms (make 2)
Fold one chenille stem in half and twist it together, making a sturdy 6" stem.
Ch 4 and join into a ring.
Rnd 1: Ch 1, 6 sc in ring. Do not join; work in continuous rounds and place a marker. (6 sc)
Rnd 2: Insert the stem into the tube. Sc in each sc around, working snugly over the stem. (6 sc)
Rnds 3–24: Sc in each sc around. (6 sc each rnd) The arm should measure about 5.5". Leave 0.5" of stem exposed at the open end for attaching.
FO, leaving a 10" tail.
At the closed end, bend the last 1.5" downward to form the ear hook.
Finishing
1. Position lenses. Lay both lenses point-down (one corner pointing toward the cheek, the flat edge across the top, like an inverted triangle). Place them with the inner top corners 1" apart.
2. Attach bridge. Using the tails, whipstitch the short ends of the bridge to the upper inner corners of each lens. Arch the bridge slightly upward.
3. Attach temples.
- Push the exposed stem end of each arm through the outer top corner sc of each lens.
- Bend the stem back on itself to secure it.
- Whipstitch the arm firmly in place with the tail.
- Angle both arms backward, mirroring each other.
4. Stiffen.
- Saturate the lenses and bridge with stiffener (avoid the arms if they already hold well).
- Pin flat onto plastic-wrapped foam, pulling the corners into sharp points.
- Dry for 24 hours.
- For a slight wrap curve, dry the front over a ball or bowl about 6–7" in diameter.
5. Final shaping. Weave in any remaining ends. Bend the arms and ear hooks to fit.
Tips
- Sharp corners: Pull the ch-2 snug and tug each corner while blocking.
- Matching lenses: Count 30 dc after Rnd 4 on both lenses before working the frame round.
- Dark yarn visibility: Black stitches are hard to see. Work under a bright light and use a contrasting stitch marker.
- Shiny "lens" effect: After stiffening, brush the lenses with a thin coat of gloss Mod Podge.
- Kids' size: Omit Rnd 4. Rnd 5 then becomes 24 + 9 = 33 sc, with sides about 2.25". Work 18 rounds on the arms.
Disclaimer: This pattern was generated by AI and should be reviewed for accuracy before use. While we strive for quality, AI-generated content may contain errors. Please verify measurements, stitch counts, charts, and instructions before beginning your project. Generated by purlJam.uk
Love this pattern?
Save this pattern to your free PurlJam libraryAccess your pattern anytime
Bookmark this page to access your pattern anytime