Type
Crochet
Difficulty
intermediate
Category
amigurumi
AI Thinking Process
Planning
Verification
Pattern
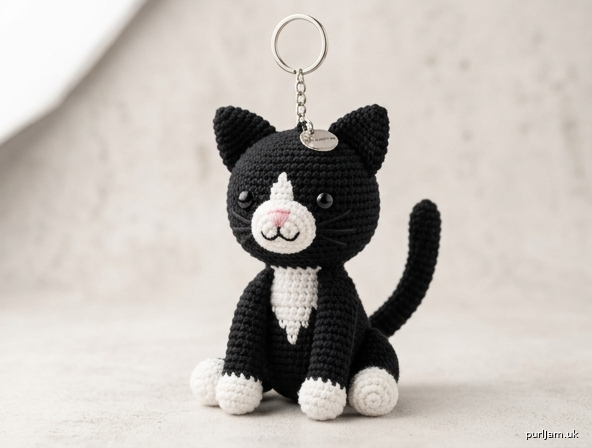
Black & White Kitten Amigurumi Keychain
Advanced Crochet Pattern (US Terms)
A compact sitting tuxedo kitten worked in continuous spirals of single crochet. Approx. finished size: 3.5–4 in (9–10 cm) tall seated, ideal for a keychain or bag charm.
Materials
- Worsted weight (4) yarn:
- Color A (Black): ~40 yd (37 m)
- Color B (White): ~15 yd (14 m)
- Color C (Pink): small scrap for nose
- Hook: US E-4 (3.5 mm) — or size needed for tight gauge (no stuffing show-through)
- 6 mm safety eyes (pair)
- Polyester fiberfill
- Yarn needle, stitch marker, scissors
- Optional: keychain ring + jump ring, black embroidery floss for mouth/whiskers (or use yarn tails)
Gauge
5 sc × 5 rnds = 1 in (2.5 cm) in continuous sc spiral (tight amigurumi gauge).
Adjust hook if needed; exact gauge is less critical than dense fabric.
Abbreviations (US)
- mr: magic ring
- sc: single crochet
- inc: 2 sc in same st
- dec: invisible decrease (FLO of next 2 sts together)
- st(s): stitch(es)
- rnd(s): round(s)
- ch: chain
- sl st: slip stitch
- BLO: back loop only
- FLO: front loop only
- [ ]: total stitches at end of rnd
- (… ) × n: repeat instructions in parentheses n times
- FO: fasten off
Work in continuous spirals unless noted. Do not join rnds. Mark first st of each rnd and move marker up. Stuff firmly as directed, especially head and body.
HEAD (Color A – Black)
Stuff firmly as you go; keep shape rounded and slightly chubby.
Rnd 1: 6 sc in mr [6]
Rnd 2: inc in each st around [12]
Rnd 3: (sc, inc) around [18]
Rnd 4: (2 sc, inc) around [24]
Rnd 5: (3 sc, inc) around [30]
Rnds 6–11: sc in each st around [30] (6 rnds even)
— Insert 6 mm safety eyes between Rnds 8 and 9, approximately 6 sts apart, centered on front.
— Embroider or attach facial features now (see Face Details below) before decreasing.
Rnd 12: (3 sc, dec) around [24]
Rnd 13: (2 sc, dec) around [18]
Rnd 14: (sc, dec) around [12]
Stuff head firmly, shaping cheeks.
Rnd 15: dec around [6]
FO, leaving 8 in (20 cm) tail. Thread tail through FLO of remaining 6 sts and pull closed. Weave in end.
Face Details (add before Rnd 12 close):
- White muzzle: With B, embroider or crochet a small oval (see Muzzle option below) centered below eyes, covering roughly Rnds 9–11, about 8–10 sts wide.
- Pink nose: With C, embroider a small inverted triangle or “Y” shape at top center of muzzle.
- Mouth: With A or black floss, straight stitch a small vertical line down from nose, then a shallow curve or “w” for smile.
- Whiskers: With A or black floss, 2–3 straight stitches on each side of muzzle, angling slightly upward/outward.
Optional crocheted muzzle (instead of embroidery):
With B: Rnd 1: 6 sc in mr [6]; Rnd 2: (sc, inc) around [9]; Rnd 3: sc around [9]. FO, leave long tail, lightly stuff, sew to lower front of head (Rnds 9–11), then add pink nose and mouth/whiskers on top.
EARS (make 2, worked directly onto head – Color A)
Locate top of head (opposite face). Each ear spans ~5 sts at base.
Join A with sl st at desired base position (leave ~4–5 sts between ears at crown center).
Row 1: sc in next 5 sts of head, ch 1, turn [5]
Row 2: sc, inc, sc, inc, sc, ch 1, turn [7]
Row 3: sc across, ch 1, turn [7]
Row 4: sc, dec, sc, dec, sc, ch 1, turn [5]
Row 5: dec, sc, dec, ch 1, turn [3]
Row 6: sc3tog [1]
FO. Weave ends inside head.
Repeat for second ear, mirroring placement.
Shape: gently curve each ear slightly outward and pinch base so they stand upright with rounded points (characteristic kitten look). If needed, add a tiny invisible stitch at base front to hold curve.
BODY (Color A with Color B chest – bottom-up)
Begin at bottom. White chest is worked on the front sts only; keep sides/back solid A. Carry unused color loosely inside or cut and rejoin cleanly at each change (advanced colorwork).
With A:
Rnd 1: 6 sc in mr [6]
Rnd 2: inc around [12]
Rnd 3: (sc, inc) around [18]
Rnd 4: (2 sc, inc) around [24]
Rnd 5: (3 sc, inc) around [30]
Rnd 6: (4 sc, inc) around [36]
Rnd 7: sc around in A [36]
Begin white chest blaze (front 10 sts become the white panel; remaining 26 sts stay A). Mark the center front.
Rnd 8: sc in next 13 A, sc in next 10 B, sc in next 13 A [36]
Rnd 9: sc in next 14 A, sc in next 8 B, sc in next 14 A [36]
Rnd 10: sc in next 15 A, sc in next 6 B, sc in next 15 A [36]
Rnd 11: sc in next 16 A, sc in next 4 B, sc in next 16 A [36]
Rnd 12: sc around in A only [36] (white blaze now pointed/narrow at top)
Rnds 13–14: sc around in A [36]
Rnd 15: (4 sc, dec) around [30]
Rnd 16: (3 sc, dec) around [24]
Stuff body firmly, keeping rounded keychain proportions.
Rnd 17: (2 sc, dec) around [18]
Rnd 18: (sc, dec) around [12]
FO, leaving long tail for sewing to head. Stuff to top. Do not close completely yet.
LEGS (make 4 – Color A with Color B paws)
Keep short and compact. Lightly stuff.
With B (paw):
Rnd 1: 6 sc in mr [6]
Rnd 2: (sc, inc) around [9]
Rnd 3: sc around [9]
Switch to A (leg):
Rnds 4–6: sc around [9] (3 rnds)
FO, leaving long tail for sewing. Lightly stuff (firmer at paw, softer at top).
Make 4 identical.
TAIL (Color A)
Long, narrow, lightly stuffed, curved.
Rnd 1: 6 sc in mr [6]
Rnds 2–14: sc around [6] (13 rnds even — adjust length ±2 rnds if desired)
Lightly stuff as you go, leaving tip softly filled.
FO, leaving long tail. Curve gently upward while stuffing so it will rest raised beside the body.
ASSEMBLY
- Head to body: Pin head onto open top of body, slightly tilted forward for cute look. Add extra stuffing at neck join if needed. Whip-stitch all around with A tail; weave ends inside.
- Legs (sitting pose):
- Front legs: sew close together under front of body (chest side), angled slightly forward.
- Back legs: sew farther apart under rear, angled outward/back so cat sits stably.
Use matching A tails; secure firmly (keychain stress).
- Tail: Attach base to lower side/back of body (slightly off-center). Shape into a gentle upward curve resting beside hip; tack mid-tail with 1–2 invisible sts if needed to hold pose.
- Ears: Already on head; final shape check — upright, slightly flared outward.
- Keychain (optional): Thread jump ring through a st at crown center (between ears) or sew a small yarn loop, then attach key ring. Reinforce the st.
- Weave in all ends securely. Steam-block very lightly if needed (do not flatten stuffing).
Finishing Notes
- Color changes: always change color in the last yarn-over of the previous st so the new color sits cleanly on the next st. Keep floats inside and snug.
- Safety: For children under 3, embroider eyes instead of safety eyes and ensure every piece is sewn extremely firmly.
- Proportions: Head is intentionally a bit large/chubby relative to the short body for keychain cuteness.
- Customization: For a slightly larger cat, work one extra even rnd on head (after Rnd 11) and body (after Rnd 14) and use 8 mm eyes.
Enjoy your tuxedo kitten keychain!
Disclaimer: This pattern was generated by AI and should be reviewed for accuracy before use. While we strive for quality, AI-generated content may contain errors. Please verify measurements, stitch counts, charts, and instructions before beginning your project. Generated by purlJam.uk
Love this pattern?
Save this pattern to your free PurlJam libraryAccess your pattern anytime
Bookmark this page to access your pattern anytime