Type
Knitting
Difficulty
intermediate
Category
amigurumi
AI Thinking Process
Planning
Verification
Pattern
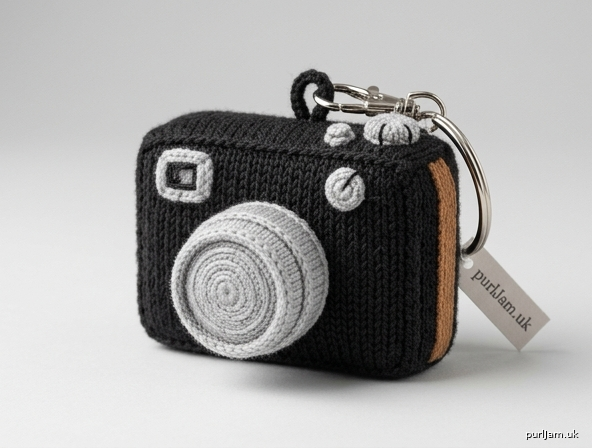
Vintage Mini Camera Keychain A detailed knitted amigurumi-style vintage rangefinder camera, perfect as a classic analog charm for keys or bags. Intermediate level.
Finished Size Approx 2.5" (6.5 cm) wide × 2" (5 cm) tall × 1.5" (4 cm) deep including lens.
Yarn Worsted weight yarn (approx 50 yd / 46 m total):
- MC (Main Color): Black or dark charcoal, 30 yd (28 m)
- CC1 (Accent): Light gray or silver, 15 yd (14 m)
- CC2 (Detail): Medium brown or tan (optional leatherette accent), 5 yd (5 m) Sample uses 100% wool or acrylic worsted.
Needles US 4 (3.5 mm) DPNs or 32–40" circular for Magic Loop, or size to obtain gauge.
Notions
- Polyester fiberfill stuffing (approx ½ oz / 15 g)
- Tapestry needle
- Stitch marker
- Small keyring or lobster clasp
- Optional: black embroidery floss, 2 tiny beads or French knots for dials
Gauge 6 sts and 8 rows = 1" (2.5 cm) in stockinette stitch worked in the round. Tight, even fabric is essential so stuffing does not show. Adjust needle size if needed.
Abbreviations (US) CO: cast on k: knit p: purl k2tog: knit 2 together ssk: slip, slip, knit kfb: knit front and back (increase) st(s): stitch(es) rnd(s): round(s) St st: stockinette stitch (knit every rnd) pm: place marker BO: bind off RS: right side
Pattern Notes
- Worked in the round. Stuff firmly as you go for crisp camera edges.
- Mattress stitch all seams for invisible joins.
- Inline stitch counts confirmed after every shaping step.
CAMERA BODY (make 1 with MC) CO 36 sts. Join to work in the rnd, being careful not to twist; pm for beg of rnd. Rnd 1: Knit. Work even in St st until piece measures 1.75" (4.5 cm) from CO edge (approx 14 rnds). Next rnd (eyelet for hanging loop): k17, BO 2 sts, k to end. (34 sts rem) Next rnd: k17, CO 2 sts over gap, k to end. (36 sts) Work 2 more rnds even. Stuff body firmly into a flat rectangular box shape approx 2" (5 cm) wide × 1" (2.5 cm) deep. Close top: Arrange sts on 2 needles (18 sts each for front/back). Graft with Kitchener stitch or BO and mattress-stitch closed. (36 sts closed evenly ✓)
LENS (make 1 with CC1) CO 12 sts. Join, pm. Rnds 1–2: Knit. Rnd 3: (k1, kfb) 6 times. (18 sts — 12 + 6 = 18 ✓) Rnds 4–5: Knit. Rnd 6: (k1, k2tog) 6 times. (12 sts — 18 – 6 = 12 ✓) Rnds 7–8: Knit. Rnd 9: (k2tog) 6 times. (6 sts) Cut yarn, thread tail through rem sts, pull tight and secure. Stuff lens lightly before final pull. Lightly flatten front for glass look.
VIEWFINDER (make 1 with CC1) CO 8 sts. Join, pm. Rnds 1–4: Knit. Rnd 5: (k2tog) 4 times. (4 sts) Cut yarn, thread through rem sts, pull tight. Stuff very lightly.
SHUTTER BUTTON (make 1 with CC1) CO 6 sts. Join. Rnd 1: Knit. Rnd 2: (k2tog) 3 times. (3 sts) Thread tail through sts and pull tight into a tiny dome. No stuffing needed.
FILM-ADVANCE KNOB (make 1 with CC1) CO 8 sts. Join. Rnds 1–2: Knit. Rnd 3: (k2tog) 4 times. (4 sts) Thread tail through sts, pull tight. Stuff lightly.
OPTIONAL LEATHERETTE STRIP (with CC2) CO 6 sts. Work flat in St st (k RS, p WS) for 10 rows. BO. This becomes a side grip accent.
HANGING LOOP With MC, CO 12 sts. BO all sts. Form into a small loop.
ASSEMBLY
- Position lens centered on front face of body (approx 0.5" / 1.5 cm up from bottom). Mattress-stitch securely around base. (Lens 12-st base matches placement ✓)
- Attach viewfinder to top left of body (as viewed from front), seaming flat side down.
- Sew shutter button to top right front edge.
- Sew film-advance knob to top right side.
- If using leatherette strip, sew vertically to right side of body.
- Embroider details with MC or floss: small rectangle around viewfinder window, concentric circles on lens front for glass rings, tiny dial lines on knobs. Add French knots or beads for release button if desired.
- Attach hanging loop securely to the eyelet at top of body; thread keyring through loop.
- Weave all ends to inside of body. Shape firmly into classic boxy camera silhouette.
Finishing Steam-block lightly if yarn allows (do not crush stuffing). Check all seams for durability. Your vintage mini camera is ready for keys or bag!
Disclaimer: This pattern was generated by AI and should be reviewed for accuracy before use. While we strive for quality, AI-generated content may contain errors. Please verify measurements, stitch counts, charts, and instructions before beginning your project. Generated by purlJam.uk
Love this pattern?
Save this pattern to your free PurlJam libraryAccess your pattern anytime
Bookmark this page to access your pattern anytime