Type
Crochet
Difficulty
beginner
Category
amigurumi
AI Thinking Process
Planning
Verification
Pattern
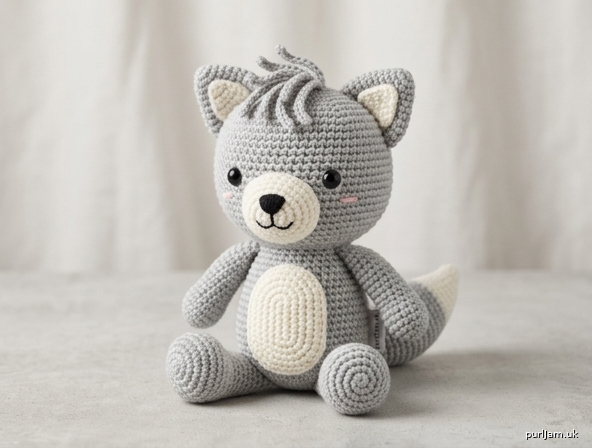
Wolf Chan Crochet Plush
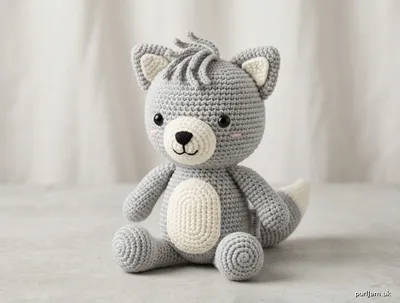
A beginner-friendly chibi wolf toy made from simple spheres, cones, and tubes. Light gray body, creamy white muzzle and belly, pointed ears, and a little hair tuft. Worked in the round with single crochet only.
Skill level: Beginner
Finished size: About 6 in (15 cm) tall sitting, with a head about 2¼ in (5.5 cm) across, using worsted yarn and the stated gauge.
Materials
Yarn (worsted weight / category 4; acrylic or cotton-blend recommended)
- MC (light gray): 70 yd (64 m)
- CC (white): 25 yd (23 m)
- Black: small amount for nose and mouth
- Pink (optional): small amount for blush and/or inner ears
Hook: US E-4 (3.5 mm), or 1–2 sizes smaller than the yarn label so the fabric is tight.
Notions
- Polyester fiberfill stuffing
- Yarn needle
- Stitch marker
- Pins
- 9 mm or 10 mm black safety eyes (pair)
- Scissors
- Optional: keychain finding if making a bag charm version
Safety note: Safety eyes and small sewn parts are a choking hazard. Do not give this toy to children under 3 years. For babies or pets, embroider the eyes instead.
Gauge
5 sc and 5 rnds = 1 in (2.5 cm) in single crochet worked in the round.
Gauge is important for a firm amigurumi fabric, not for exact fit. If stuffing shows through, use a smaller hook. A looser gauge makes a larger, softer wolf.
Abbreviations (US)
- ch — chain
- sc — single crochet
- inc — increase (2 sc in the same stitch)
- dec — decrease (sc2tog; invisible decrease preferred)
- MR — magic ring (adjustable ring)
- sl st — slip stitch
- st(s) — stitch(es)
- rnd(s) — round(s)
- FO — fasten off
- MC / CC — main color / contrast color
Invisible decrease (recommended): Insert hook under the front loop of the next st, then under the front loop of the following st, yarn over and pull through both front loops, yarn over and pull through 2 loops on hook.
Pattern Notes
- Work in a continuous spiral unless told to turn. Do not join rounds. Place a stitch marker in the first stitch of every round and move it up as you go.
- Work tightly for a clean surface.
- Stuff as you go; it is hard to stuff evenly after a piece is closed.
- Numbers in [brackets] are the stitch count at the end of the round.
- Inline checks (for example, 12 + 6 = 18 ✓) confirm the math; they are not extra stitches.
- Leave long yarn tails on every piece for sewing.
- Pin all pieces in place before sewing.
Head (MC)
Worked from the top of the head down.
Rnd 1: 6 sc in MR. [6]
Rnd 2: Inc in each st around. [12] (6 inc → 6 + 6 = 12 ✓)
Rnd 3: (Sc, inc) 6 times. [18] (6 inc → 12 + 6 = 18 ✓)
Rnd 4: (2 sc, inc) 6 times. [24] (6 inc → 18 + 6 = 24 ✓)
Rnd 5: (3 sc, inc) 6 times. [30] (6 inc → 24 + 6 = 30 ✓)
Rnd 6: (4 sc, inc) 6 times. [36] (6 inc → 30 + 6 = 36 ✓)
Rnds 7–12: Sc in each st around. [36] (6 even rounds)
Eye placement: Insert safety eyes between Rnds 9 and 10, 7 sts apart, centered on the face. Do not snap the washers until you like the expression. For an embroidered face, skip the safety eyes and stitch them on in Finishing.
Rnd 13: (4 sc, dec) 6 times. [30] (6 dec → 36 − 6 = 30 ✓)
Rnd 14: (3 sc, dec) 6 times. [24] (6 dec → 30 − 6 = 24 ✓)
Rnd 15: (2 sc, dec) 6 times. [18] (6 dec → 24 − 6 = 18 ✓)
Stuff the head firmly, filling the top first so it stays round.
Rnd 16: (Sc, dec) 6 times. [12] (6 dec → 18 − 6 = 12 ✓)
Rnd 17: Dec 6 times. [6] (6 dec → 12 − 6 = 6 ✓)
FO, leaving a 12 in (30 cm) tail. Thread the tail through the front loops of the remaining 6 sts and pull closed. Weave in the end. Do not sew the head to the body yet.
Muzzle (CC)
Worked in the round around a starting chain to make a small oval.
Ch 5.
Rnd 1: 2 sc in 2nd ch from hook, sc in next 2 ch, 3 sc in last ch; rotate to work along the opposite side of the chain, sc in next 2 ch, sc in the same ch as the first 2 sc. [10]
Rnd 2: Inc in next 2 sts, sc in next 2 sts, inc in next 3 sts, sc in next 2 sts, inc in last st. [16] (6 inc → 10 + 6 = 16 ✓)
Rnds 3–4: Sc in each st around. [16]
FO, leaving a 14 in (36 cm) tail. Stuff the muzzle lightly so it stays a soft oval, not a ball.
Ears (make 2 outer ears in MC; 2 inner ears in CC)
Outer ear (MC) — small cone
Rnd 1: 4 sc in MR. [4]
Rnd 2: (Sc, inc) 2 times. [6] (2 inc → 4 + 2 = 6 ✓)
Rnd 3: (2 sc, inc) 2 times. [8] (2 inc → 6 + 2 = 8 ✓)
Rnd 4: Sc in each st around. [8]
Rnd 5: (3 sc, inc) 2 times. [10] (2 inc → 8 + 2 = 10 ✓)
Rnd 6: Sc in each st around. [10]
FO, leaving a 10 in (25 cm) tail. Do not stuff (or add only a pinch of stuffing at the base) so the ear stays pointed.
Inner ear (CC) — small triangle
Ch 4.
Row 1: Sc in 2nd ch from hook and in each ch across. [3]
Row 2: Ch 1, turn, inc, sc, inc. [5] (2 inc → 3 + 2 = 5 ✓)
Row 3: Ch 1, turn, sc in each st across. [5]
FO, leaving an 8 in (20 cm) tail. (Use pink instead of white if you prefer a flushed inner ear.)
Sew each inner ear onto the front of an outer ear, matching the wide edges at the base. The point of the inner triangle sits just below the outer ear tip.
Body (MC)
Worked from the bottom up.
Rnd 1: 6 sc in MR. [6]
Rnd 2: Inc in each st around. [12] (6 inc → 6 + 6 = 12 ✓)
Rnd 3: (Sc, inc) 6 times. [18] (6 inc → 12 + 6 = 18 ✓)
Rnd 4: (2 sc, inc) 6 times. [24] (6 inc → 18 + 6 = 24 ✓)
Rnd 5: (3 sc, inc) 6 times. [30] (6 inc → 24 + 6 = 30 ✓)
Rnds 6–12: Sc in each st around. [30] (7 even rounds)
Rnd 13: (3 sc, dec) 6 times. [24] (6 dec → 30 − 6 = 24 ✓)
Rnd 14: (2 sc, dec) 6 times. [18] (6 dec → 24 − 6 = 18 ✓)
Stuff the body firmly, with extra filling in the base so the toy sits flat.
Rnd 15: (Sc, dec) 6 times. [12] (6 dec → 18 − 6 = 12 ✓)
Rnd 16: Dec 6 times. [6] (6 dec → 12 − 6 = 6 ✓)
FO, leaving an 18 in (46 cm) tail. Close the hole the same way as the head. The long tail is used later to sew the head on.
Belly Patch (CC)
Ch 8.
Rnd 1: 2 sc in 2nd ch from hook, sc in next 5 ch, 3 sc in last ch; rotate to work along the opposite side of the chain, sc in next 5 ch, sc in the same ch as the first 2 sc. [16]
Rnd 2: Inc in next 2 sts, sc in next 5 sts, inc in next 3 sts, sc in next 5 sts, inc in last st. [22] (6 inc → 16 + 6 = 22 ✓)
Rnd 3: Sc in each st around. [22]
FO, leaving a 14 in (36 cm) tail. Do not stuff. Flatten the piece into an oval.
Arms (make 2, MC)
Rnd 1: 6 sc in MR. [6]
Rnds 2–7: Sc in each st around. [6] (6 even rounds)
Stuff lightly in the lower half only so the arm stays bendable. FO, leaving a 10 in (25 cm) tail. Flatten the open edge; the arm is sewn closed as you attach it.
Legs (make 2, MC)
Rnd 1: 6 sc in MR. [6]
Rnd 2: Inc in each st around. [12] (6 inc → 6 + 6 = 12 ✓)
Rnds 3–6: Sc in each st around. [12] (4 even rounds)
Stuff firmly. FO, leaving a 12 in (30 cm) tail. Flatten the open edge slightly for sewing.
Tail (MC, with optional CC tip)
Rnd 1: 4 sc in MR. [4]
Rnd 2: (Sc, inc) 2 times. [6] (2 inc → 4 + 2 = 6 ✓)
Rnd 3: Sc in each st around. [6]
Rnd 4: (2 sc, inc) 2 times. [8] (2 inc → 6 + 2 = 8 ✓)
Rnd 5: Sc in each st around. [8]
Rnd 6: (3 sc, inc) 2 times. [10] (2 inc → 8 + 2 = 10 ✓)
Change to CC if you want a white tail tip; otherwise stay in MC.
Rnds 7–8: Sc in each st around. [10]
Stuff lightly, more at the base than at the tip, so the tail tapers. FO, leaving a 10 in (25 cm) tail.
Hair Tuft (MC)
Make 5 separate strands:
Ch 10. FO, leaving a 6 in (15 cm) tail on each strand.
These are sewn in a small cluster on top of the head to suggest a messy swoop of fur.
Assembly
Use pins and check the toy from the front and both sides before sewing. Whipstitch with matching yarn unless noted. Hide all knots inside the stuffing.
1. Face on the head
- Center the muzzle on the lower half of the face, covering roughly Rnds 11–15, with the top edge sitting just under the eyes. Sew all the way around with the CC tail. Add a pinch more stuffing under the muzzle if it looks flat.
- With black yarn, embroider a rounded triangle nose on the upper center of the muzzle (3–4 short satin stitches stacked). Bring the yarn down 1 short stitch for a philtrum, then a small curved smile to each side (a shallow “v” or gentle “u”).
- Optional blush: with pink yarn, make 2–3 tiny horizontal stitches on each cheek, just outside the muzzle.
2. Ears and hair
- Pin the ears to the top sides of the head, spanning about Rnds 4–8, tilted slightly outward and a little forward. The inner-ear color faces the front. Sew firmly around the open base.
- Cluster the 5 hair-tuft chains at the crown, just in front of the ears, slightly off-center toward the face. Stitch the midpoint of each chain down so the ends flop like bangs. Trim the chain ends even if needed.
3. Body details
- Sew the belly patch to the front of the body, covering about Rnds 6–12, centered. Keep it flat; do not stuff it.
4. Limbs and tail (sitting pose)
- Legs: Sew to the lower front of the body (about Rnds 3–6), angled forward and slightly apart so the wolf sits. The closed magic-ring ends point forward as paws.
- Arms: Sew to the upper sides of the body, just below where the head will sit (about Rnds 12–14). Flatten the open ends against the body. Angle them slightly forward.
- Tail: Sew to the lower back of the body, just above the base, pointing up and a little to one side. A slight curve looks more wolf-like than a straight stick.
5. Join head to body
- Pin the head on the body with the face looking slightly down (chibi tilt). The head is larger than the body; center it so equal gray shows around the neck.
- Sew all the way around with the body tail, adding a little extra stuffing at the neck before closing the last 1 in (2.5 cm) so the head does not wobble.
Finishing
- Weave in every remaining end.
- Roll the head and body between your palms to round the stuffing.
- If a seam dimples, tug the fabric gently or add a tiny bit of stuffing from a nearby gap with the yarn needle.
- Optional: with 1 strand of MC, add 2–3 surface slip-stitch “fur lines” on each cheek beside the muzzle, or a few short stitches on the forehead under the hair tuft.
- Optional keychain: sew a metal finding securely through the top of the head (through several stitches, not just yarn), reinforcing with extra stitches.
Your Wolf Chan is ready to sit on a shelf, a desk, or in a backpack pocket.
Disclaimer: This pattern was generated by AI and should be reviewed for accuracy before use. While we strive for quality, AI-generated content may contain errors. Please verify measurements, stitch counts, charts, and instructions before beginning your project. Generated by purlJam.uk
Love this pattern?
Save this pattern to your free PurlJam libraryAccess your pattern anytime
Bookmark this page to access your pattern anytime