Type
Crochet
Difficulty
beginner
Category
amigurumi
AI Thinking Process
Planning
Verification
Pattern
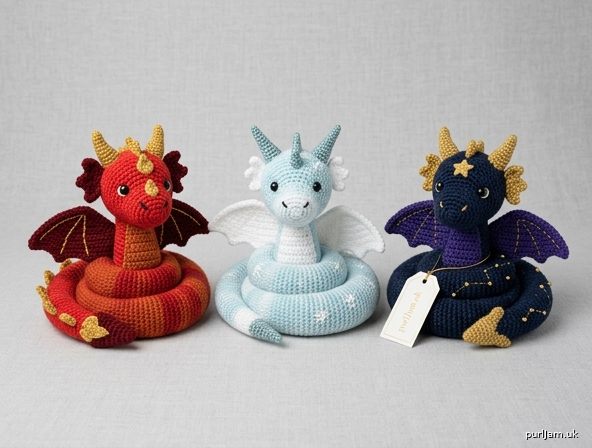
3-in-1 Spiral Dragon Pattern Bundle
Elemental Amigurumi: Fire, Ice & Celestial
Beginner · Worsted Weight · US Crochet Terms
Three coiled sitting dragons from one construction. Make the Fire dragon in red and gold, the Ice dragon in pale blue and white, and the Celestial dragon in navy and gold. Same stitches, same pieces — only colors and finishing change.
Difficulty: Beginner. Skills: magic ring, single crochet, increase, decrease, working in continuous rounds, basic sewing.
Finished size: Coiled dragon about 4 in (10 cm) tall including horns and 4½ in (11.5 cm) across. Uncoiled body about 10 in (25 cm). Size varies with gauge and stuffing.
Materials
Yarn — worsted weight (category 4), acrylic or cotton-acrylic. Amounts are per dragon.
| Role | Yards (meters) | Fire | Ice | Celestial |
|---|---|---|---|---|
| MC Main body & head | 55 yd (50 m) | Red or burnt orange | Ice blue or white | Midnight navy or deep purple |
| A Wings & ear frills | 15 yd (14 m) | Dark red or charcoal | White or pale gray | Royal purple |
| B Horns, spikes, extra motifs | 10 yd (9 m) | Gold or yellow | Teal or silver | Metallic gold |
| C Face details | scraps | Black + cream | Black + white | Black + gold |
To make the full set of 3, pick up one skein of each MC plus small balls of A and B. One 100 g skein of worsted MC will usually yield two dragons.
Other supplies (each dragon)
- US E-4 (3.5 mm) hook, or size needed for a tight fabric with no stuffing show-through (go down 1–2 sizes from the ball band)
- 8 mm safety eyes (1 pair) or black embroidery floss for sewn eyes
- Polyester fiberfill
- Yarn needle
- Stitch marker
- Straight pins
- Optional: pink embroidery floss or crayon blush for cheeks; 6 mm gold beads for Celestial (sew on securely)
Safety: Safety eyes are a choking hazard. Use embroidered eyes for anyone under 3 years, and sew all beads on with doubled thread, knotted on the inside.
Gauge
5 sc and 5 rnds = 1 in (2.5 cm) in single crochet, worked in the round.
Gauge is not critical, but a dense fabric is. If you see stuffing through the stitches, go down a hook size. At this gauge the coiled dragon matches the finished size above.
Abbreviations (US)
| Abbreviation | Meaning |
|---|---|
| MR | magic ring |
| ch | chain |
| sc | single crochet |
| hdc | half double crochet |
| dc | double crochet |
| inc | 2 sc in the same stitch (increase) |
| dec | sc 2 stitches together (decrease); invisible decrease preferred |
| sl st | slip stitch |
| st(s) | stitch(es) |
| rnd(s) | round(s) |
| FO | fasten off |
| MC, A, B, C | yarn colors as listed |
Invisible decrease: Insert hook through the front loop only of the next 2 sts, yarn over, pull through both loops, yarn over, pull through 2. Use this on the head and body for a smooth surface. A regular sc2tog is fine if you prefer.
Pattern Notes
- Work the head, body, horns, spikes, and feet in continuous spirals. Do not join and do not chain at the start of a round. Place a stitch marker in the first stitch of every round and move it up.
- Wings and ear frills are worked flat, in turned rows.
- Stuff as you go. The head and the thick part of the body should be firm. The last 3 in (7.5 cm) of tail should be lightly stuffed so the spiral can curve.
- Numbers in brackets
[ ]are the stitch count at the end of that round or row. - Inline checks such as
(6 inc → 12 + 6 = 18 ✓)confirm the math. - If you prefer not to use a magic ring: ch 2, work the Rnd 1 stitches into the 2nd ch from the hook, then pull the tail to close.
- Read Assembly before you sew. Pinning the coil is what makes this look like a dragon and not a snake.
Shared Pattern
Work these pieces for every dragon. Change only the yarn colors as listed in Materials.
Head (make 1 — MC)
Worked from the snout to the back of the head.
Rnd 1: 6 sc in MR. [6] Rnd 2: inc in each st around. [12] (6 inc → 6 + 6 = 12 ✓) Rnds 3–4: sc in each st around. [12] — this is the snout. Rnd 5: (sc in next st, inc) around. [18] (6 inc → 12 + 6 = 18 ✓) Rnd 6: (sc in next 2 sts, inc) around. [24] (6 inc → 18 + 6 = 24 ✓) Rnd 7: (sc in next 3 sts, inc) around. [30] (6 inc → 24 + 6 = 30 ✓) Rnds 8–11: sc in each st around. [30] — 4 rounds.
Eyes: Insert 8 mm safety eyes between Rnds 8 and 9, 6 stitches apart, on the side of the head that faces the snout (the MR end). If you are embroidering eyes, mark the same spots with pins and stitch them after stuffing.
Rnd 12: (sc in next 3 sts, dec) around. [24] (6 dec → 30 − 6 = 24 ✓) Rnd 13: (sc in next 2 sts, dec) around. [18] (6 dec → 24 − 6 = 18 ✓) Stuff the snout and head firmly, pushing fill all the way into Rnds 1–4 so the nose stays round. Rnd 14: (sc in next st, dec) around. [12] (6 dec → 18 − 6 = 12 ✓) Rnd 15: dec around. [6] (6 dec → 12 − 6 = 6 ✓)
FO, leaving a 8 in (20 cm) tail. Thread the tail through the front loops of the remaining 6 sts, pull closed, and weave in. The closed end is the back of the head.
Head measures about 1¾ in (4.5 cm) from snout to back.
Body (make 1 — MC)
Worked from the neck (wide, sewn to the head) to the tail tip (narrow).
Rnd 1: 6 sc in MR. [6] Rnd 2: inc in each st around. [12] (6 inc → 6 + 6 = 12 ✓) Rnd 3: (sc in next st, inc) around. [18] (6 inc → 12 + 6 = 18 ✓) Rnds 4–12: sc in each st around. [18] — 9 rounds. This is the chest. Begin stuffing after Rnd 8; keep this section firm.
Rnd 13: (sc in next 4 sts, dec) around. [15] (3 dec → 18 − 3 = 15 ✓) Rnds 14–21: sc in each st around. [15] — 8 rounds. Stuff as you go.
Rnd 22: (sc in next 3 sts, dec) around. [12] (3 dec → 15 − 3 = 12 ✓) Rnds 23–30: sc in each st around. [12] — 8 rounds. Stuff medium-firm.
Rnd 31: (sc in next 2 sts, dec) around. [9] (3 dec → 12 − 3 = 9 ✓) Rnds 32–37: sc in each st around. [9] — 6 rounds. Lighten the stuffing.
Rnd 38: (sc in next st, dec) around. [6] (3 dec → 9 − 3 = 6 ✓) Rnds 39–43: sc in each st around. [6] — 5 rounds. Stuff lightly.
Rnd 44: (sc in next st, dec) around. [4] (2 dec → 6 − 2 = 4 ✓) Rnds 45–47: sc in each st around. [4] — 3 rounds. Barely stuff, or leave empty.
Rnd 48: sc in next st, dec, sc in last st. [3] (1 dec → 4 − 1 = 3 ✓) Rnds 49–51: sc in each st around. [3] — 3 rounds.
FO, leaving a 8 in (20 cm) tail. Thread through the remaining 3 sts, pull closed, weave in. Body is about 10 in (25 cm) long.
Wings (make 2 — Color A)
Worked flat. The starting chain is the straight inner edge that sews to the body.
Ch 9. Row 1: sc in 2nd ch from hook and in each ch across. [8] Row 2: ch 1, turn, inc in first st, sc in next 6 sts, inc in last st. [10] (8 + 2 = 10 ✓) Row 3: ch 1, turn, sc in each st across. [10] Row 4: ch 1, turn, dec, sc in next 6 sts, dec. [8] (10 − 2 = 8 ✓) Row 5: ch 1, turn, dec, sc in next 4 sts, dec. [6] (8 − 2 = 6 ✓) Row 6: ch 1, turn, dec, sc in next 2 sts, dec. [4] (6 − 2 = 4 ✓) Row 7: ch 1, turn, dec twice. [2] (4 − 2 = 2 ✓) Row 8: ch 1, turn, dec. [1] (2 − 1 = 1 ✓)
Edging (same yarn): Do not turn. Work sc evenly around the entire wing — about 1 sc per row-end on the sides, 3 sc in the pointed tip, and 1 sc in each remaining starting-chain stitch. Sl st to the first edging sc. FO, leaving a 12 in (30 cm) tail for sewing.
Make the second wing a mirror of the first only in the sense that both get the same rows; they are identical and you flip one at assembly.
Horns (make 2 — Color B)
Rnd 1: 4 sc in MR. [4] Rnd 2: sc in each st around. [4] Rnd 3: (sc in next st, inc) around. [6] (2 inc → 4 + 2 = 6 ✓) Rnds 4–6: sc in each st around. [6] — 3 rounds.
FO, leaving a 8 in (20 cm) tail. Do not stuff, or push in a pea-size bit of fill. Flatten slightly into a cone.
Spikes (make 6 — Color B)
Rnd 1: 4 sc in MR. [4] Rnd 2: (sc in next st, inc) around. [6] (2 inc → 4 + 2 = 6 ✓) Rnd 3: sc in each st around. [6]
FO, leaving a 8 in (20 cm) tail. Do not stuff. Flatten into a small triangle-cone.
Optional Feet (make 2 — MC)
Tiny stubs that peek from under the front of the coil.
Rnd 1: 6 sc in MR. [6] Rnds 2–3: sc in each st around. [6]
FO, leaving a 8 in (20 cm) tail. Stuff lightly.
Optional Ear Frills (make 2 — Color A)
Ch 7. Row 1: sl st in 2nd ch from hook, sc in next ch, hdc in next ch, dc in next ch, hdc in next ch, sc in last ch. [6]
FO, leaving a 8 in (20 cm) tail. The dc sits at the outer point of the frill.
Assembly
Use matching yarn and a yarn needle. Pin everything before you commit to stitches.
1. Attach the head to the body
The MR end of the body is the neck. Pin it to the lower back of the head, just behind where the head is widest (around Head Rnds 10–12), so the snout points forward and slightly up. The body should come out of the head like a neck, not like a hat. Whip stitch around the neck opening, going through both layers twice. Weave in.
2. Coil the spiral
Lay the dragon on a table, head toward you, snout up.
- Bend the body into a flat cinnamon-bun spiral of about 2½ coils, wrapping clockwise or counterclockwise — pick one and stay consistent if you are batching a market set.
- The chest (18-st section) forms the inner ring under and beside the head.
- The tail forms the outer ring and should rest on the table.
- The head sits on top of the inner coil, looking forward.
Pin through all layers. The toy should sit without tipping. If it rocks, flatten the underside by pinning the bottom coil tighter.
Sew the coil: With MC, take long running stitches through all layers of the coil, working from the underside so stitches do not show on top. Catch the inner ring to the chest, then the next ring to the one inside it, every ½ in (1.3 cm). The spiral must hold when you pick the dragon up. Do not sew the tail tip down yet if you want it to curl up as a flourish — tack it last.
3. Wings
Pin one wing on each side of the upper body, just behind the neck, inner (chain) edge against the body, points angling up and back. The top corners should sit near the neck and the bottom corners along the first coil. Whip stitch the inner edge only, leaving the wing free to stand. A tiny stitch at the top inner corner keeps them from flopping forward.
4. Horns
Pin on top of the head, slightly forward of center, 3–4 sts apart, tilting a little backward. Sew around the open base.
5. Spikes
Sew along the visible spine:
- 1 spike on the forehead, centered between the horns and about 2 rnds in front of them (optional — skip if the face looks crowded).
- 1 spike on the back of the head.
- 4 spikes down the top of the body, following the coil so they sit on the highest ridge, spaced about ¾ in (2 cm) apart.
Sew each open base with a few stitches. Flatten the spike so the point stands up.
6. Ear frills (optional)
Sew one on each side of the head, just behind the eyes and below the horns, dc-point facing out.
7. Feet (optional)
Tuck both feet under the front of the first coil so only the toes show. Tack in place from the underside.
8. Face
With Color C (black unless noted):
- Nostrils: 2 small straight stitches on the snout (Head Rnds 3–4), 2 sts apart.
- Mouth: A short V or a shallow curved stitch just below the snout.
- Eyes, if embroidered: A French knot or small satin-stitch oval at the marked spots, with a tiny white/cream highlight stitch on each.
- Cheeks (optional): A small pink stitch or a rub of crayon blush just behind the eyes.
Weave in every tail to the inside of the body.
Elemental Finishing
The construction is done. These steps turn one dragon into Fire, Ice, or Celestial.
Fire Dragon
Palette: MC red or burnt orange, A dark red, B gold or yellow.
Extra flames (make 3 — Color B): Ch 6. Row 1: sl st in 2nd ch from hook, sc in next ch, hdc in next ch, dc in next ch, hdc in last ch. FO, leaving a 6 in (15 cm) tail.
Sew one flame at the tail tip (pointing back), one at the side of the snout like a breath of fire, and one mixed into the spike line on the back. Keep them flat.
Optional glow: With gold, add 3–4 tiny straight stitches along the inner edge of each wing (veins).
Look: Warm, alert, a little fierce. Gold spikes read as embers.
Ice Dragon
Palette: MC ice blue or white, A white or pale gray, B teal or silver.
Icicle spikes: Make 2 extra spikes (Color B) with one added round: Work Spikes Rnds 1–3, then Rnd 4: sc in each st around. [6] FO. Use these two longer cones at the tail tip and as the forehead spike so they read as icicles.
Frost: With white or silver, embroider 3 small snowflakes on the body coil — each snowflake is a + plus an × (6 stitches crossing at one point), about ¼ in (6 mm) across. Place one on the chest, one on the outer coil, one on a wing.
Optional frost edge: With white, surface sl st along the outer edge of each wing.
Look: Cool, clean, a little sparkle. Keep stuffing very even so the body looks like packed snow, not lumpy.
Celestial Dragon
Palette: MC midnight navy or deep purple, A royal purple, B gold.
Mini star (make 1 — Color B): In a MR, (ch 3, sl st in the ring) 5 times. Pull the ring closed. FO, leaving a 6 in (15 cm) tail. Sew the star to the forehead between the horns.
Constellation: With gold, scatter 7–9 French knots across the back coil and one wing. Vary the spacing so they look like a night sky, not a grid. If using 6 mm beads instead of knots, sew each bead through the stuffed body twice and knot on the underside.
Wing orbits: With gold, one dashed line of running stitch from the inner edge of each wing toward the tip.
Look: Dark body, gold hardware. If you have a galaxy or speckled navy worsted, use it as MC — the flecks do the star work for you.
Market Prep Notes
These are designed as a fast, repeatable booth item.
Time (after the first dragon): about 2–2½ hours each. The first one will take 4–5 hours while you learn the coil.
Batch order (for a set of 6–12):
- All heads (insert all safety eyes in one sitting).
- All bodies (stuff at the same firmness so sizes match).
- All wings, then all horns, then all spikes.
- Assembly line: neck seams → coil-and-pin all of them on a tray → sew coils → wings → horns → spikes → faces.
- Elemental extras last, so you can decide the mix of Fire / Ice / Celestial as you go.
Consistency tips: Use the same hook, the same stuffing handfuls, and the same eye spacing (count stitches every time). Sit every finished dragon next to the first “sample” dragon and adjust the coil tightness before sewing.
Yarn math for a dozen: about 660 yd MC total if mixed colorways, plus 180 yd A and 120 yd B. Three 100 g worsted skeins in different MCs plus leftovers of gold, white, and dark red will usually cover 6–8 dragons.
Finishing for sale: Weave in every end. Tug each spike and horn. Check that the coil does not unwind when the toy is squeezed. Add a small care tag.
Care
Surface clean with a damp cloth. If the yarn is machine-washable acrylic, place the dragon in a mesh bag and wash cold, gentle cycle; reshape the coil while damp and air dry. Do not tumble dry. Do not bleach.
Quick Stitch-Count Recap
| Piece | Start | Max / even | End | Qty |
|---|---|---|---|---|
| Head | 6 | 30 (Rnds 8–11) | 6, closed | 1 |
| Body | 6 | 18 (Rnds 4–12) | 3, closed | 1 |
| Wing | ch 9 → 8 | 10 | 1 + edging | 2 |
| Horn | 4 | 6 | 6, open base | 2 |
| Spike | 4 | 6 | 6, open base | 6 (+2 Ice) |
| Foot (opt.) | 6 | 6 | 6, open base | 2 |
| Ear frill (opt.) | ch 7 | — | 6 sts | 2 |
You now have one pattern and three elemental dragons. Coil, pin, sew, and they will sit on a stall shelf like they belong there.
Disclaimer: This pattern was generated by AI and should be reviewed for accuracy before use. While we strive for quality, AI-generated content may contain errors. Please verify measurements, stitch counts, charts, and instructions before beginning your project. Generated by purlJam.uk
Love this pattern?
Save this pattern to your free PurlJam libraryAccess your pattern anytime
Bookmark this page to access your pattern anytime