Type
Crochet
Difficulty
intermediate
Category
amigurumi
AI Thinking Process
Planning
Verification
Pattern
Art the Clown
Realistic Amigurumi Head (Advanced)
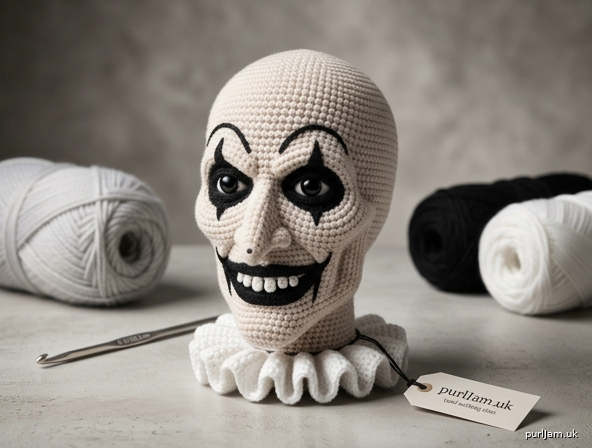
A sculptural, display-scale head in the likeness of Art the Clown: elongated bald skull, corpse-pale skin, sunken black-ringed eyes, long pale nose, and a wide painted grin. Worked in tight worsted single crochet with separate facial pieces, needle sculpting, and optional neck ruff.
Skill level: Advanced. Tight even spirals, many small pieces, precise eye placement, and needle sculpting.
Finished size: About 6 in (15 cm) tall including neck and 3¾ in (9.5 cm) wide at the temples, with given gauge and stuffing.
Materials
Yarn (worsted / medium 4; dense amigurumi tension)
- A (skin): pale gray-white or off-white, 70 yd (64 m)
- B (makeup): black, 35 yd (32 m)
- C (teeth): white, 10 yd (9 m)
- D (optional socket wash): cool gray, 5 yd (5 m)
- E (optional ruff): white or off-white, 25 yd (23 m) — may use A
Hook: US E-4 / 3.5 mm (or size needed for gauge; fabric must be stuffing-proof)
Notions
- Pair of 12 mm black safety eyes with washers
- Polyester fiberfill
- Stitch marker
- Yarn needle
- Pins
- Small sharp scissors
- Optional: 6 in (15 cm) of 18-gauge craft wire for a poseable neck core
- Optional: pale gray or taupe embroidery floss for crease shading
- Optional: dry pastel or chalk pencil in gray and dusty rose for surface shading (seal with textile spray if used)
Note: This is an adult display piece, not a child’s toy. Safety eyes and small teeth are choking hazards. Do not give to children under 3 years.
Gauge
20 sc and 20 rnds = 4 in (10 cm) in unstretched single crochet, worked tightly in the round.
A 2 in (5 cm) swatch in the round should measure 10 sc × 10 rnds. If the swatch is larger, go down a hook size. Soft, gappy fabric will distort the face.
Abbreviations (US)
- BLO — back loop only
- ch — chain
- dc — double crochet
- dec — single crochet 2 together (sc2tog)
- FLO — front loop only
- FO — fasten off
- hdc — half double crochet
- inc — 2 sc in the same stitch
- MR — magic ring
- rnd(s) — round(s)
- sc — single crochet
- sl st — slip stitch
- st(s) — stitch(es)
Pattern notes
- Work in a continuous spiral unless a row is specified. Do not join or turn. Mark the first stitch of every round and move the marker up.
- Keep tension firm and even. The head must be a closed fabric.
- Stuff in small pinches as you decrease. Overstuffed cheeks look round and cartoonish; Art’s face is gaunt.
- “Front” is the face. After Rnd 10, place a second marker at the center front and keep it there for eye, nose, and mouth placement.
- Colorwork on the face is appliqué plus embroidery so the makeup sits on the surface like greasepaint.
- When a round lists a stitch count in parentheses, that is the count after the round is complete.
Head
With A, work from the crown down.
Rnd 1: 6 sc in MR. (6) Rnd 2: inc in each st around. (6 inc → 6 + 6 = 12 ✓) Rnd 3: (sc, inc) 6 times. (6 inc → 12 + 6 = 18 ✓) Rnd 4: (2 sc, inc) 6 times. (6 inc → 18 + 6 = 24 ✓) Rnd 5: (3 sc, inc) 6 times. (6 inc → 24 + 6 = 30 ✓) Rnd 6: (4 sc, inc) 6 times. (6 inc → 30 + 6 = 36 ✓) Rnd 7: (5 sc, inc) 6 times. (6 inc → 36 + 6 = 42 ✓) Rnd 8: (6 sc, inc) 6 times. (6 inc → 42 + 6 = 48 ✓) Rnd 9: (7 sc, inc) 6 times. (6 inc → 48 + 6 = 54 ✓) Rnd 10: (8 sc, inc) 6 times. (6 inc → 54 + 6 = 60 ✓)
Place a center-front marker on Rnd 10. Keep increases stacked at the back of the head from here if a stitch “seam” appears; rotate the marker 1 st every few rounds if you need to hide it in the nape.
Rnds 11–20: sc in each st around. (60; 10 rounds even)
Safety eyes (do this now, before the skull narrows): Insert 12 mm safety eyes between Rnds 16 and 17. Count 11 stitches between the posts (not including the stitches the posts occupy), centered on the front marker. The eyes sit slightly high and close, which reads gaunt rather than friendly.
Do not press the washers on yet.
Socket wash (optional, recommended): With D or B, stitch a tight ring of 8–10 satin stitches around each eye post on the fabric surface, then sink the post. This stains the socket before the washer locks.
Press washers on firmly.
Rnd 21: (8 sc, dec) 6 times. (6 dec → 60 − 6 = 54 ✓) Rnd 22: sc in each st around. (54) Rnd 23: (7 sc, dec) 6 times. (6 dec → 54 − 6 = 48 ✓) Rnd 24: sc in each st around. (48) Rnd 25: (6 sc, dec) 6 times. (6 dec → 48 − 6 = 42 ✓) Rnd 26: sc in each st around. (42)
Begin stuffing the crown firmly. Leave the face slightly under-filled so sockets can be pulled in later.
Rnd 27: (5 sc, dec) 6 times. (6 dec → 42 − 6 = 36 ✓) Rnd 28: sc in each st around. (36) Rnd 29: (4 sc, dec) 6 times. (6 dec → 36 − 6 = 30 ✓) Rnd 30: (3 sc, dec) 6 times. (6 dec → 30 − 6 = 24 ✓)
Stuff the jaw. Chin should feel firm, cheeks still pinchable.
Rnds 31–34: sc in each st around. (24; 4 rounds — neck) Rnd 35: (2 sc, dec) 6 times. (6 dec → 24 − 6 = 18 ✓) Rnds 36–37: sc in each st around. (18)
If using wire, fold a 6 in (15 cm) length in half, wrap the fold with tape, and seat it in the neck with the raw ends buried in the skull stuffing.
Rnd 38: (sc, dec) 6 times. (6 dec → 18 − 6 = 12 ✓)
Finish stuffing the neck hard so the head does not wobble.
Rnd 39: dec 6 times. (6 dec → 12 − 6 = 6 ✓)
FO, leaving a 12 in (30.5 cm) tail. Weave through the remaining 6 sts, pull closed, and hide the tail in the neck.
Nose
Long, pale, slightly pinched at the bridge and fuller at the tip. With A:
Rnd 1: 6 sc in MR. (6) Rnd 2: (sc, inc) 3 times. (3 inc → 6 + 3 = 9 ✓) Rnd 3: sc in each st around. (9) Rnd 4: (2 sc, inc) 3 times. (3 inc → 9 + 3 = 12 ✓) Rnds 5–7: sc in each st around. (12; 3 rounds) Rnd 8: (2 sc, dec) 3 times. (3 dec → 12 − 3 = 9 ✓) Rnd 9: sc in each st around. (9)
Stuff the tip only — the bridge should squash flat against the face. FO, leaving a 14 in (35.5 cm) tail.
Ears (make 2)
Small, close to the skull, no lobe emphasis.
With A:
Rnd 1: 6 sc in MR. (6) Rnd 2: (sc, inc) 3 times. (3 inc → 6 + 3 = 9 ✓) Rnd 3: sc in each st around. (9) Rnd 4: (sc, dec) 3 times. (3 dec → 9 − 3 = 6 ✓)
Flatten. FO, leaving an 8 in (20 cm) tail. Do not stuff.
Upper eyelids (make 2)
With A:
Row 1: Ch 9. Sc in 2nd ch from hook, hdc, dc in next 4 ch, hdc, sc. (8)
FO, leaving a 10 in (25.5 cm) tail. The dc section is the center of the lid and should arch over the eye.
Lower lids (make 2)
With A:
Row 1: Ch 7. Sc in 2nd ch from hook, sc in next 4 ch, sc in last ch. (6)
FO, leaving an 8 in (20 cm) tail.
Black eye makeup (make 2)
Almond ovals that sit around the eyes like greasepaint, wider toward the temples.
With B:
Rnd 1: Ch 8. Sc in 2nd ch from hook, sc in next 5 ch, 3 sc in last ch; rotate to work along the opposite side of the chain, sc in next 5 sts, 2 sc in last st. (16) Rnd 2: Inc, 5 sc, inc in next 3 sts, 5 sc, inc in next 2 sts. (6 inc → 16 + 6 = 22 ✓) Rnd 3: Sc, inc, 5 sc, (sc, inc) 3 times, 5 sc, (sc, inc) 2 times. (6 inc → 22 + 6 = 28 ✓)
FO, leaving a 14 in (35.5 cm) tail. The piece is a pointed oval. The sharper end faces the nose; the wider end runs toward the temple.
Mouth base
Wide painted grin, slightly curved.
With B:
Rnd 1: Ch 14. Sc in 2nd ch from hook, sc in next 11 ch, 3 sc in last ch; rotate, sc in next 11 sts, 2 sc in last st. (28) Rnd 2: Inc, 11 sc, inc in next 3 sts, 11 sc, inc in next 2 sts. (6 inc → 28 + 6 = 34 ✓)
FO, leaving an 18 in (45.5 cm) tail. Do not stuff. Pinch the piece into a shallow banana curve — corners lifted, center slightly lower — before sewing.
Teeth (make 8)
Small, slightly uneven rectangles. With C, make 8:
Row 1: Ch 4. Sc in 2nd ch from hook, sc in next 2 ch. (3) Row 2: Ch 1, turn. Sc in each st across. (3)
FO, leaving a 6 in (15 cm) tail on each. Weave in the starting tail only. Two teeth may be worked as ch 3, then 2 sc for smaller side teeth.
Optional neck ruff
A tight, gathered clown ruff to finish the base.
With E (or A):
Row 1: Ch 19. Sc in 2nd ch from hook and in each ch across. (18) Row 2: Ch 2 (does not count as a st), turn. 3 dc in each st across. (54) Row 3: Ch 2, turn. 2 dc in each st across. (108)
FO, leaving a 20 in (51 cm) tail. The strip will ruffle as it is sewn around the neck.
Assembly
Pin every piece before sewing. Use matching yarn and small stitches. Sew through both loops unless noted.
1. Needle-sculpt the sockets (do this first). Thread a long strand of A. Anchor inside the neck. Come out at the inner corner of the right eye, take a small stitch, go through the head and out at the inner corner of the left eye, and pull until both eyes sink ⅛–¼ in (3–6 mm). Repeat at the outer corners, then from each lower lid down toward the cheek hollow. Tie off inside the neck. The brow should shade the eye; the eye should not sit on the surface like a button.
2. Eye makeup. Center each black oval over a safety eye. The inner (pointed) tips sit about 2 sts apart over the bridge. The outer edges angle slightly upward toward the temples. Sew with B around the perimeter, easing extra fabric into a soft crease under the brow. The safety eye pupil should remain visible in the center. If the oval covers too much pupil, tack only the outer half and trim the inner edge.
3. Eyelids. Sew each upper lid along Rnds 15–16 so the dc section hoods the top third of the eye. Catch the black makeup and a little skin yarn so the lid reads as skin over paint. Sew each lower lid along Rnds 17–18, barely covering the bottom of the iris. Leave a thin black gap between upper and lower lids — a staring, unsleeping eye.
4. Nose. Pin the nose so the stuffed tip sits over Rnds 19–23, centered. The top (unstuffed) edge tucks between the inner eye corners on Rnd 18. Sew around the base with A, pulling the bridge flat. A slightly off-center tip is more unsettling than a perfectly straight one; keep the lean under ⅛ in (3 mm).
5. Needle-sculpt cheeks and chin. With A, run a long stitch from inside the left mouth corner (about Rnd 26, 6 sts left of center) out through the left cheek (Rnds 22–24, 8–10 sts from center), pull gently, and return. Repeat on the right. This hollows the cheek, not a dimple — stop before you pucker the fabric. Add 2–3 vertical tacks under the chin (Rnd 29) toward the neck to lengthen the jaw.
6. Mouth. Pin the black mouth base across Rnds 25–28, centered, about 1¾ in (4.5 cm) wide. Corners should sit under the inner eye line, not out as far as the eye makeup. Sew the perimeter with B, leaving the top and bottom long edges slightly proud so teeth can be tucked underneath.
7. Teeth. Arrange 4 teeth along the upper edge of the mouth and 4 along the lower, with a slightly wider gap at center. Outer teeth may be the smaller 2-sc pair. Sew only the back of each tooth under the black edge so the white rectangles hang like a grimace. Do not make a neat picket fence — stagger height by 1 row on 2 or 3 teeth.
8. Lips (embroidery). With B, satin-stitch a thin hard line along the upper and lower mouth edges, extending 2–3 sts past each corner into a cut-line grin. Add a short vertical tick at each corner. Keep the line sharp; do not round it into a friendly smile.
9. Ears. Flatten and sew over Rnds 17–21, centered on each side, about 1 in (2.5 cm) behind the outer eye makeup. Top of ear aligns with the eye line. Tack the front edge closer to the skull than the back so they hug the head.
10. Brow. With B or D, surface-sl-st a shallow V above each eye on Rnd 15, 5–6 sts long, higher at the outer end. Split-stitch a faint vertical frown line from the bridge up 3 rnds if desired.
11. Optional ruff. Wrap Row 1 of the ruff around Rnds 33–35 of the neck. Gather until it fits, overlapping the short ends at the back. Sew through Row 1 only, letting Rows 2–3 stand away from the neck.
Finishing
- Weave in every tail. On the face, hide ends inside the stuffing, not under the makeup (dark tails ghost through pale yarn).
- If the skull looks too spherical, add 3–4 long darts of A from the crown down the back and pull until the head reads slightly egg-shaped (taller than it is deep).
- Optional surface shading: tick cool gray pastel into the sockets, under the cheek hollows, at the temples, and under the lower lip. A whisper of dusty rose only in the inner eye corner and nostril edge — Art is bloodless, not flushed. Brush off excess. Seal if the piece will be handled.
- Steam is optional and risky on acrylic; if you block, hover a steamer and reshape the nose and lids with fingers. Do not press.
- Check symmetry from 3 ft (1 m) away. Adjust by restitching lids or makeup before considering the piece finished.
The head should read as bald, pale, and watchful: black-ringed eyes, long nose, and a wide thin grin. Display out of reach of children and pets.
Disclaimer: This pattern was generated by AI and should be reviewed for accuracy before use. While we strive for quality, AI-generated content may contain errors. Please verify measurements, stitch counts, charts, and instructions before beginning your project. Generated by purlJam.uk
Love this pattern?
Save this pattern to your free PurlJam libraryAccess your pattern anytime
Bookmark this page to access your pattern anytime