Type
Crochet
Difficulty
beginner
Category
amigurumi
AI Thinking Process
Planning
Verification
Pattern
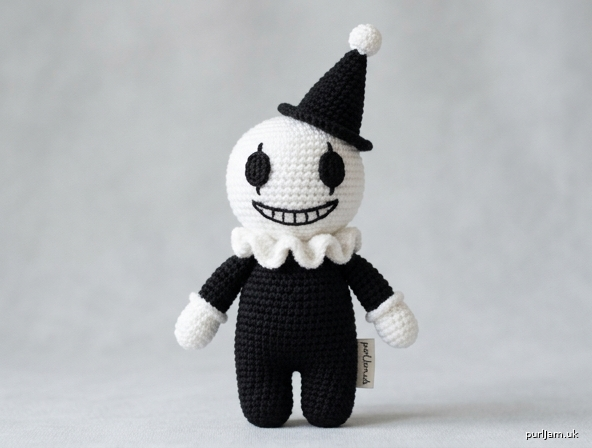
Art the Clown
Stylised beginner amigurumi plush
A small, geometric plush inspired by Art the Clown: white spherical head, tall pointed black hat with a white ball, black cylindrical body, white ruff, white gloves, and a wide embroidered grin. Worked from basic spheres, cones, and tubes in UK double crochet. Decorative plush; see safety notes.
Skill level: Beginner
Finished size: Approximately 16 cm (6¼ in) tall including hat, 7 cm (2¾ in) wide at the body, using the yarn and hook below.
Materials
Yarn — Aran / worsted (category 4), acrylic or acrylic blend
- Colour A (White): 25 g / approx. 50 m
- Colour B (Black): 40 g / approx. 80 m
Hook: 3.5 mm (US E-4). Go down a size if your fabric shows gaps.
Notions:
- Polyester fibre filling
- Yarn needle
- Stitch marker
- Pins
- Scissors
- Optional: two small pieces of black felt (instead of crocheted eye ovals)
- Optional: a little extra Colour A for teeth stitches
Safety notes: Embroider or sew on all features (no safety eyes or beads). This character is from a horror film — the plush is intended as décor for older fans, not as a toy for young children. If you do gift it, embroider every detail, sew all parts on firmly, and use your own judgement about age-appropriateness.
Tension (gauge)
10 dc × 10 rounds = 5 cm × 5 cm (2 in × 2 in), worked in the round in a spiral.
Tension is less about matching a swatch and more about dense fabric. Stuffing must not show through. If you see gaps, drop to 3.25 mm or 3.0 mm.
Abbreviations (UK)
| Abb. | Meaning |
|---|---|
| ch | chain |
| dc | double crochet (US single crochet) |
| inc | increase — 2 dc in next stitch |
| dec | decrease — dc2tog (see Notes for invisible decrease) |
| sl st | slip stitch |
| st(s) | stitch(es) |
| rnd(s) | round(s) |
| MR | magic ring (magic loop) |
| FLO | front loop only |
| FO | fasten off |
| yrh | yarn round hook |
Pattern notes
- Work in a continuous spiral unless told to join. Do not slip-stitch to close each round.
- Place a stitch marker in the first stitch of every round and move it up as you go.
- Invisible decrease (recommended): insert hook through the front loop of the next stitch, then through the front loop of the following stitch (2 loops on hook), yrh, pull through both front loops (2 loops on hook), yrh, pull through both loops.
- Stuff firmly as you go — it is hard to fill a closed piece later. Use small pinches of filling and pack the neck and hat tip especially well.
- Colour changes: work the last yarn-over of the previous stitch with the new colour. Weave tails in as you work.
- Counts in square brackets are the stitch total at the end of the round. Increase/decrease rounds include a check.
- Pin every piece before sewing. Use whip stitch or mattress stitch with matching yarn.
Head
Colour A (White). Sphere.
Rnd 1: 6 dc in MR. [6]
Rnd 2: inc in each st around. [12] (6 increases → 6 + 6 = 12 ✓)
Rnd 3: (1 dc, inc) 6 times. [18] (6 increases → 12 + 6 = 18 ✓)
Rnd 4: (2 dc, inc) 6 times. [24] (6 increases → 18 + 6 = 24 ✓)
Rnd 5: (3 dc, inc) 6 times. [30] (6 increases → 24 + 6 = 30 ✓)
Rnds 6–10: dc in each st around. [30] (5 rounds even)
Rnd 11: (3 dc, dec) 6 times. [24] (6 decreases → 30 − 6 = 24 ✓)
Rnd 12: (2 dc, dec) 6 times. [18] (6 decreases → 24 − 6 = 18 ✓)
Stuff the head firmly, rounding it as you fill.
Rnd 13: (1 dc, dec) 6 times. [12] (6 decreases → 18 − 6 = 12 ✓)
Rnd 14: dec 6 times. [6] (6 decreases → 12 − 6 = 6 ✓)
FO, leaving a 20 cm (8 in) tail. Thread the tail through the front loops of the remaining 6 sts, pull closed, and weave in. The closed point is the bottom of the head (neck join).
Hat
Colour B (Black). Tall cone with a small brim.
Rnd 1: 4 dc in MR. [4]
Rnd 2: (1 dc, inc) 2 times. [6] (2 increases → 4 + 2 = 6 ✓)
Rnd 3: dc in each st around. [6]
Rnd 4: (2 dc, inc) 2 times. [8] (2 increases → 6 + 2 = 8 ✓)
Rnd 5: dc in each st around. [8]
Rnd 6: (3 dc, inc) 2 times. [10] (2 increases → 8 + 2 = 10 ✓)
Rnd 7: dc in each st around. [10]
Rnd 8: (4 dc, inc) 2 times. [12] (2 increases → 10 + 2 = 12 ✓)
Rnd 9: dc in each st around. [12]
Rnd 10: (5 dc, inc) 2 times. [14] (2 increases → 12 + 2 = 14 ✓)
Rnd 11: dc in each st around. [14]
Rnd 12: (6 dc, inc) 2 times. [16] (2 increases → 14 + 2 = 16 ✓)
Rnd 13: dc in each st around. [16]
Lightly stuff the cone. Do not stuff the brim.
Rnd 14 (brim): working in FLO, (1 dc, inc) 8 times. [24] (8 increases → 16 + 8 = 24 ✓)
Rnd 15: dc in each st around. [24]
FO, leaving a 30 cm (12 in) tail for sewing. The unused back loops of Rnd 13 sit inside the hat and help it hold its shape on the head.
Hat ball
Colour A (White). Small sphere.
Rnd 1: 6 dc in MR. [6]
Rnd 2: inc in each st around. [12] (6 increases → 6 + 6 = 12 ✓)
Rnd 3: dc in each st around. [12]
Rnd 4: dec 6 times. [6] (6 decreases → 12 − 6 = 6 ✓)
Stuff firmly. FO, leaving a 15 cm (6 in) tail. Close the hole as for the head.
Body
Colour B (Black). Cylinder, closed at both ends.
Rnd 1: 6 dc in MR. [6]
Rnd 2: inc in each st around. [12] (6 increases → 6 + 6 = 12 ✓)
Rnd 3: (1 dc, inc) 6 times. [18] (6 increases → 12 + 6 = 18 ✓)
Rnd 4: (2 dc, inc) 6 times. [24] (6 increases → 18 + 6 = 24 ✓)
Rnds 5–14: dc in each st around. [24] (10 rounds even)
Rnd 15: (2 dc, dec) 6 times. [18] (6 decreases → 24 − 6 = 18 ✓)
Stuff firmly — a well-packed body keeps the figure standing.
Rnd 16: (1 dc, dec) 6 times. [12] (6 decreases → 18 − 6 = 12 ✓)
Rnd 17: dec 6 times. [6] (6 decreases → 12 − 6 = 6 ✓)
FO, close the hole, weave in. The magic-ring end is the bottom of the body; the closed decrease end is the neck.
Arms
Make 2. White glove, then black sleeve.
With Colour A (White):
Rnd 1: 6 dc in MR. [6]
Rnd 2: (1 dc, inc) 3 times. [9] (3 increases → 6 + 3 = 9 ✓)
Rnd 3: dc in each st around. [9]
Change to Colour B (Black).
Rnds 4–9: dc in each st around. [9] (6 rounds even)
Stuff the hand firmly and the sleeve lightly (leave the last 1 cm / ⅜ in unstuffed so the arm sews flat). FO, leaving a 20 cm (8 in) tail.
Legs
Make 2. Colour B (Black).
Rnd 1: 6 dc in MR. [6]
Rnd 2: inc in each st around. [12] (6 increases → 6 + 6 = 12 ✓)
Rnds 3–10: dc in each st around. [12] (8 rounds even)
Stuff firmly. FO, leaving a 20 cm (8 in) tail.
Eye ovals
Make 2. Colour B (Black).
(Skip this piece if you prefer felt ovals or satin-stitch embroidery.)
Ch 5.
Rnd 1: dc in 2nd ch from hook, dc in next 2 ch, 3 dc in last ch; rotate and work along the other side of the foundation: dc in next 2 ch, 2 dc in the last ch (the same chain as the first dc). [10]
(3 + 3 + 2 + 2 = 10 ✓)
Sl st to first dc. FO, leaving a 15 cm (6 in) tail.
Ruff (collar)
Colour A (White). Simple beginner frill.
Ch 28.
Row 1: 3 dc in 2nd ch from hook, 3 dc in each remaining ch to end. [81 dc]
(27 chains worked × 3 = 81 ✓)
FO, leaving a 25 cm (10 in) tail. The strip will curl into a ruffle.
Face
Work all face details on the head before attaching the hat.
Eyes: Using the black ovals (or felt cut to about 1.5 × 1 cm / ⅝ × ⅜ in), sew them onto the front of the head over Rnds 6–9, with a gap of about 4 stitches between the inner edges. They should look like deep, dark sockets — slightly angled is fine.
Grin: With Colour B and a yarn needle, embroider a wide, shallow curve across Rnds 9–11, running from the outer corner of one eye-line to the other. Use backstitch or split stitch, two strands if your yarn is plump. Keep it simple and graphic.
Optional teeth: With Colour A, work 3–5 tiny vertical stitches hanging from the grin, spaced evenly. Do not overdo this — a few marks read clearly on a small face.
Do not add a red nose; this stylised version stays pale, with black features only.
Assembly
Pin first. Check the figure in profile: tall hat, round head, narrower body, legs slightly apart.
- Hat ball to hat. Sew the white ball to the magic-ring tip of the hat. A few firm stitches through both pieces are enough.
- Hat to head. Seat the hat on top of the head so the brim sits around Rnds 3–5. The cone should point straight up (or tilt it a fraction to one side if you prefer a jauntier look). Sew through the inner unused loops of hat Rnd 13 and into the head, all the way around, so the brim can flare slightly.
- Head to body. Place the closed bottom of the head on the neck end of the body. Sew around twice for strength. The head (30 sts at its widest) should sit a little wider than the body (24 sts) — that is the intended proportion.
- Ruff. Wrap the frill around the head–body join, overlapping the ends at the back. Sew the inner (chain) edge only, so the 3-dc ruffles stand out. The ruff should hide the neck seam.
- Arms. Sew one arm to each side of the body, top of the sleeve level with Rnd 6 of the body (counting from the neck down). Hands point slightly forward and down.
- Legs. Sew both legs to the bottom of the body, side by side, magic-ring ends as the feet. Angle them so the plush sits. If it wobbles, add a little extra filling through a gap before closing the last stitches, or take a couple of tacking stitches between the inner legs.
Weave in every remaining tail on the wrong side / inside a seam.
Finishing
- Steam is not needed. If the hat leans, a pinch more filling in the cone or a few extra stitches at the brim will straighten it.
- Shape the head with your fingers so the face is smooth.
- Check that no filling shows at colour changes on the arms.
Care: Surface-clean only. Do not machine-wash; embroidery and stuffing can shift.
Stitch & count recap
| Piece | Colour | Key counts | Approx. size |
|---|---|---|---|
| Head | A White | 30 sts max; 14 rnds | 5.5 cm (2¼ in) diameter |
| Hat | B Black | 4 → 16 sts, brim 24 | 6 cm (2⅜ in) tall |
| Hat ball | A White | 12 sts max | 1.5 cm (⅝ in) |
| Body | B Black | 24 sts; 17 rnds | 6 cm (2⅜ in) tall |
| Arms ×2 | A then B | 9 sts; 9 rnds | 4.5 cm (1¾ in) |
| Legs ×2 | B Black | 12 sts; 10 rnds | 5 cm (2 in) |
| Ruff | A White | ch 28; 81 dc | wraps the neck |
| Eyes ×2 | B Black | 10 sts each | ovals |
All increase and decrease rounds above close exactly on the stated totals.
Disclaimer: This pattern was generated by AI and should be reviewed for accuracy before use. While we strive for quality, AI-generated content may contain errors. Please verify measurements, stitch counts, charts, and instructions before beginning your project. Generated by purlJam.uk
Love this pattern?
Save this pattern to your free PurlJam libraryAccess your pattern anytime
Bookmark this page to access your pattern anytime