Type
Crochet
Difficulty
intermediate
Category
amigurumi
AI Thinking Process
Planning
Verification
Pattern
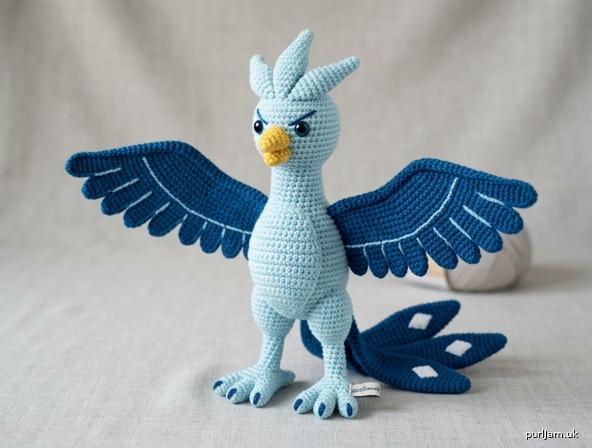
Articuno Amigurumi
Intermediate crochet pattern
A fan-inspired plush of the legendary ice bird: a long neck, a three-spike crest, deep-blue wings, a yellow beak, and three diamond-marked tail plumes. This is an original fan-inspired design, not an official licensed product.
Pieces are worked separately and sewn together. Stitches are basic single crochet; the intermediate rating comes from shaping, matched seams, and assembly.
Finished Size
At the gauge below, approximately:
- Height: 10 in (25 cm) from the sole of the foot to the tip of the center crest
- Wingspan: 11 in (28 cm) tip to tip, wings extended to the sides
- Body width: 3 in (7.5 cm)
Size will change if your gauge changes. A firm fabric matters more than exact row gauge.
Materials
- Worsted weight / Category 4 yarn
- Color A (ice blue / pale cyan): approximately 150 yd (137 m) — head, body, neck, crest, legs
- Color B (deep blue): approximately 100 yd (91 m) — wings, tail feathers, brows, talons
- Color C (golden yellow): approximately 15 yd (14 m) — beak
- Color D (white or pale silver-blue): approximately 10 yd (9 m) — tail diamonds and eye highlights
- Hook: US F-5 / 3.75 mm. If stuffing shows between stitches, drop to US E-4 / 3.5 mm.
- 12 mm safety eyes, 1 pair (about 1/2 in). Dark blue is closest to the character; black is fine.
- Polyester fiberfill
- Stitch marker, tapestry needle, pins, scissors
- Optional: dark blue embroidery floss for finer brows
Acrylic worsted holds its shape well for amigurumi. Any similar fiber in these colors will work.
Gauge
5 sc and 6 rounds = 1 in (2.5 cm) in continuous single crochet.
A flat check: 10 sc and 12 rows = 2 in (5 cm). Gauge is a tight, stuffing-hiding fabric, not a drapey fabric gauge. Measure a swatch before starting the head.
Abbreviations (US)
| Abbreviation | Meaning |
|---|---|
| BLO | back loop only |
| ch | chain |
| dec | decrease (sc2tog) |
| FO | fasten off |
| inc | increase (2 sc in the next st) |
| MR | magic ring |
| rnd(s) | round(s) |
| sc | single crochet |
| sl st | slip stitch |
| st(s) | stitch(es) |
dec: Draw up a loop in each of the next 2 sts, yarn over, pull through all 3 loops. An invisible decrease is preferred and uses the same counts: insert the hook under the front loop only of the next 2 sts, yarn over, pull through both front loops, yarn over, pull through the 2 loops on the hook.
Parentheses at the end of a round or row are the stitch count. Inline checks confirm the shaping.
Notes
- US crochet terms throughout. Do not substitute UK double crochet for US single crochet.
- Work stuffed pieces in a continuous spiral. Do not join rounds unless told to. Move a marker to the first stitch of each round.
- The start of a spiral drifts. Place eyes and the beak by eye, centered on the front, not by where the marker falls.
- Right side is the outside of the work. Keep it facing out.
- Stuff the head and body firmly, the crest and beak lightly, the neck just enough to hold a curve, and the feet firmly. Do not stuff the wings. Stuff the tail feathers very lightly.
- The number after a round range is how many rounds to work. Example: “Rnds 7–12 (6 rounds)” means work 6 rounds, not 1.
- Magic ring alternative: ch 2 and work the first round into the 2nd chain from the hook.
- Safety: Safety eyes and any sewn-on claws are a choking hazard. For a child under 3 years, embroider the eyes and the talons. Do not use safety eyes or small attached claws.
- Count at the end of every round. If a count is off, fix it before the next round.
Pieces to make
| Piece | Quantity | Color |
|---|---|---|
| Head | 1 | A |
| Body | 1 | A |
| Neck | 1 | A |
| Wing | 2 | B |
| Side tail feather | 2 | B |
| Center tail feather | 1 | B |
| Side crest spike | 2 | A |
| Center crest spike | 1 | A |
| Upper beak | 1 | C |
| Lower beak | 1 | C |
| Leg and foot | 2 | A |
Head (Color A)
The magic ring is the crown. The 18-stitch opening is the underside and joins to the neck. Do not close that opening.
Rnd 1: 6 sc in MR (6) Rnd 2: inc in each st around (12) (6 + 6 = 12 ✓) Rnd 3: (sc, inc) x 6 (18) (12 + 6 = 18 ✓) Rnd 4: (2 sc, inc) x 6 (24) (18 + 6 = 24 ✓) Rnd 5: (3 sc, inc) x 6 (30) (24 + 6 = 30 ✓) Rnd 6: (4 sc, inc) x 6 (36) (30 + 6 = 36 ✓) Rnds 7–12 (6 rounds): sc in each st around (36)
Rnd 13: (4 sc, dec) x 6 (30) (36 − 6 = 30 ✓) Rnd 14: (3 sc, dec) x 6 (24) (30 − 6 = 24 ✓) Rnd 15: (2 sc, dec) x 6 (18) (24 − 6 = 18 ✓)
Safety eyes placement
Insert the eyes now, before stuffing.
- Place them between Rnds 9 and 10.
- Leave 6 stitches between the inner edges of the posts.
- Center the pair on the front of the head (the face), not on the sides.
- The beak will sit about 2 rounds below the eyes. Check that both eyes sit on the same round and the same distance from the center.
- Push the posts through from the outside and lock the washers on the inside. Tug gently to be sure each washer is flat and fully seated.
Embroidered eyes (required if the toy is for a child under 3): satin-stitch a narrow oval in black or dark blue, about 3/8 in (1 cm) wide, in the same position. Add a tiny Color D stitch at the upper outer edge of each eye.
Stuff the head firmly, keeping the 18-stitch opening round. FO, leaving a long tail for sewing. Do not gather the opening closed.
Body (Color A)
The magic ring is the bottom. The 18-stitch opening is the top and joins to the neck.
Rnd 1: 6 sc in MR (6) Rnd 2: inc in each st around (12) (6 + 6 = 12 ✓) Rnd 3: (sc, inc) x 6 (18) (12 + 6 = 18 ✓) Rnd 4: (2 sc, inc) x 6 (24) (18 + 6 = 24 ✓) Rnd 5: (3 sc, inc) x 6 (30) (24 + 6 = 30 ✓) Rnd 6: (4 sc, inc) x 6 (36) (30 + 6 = 36 ✓) Rnd 7: (5 sc, inc) x 6 (42) (36 + 6 = 42 ✓) Rnd 8: (6 sc, inc) x 6 (48) (42 + 6 = 48 ✓) Rnds 9–14 (6 rounds): sc in each st around (48)
Rnd 15: (6 sc, dec) x 6 (42) (48 − 6 = 42 ✓) Rnd 16: (5 sc, dec) x 6 (36) (42 − 6 = 36 ✓) Rnds 17–18 (2 rounds): sc in each st around (36) Rnd 19: (4 sc, dec) x 6 (30) (36 − 6 = 30 ✓) Rnd 20: (3 sc, dec) x 6 (24) (30 − 6 = 24 ✓) Rnd 21: (2 sc, dec) x 6 (18) (24 − 6 = 18 ✓)
Stuff firmly. Keep the opening round — a temporary strand of yarn through the front loops will stop it stretching while you set the piece down. FO, leaving a long tail for sewing. Do not close the opening.
Neck (Color A)
A straight tube. Both ends stay open and are 18 stitches, matching the head and the body.
Ch 18. Sl st in the first ch to form a ring, without twisting the chain.
Rnd 1: sc in each ch around (18). Do not join. Place a marker in the first sc. The joining slip stitch is not a stitch; do not work into it. Rnds 2–12 (11 more rounds; 12 rounds total): sc in each st around (18)
FO, leaving a long tail. Do not stuff yet.
Wings (Color B) — make 2
Worked flat in rows, unstuffed. Row 1 is the tip. Rows 26–27 are the base that sews to the body.
Ch 1 and turn at the end of every row. The turning chain does not count as a stitch and is not included in the counts.
Row 1: Ch 2, 3 sc in the 2nd ch from the hook, turn (3) Row 2: inc, sc 1, inc (5) (3 + 2 = 5 ✓) Row 3: inc, sc 3, inc (7) (5 + 2 = 7 ✓) Row 4: sc across (7) Row 5: inc, sc 5, inc (9) (7 + 2 = 9 ✓) Row 6: sc across (9) Row 7: inc, sc 7, inc (11) (9 + 2 = 11 ✓) Row 8: sc across (11) Row 9: inc, sc 9, inc (13) (11 + 2 = 13 ✓) Row 10: sc across (13) Row 11: inc, sc 11, inc (15) (13 + 2 = 15 ✓) Row 12: sc across (15) Row 13: inc, sc 13, inc (17) (15 + 2 = 17 ✓) Row 14: sc across (17) Row 15: inc, sc 15, inc (19) (17 + 2 = 19 ✓) Row 16: sc across (19) Row 17: inc, sc 17, inc (21) (19 + 2 = 21 ✓) Rows 18–20 (3 rows): sc across (21) Row 21: dec, sc 17, dec (19) (21 − 2 = 19 ✓) Row 22: sc across (19) Row 23: dec, sc 15, dec (17) (19 − 2 = 17 ✓) Row 24: sc across (17) Row 25: dec, sc 13, dec (15) (17 − 2 = 15 ✓) Rows 26–27 (2 rows): sc across (15)
Do not FO yet.
Edging: Ch 1. Sc evenly around the wing, working 1 sc in each row-end along both long edges, 1 sc in each of the 15 base stitches, and 3 sc in the tip (the Row 1 cluster). Sl st to the first edging sc. FO, leaving a long tail for sewing.
The wing should lie flat. If the edges cup, the edging is too tight — redo it with slightly looser tension.
Make the second wing as a mirror only in how you will mount it. The fabric itself is the same on both; you will flip one at assembly so the right sides face out.
Tail Feathers (Color B)
Worked from the tip (magic ring) toward an open base. Stuff very lightly, just enough for the feather to hold a gentle curve. Leave each 9-stitch base open for sewing.
Side feather — make 2
Approximately 3.75 in (9.5 cm) long.
Rnd 1: 4 sc in MR (4) Rnd 2: (sc, inc) x 2 (6) (4 + 2 = 6 ✓) Rnd 3: (sc, inc) x 3 (9) (6 + 3 = 9 ✓) Rnd 4: (2 sc, inc) x 3 (12) (9 + 3 = 12 ✓) Rnd 5: (3 sc, inc) x 3 (15) (12 + 3 = 15 ✓) Rnds 6–18 (13 rounds): sc in each st around (15) Rnd 19: (3 sc, dec) x 3 (12) (15 − 3 = 12 ✓) Rnds 20–22 (3 rounds): sc in each st around (12) Rnd 23: (2 sc, dec) x 3 (9) (12 − 3 = 9 ✓)
FO, leaving a long tail. Stuff very lightly. Do not close.
Center feather — make 1
Approximately 4.5 in (11.5 cm) long, and a little wider than the side feathers.
Rnd 1: 4 sc in MR (4) Rnd 2: (sc, inc) x 2 (6) (4 + 2 = 6 ✓) Rnd 3: (sc, inc) x 3 (9) (6 + 3 = 9 ✓) Rnd 4: (2 sc, inc) x 3 (12) (9 + 3 = 12 ✓) Rnd 5: (3 sc, inc) x 3 (15) (12 + 3 = 15 ✓) Rnd 6: (4 sc, inc) x 3 (18) (15 + 3 = 18 ✓) Rnds 7–22 (16 rounds): sc in each st around (18) Rnd 23: (4 sc, dec) x 3 (15) (18 − 3 = 15 ✓) Rnd 24: (3 sc, dec) x 3 (12) (15 − 3 = 12 ✓) Rnds 25–26 (2 rounds): sc in each st around (12) Rnd 27: (2 sc, dec) x 3 (9) (12 − 3 = 9 ✓)
FO, leaving a long tail. Stuff very lightly. Do not close.
Tail diamonds (Color D)
On the front of each feather, centered on the wide middle third, embroider a diamond outline in straight stitches: top point, right point, bottom point, left point, and back to the top. Keep the diamond about 4 stitches wide. These marks are what make the tail read as Articuno’s. Work them before sewing the feathers on, while each feather is easy to hold.
Crest (Color A)
Lightly stuffed spikes. The magic ring is the tip. Pinch each base flat when you sew, so the crest sweeps back instead of standing straight up.
Optional variation: work the crest in Color B for a sharper contrast. The default, matching the usual coloring, is Color A.
Side spike — make 2
Rnd 1: 4 sc in MR (4) Rnd 2: (sc, inc) x 2 (6) (4 + 2 = 6 ✓) Rnd 3: sc in each st around (6) Rnd 4: (2 sc, inc) x 2 (8) (6 + 2 = 8 ✓) Rnds 5–10 (6 rounds): sc in each st around (8)
FO, leaving a long tail. Stuff lightly. Leave the base open.
Center spike — make 1
Rnd 1: 4 sc in MR (4) Rnd 2: (sc, inc) x 2 (6) (4 + 2 = 6 ✓) Rnd 3: sc in each st around (6) Rnd 4: (2 sc, inc) x 2 (8) (6 + 2 = 8 ✓) Rnd 5: sc in each st around (8) Rnd 6: (3 sc, inc) x 2 (10) (8 + 2 = 10 ✓) Rnds 7–14 (8 rounds): sc in each st around (10)
FO, leaving a long tail. Stuff lightly. Leave the base open.
Beak (Color C)
Upper beak — make 1
Rnd 1: 4 sc in MR (4) Rnd 2: (sc, inc) x 2 (6) (4 + 2 = 6 ✓) Rnd 3: (2 sc, inc) x 2 (8) (6 + 2 = 8 ✓) Rnd 4: (3 sc, inc) x 2 (10) (8 + 2 = 10 ✓) Rnds 5–6 (2 rounds): sc in each st around (10)
FO, leaving a long tail. Stuff lightly and flatten into a wedge, open end wider than the tip.
Lower beak — make 1
Rnd 1: 4 sc in MR (4) Rnd 2: (sc, inc) x 2 (6) (4 + 2 = 6 ✓) Rnd 3: (2 sc, inc) x 2 (8) (6 + 2 = 8 ✓) Rnd 4: sc in each st around (8)
FO, leaving a long tail. Do not stuff. Flatten.
Legs and Feet (Color A) — make 2
The magic ring is the center of the sole.
Rnd 1: 6 sc in MR (6) Rnd 2: inc in each st around (12) (6 + 6 = 12 ✓) Rnd 3: (sc, inc) x 6 (18) (12 + 6 = 18 ✓) Rnd 4: BLO sc in each st around (18) — this round makes the sole edge Rnd 5: sc in each st around, through both loops (18) Rnd 6: (sc, dec) x 6 (12) (18 − 6 = 12 ✓) Rnd 7: (sc, dec) x 4 (8) (12 − 4 = 8 ✓)
Stuff the foot firmly.
Rnds 8–13 (6 rounds): sc in each st around (8)
Stuff the leg lightly. FO, leaving a long tail. Weave the tail through the front loops of the final 8 stitches and pull to close. Knot securely and leave the remaining tail for sewing.
Talons
Default (embroidery): With Color B, embroider 3 short straight stitches on the front of each foot, fanning from the ankle toward the toe edge.
Optional crocheted claws (make 6), Color B: Ch 4. Sl st in the 2nd ch from the hook, sc in the next ch, hdc in the last ch. FO, leaving a tail. Sew 3 claws to the front of each foot, fanning outward. Skip these if the toy is for a child under 3; embroider instead.
Assembly
Pin every piece in place and look at the silhouette from the front and the side before you sew. The two wings, the two side crest spikes, and the two side tail feathers must match.
Use mattress stitch for the head–neck and neck–body joins (under one stitch on one piece, then under the matching stitch on the other, pulling snug every few stitches). Use whipstitch for the wings, crest, tail, beak, and legs.
1. Face
Eyes are already locked in (see Head).
- With a split strand of Color B, or dark blue floss, embroider a short brow above each eye: 2 to 3 stitches, slanting down toward the beak. This is the stern expression. Keep the brows matched.
- With Color D, add one small straight stitch at the upper outer corner of each eye.
2. Beak
Sew the upper beak to the front of the head, centered, with its top edge about 2 rounds below the eyes (around Rnds 11–12). The tip points forward and very slightly down. Sew the lower beak directly beneath it, touching the upper beak, so the two read as one bill. Weave in the beak ends.
3. Crest
Sew all three spikes to the crown (over about Rnds 2–6), bases pinched flat.
- Center spike in the middle, longest, sweeping backward.
- One side spike on each side, about 1/2 in (1.3 cm) from the center spike, angled backward and slightly outward.
- The tips should clear the back of the head, not poke straight up.
4. Neck to head
Match the neck’s 18 stitches to the head’s 18-stitch opening, stitch for stitch. The seam should not gather. Before you close the last few stitches, check that the face is centered over the neck and that the neck can lean slightly forward.
5. Neck to body
Stuff the neck lightly through its open end — enough to hold a gentle forward curve, not enough to make a rigid tube. A too-firm neck will not pose and will tip the head.
Match the open end to the body’s 18-stitch opening, stitch for stitch, face centered over the body’s front. Add a pinch of stuffing into the seam if it feels hollow. The neck should sit on the body with the head slightly in front of the body’s center line.
6. Wings
Sew the 15-stitch base of each wing to the upper side of the body, just below the neck join.
- Right side of each wing facing out.
- Leading edge (the smoother long edge you choose as the top) angled slightly up; tip pointing back and a little down.
- Both wings at the same height and the same angle. Check from the front: the tips should match.
With Color A, backstitch two long lines on each wing, from the base toward the tip, dividing the wing into three feather sections. Backstitch: come up, go down a short step ahead, come up the same distance ahead, and go down into the previous hole; repeat along the line.
7. Tail
Sew the feathers to the lower back, diamonds facing out.
- Center feather in the middle, angled down and back so its tip can rest on the surface and help the figure stand.
- Side feathers just above the center feather, one to each side, angled outward. Overlap the bases slightly so there is no gap of body color between them.
8. Legs
Sew the closed top of each leg to the lower front of the body, feet pointing forward and set slightly apart. The soles should sit flat. If the figure tips, move the feet a little farther forward and drop the center tail feather until it touches the surface. Feet plus center tail are the standing base.
Finishing
- Weave in every remaining end. Run ends into the stuffing, not along a seam where they can work back out.
- Smooth the neck curve with your fingers. The head should look forward, crest sweeping back, beak level or a touch down.
- Check symmetry once more: eyes, brows, crest spikes, wings, side feathers, feet.
- Display standing. The piece is a plush, not a wearable. Do not add a hanging loop unless you reinforce it by sewing through the body fabric and a stuffed section, not through a single stitch.
Quick count reference
| Piece | Final open or edge count |
|---|---|
| Head opening | 18 |
| Body opening | 18 |
| Neck, each end | 18 |
| Wing base | 15 |
| Each tail-feather base | 9 |
| Upper beak opening | 10 |
| Lower beak opening | 8 |
| Leg, before closing | 8 |
Head, neck, and body are designed to meet 18 to 18. If any of those three is not 18 at the joining edge, recount before sewing — do not gather a mismatched edge to force the seam.
Disclaimer: This pattern was generated by AI and should be reviewed for accuracy before use. While we strive for quality, AI-generated content may contain errors. Please verify measurements, stitch counts, charts, and instructions before beginning your project. Generated by purlJam.uk
Love this pattern?
Save this pattern to your free PurlJam libraryAccess your pattern anytime
Bookmark this page to access your pattern anytime