Type
Crochet
Difficulty
intermediate
Category
amigurumi
AI Thinking Process
Planning
Verification
Pattern
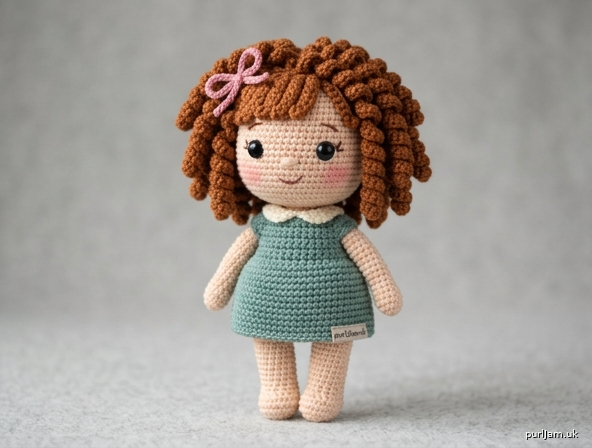
Cute Girl Amigurumi
Round Face, Big Eyes & Curly Hair
A sweet standing doll with a plump round face, oversized eyes, and a full head of corkscrew curls. Worked in worsted weight yarn with separate pieces.
Skill level: Intermediate
Finished size: Approximately 9 inches (23 cm) tall
Materials
- Worsted weight (category 4) yarn:
- Yarn A (skin): 70 yd (64 m)
- Yarn B (hair): 80 yd (73 m)
- Small amount of dark brown or black for mouth/lashes
- Small amount of pink for optional blush or bow
- US E-4 / 3.5 mm crochet hook (or size needed for gauge)
- 12 mm (½ inch) safety eyes (1 pair)
- Polyester fiberfill
- Yarn needle
- Stitch marker
- Scissors
- Optional: pink pastel or fabric crayon for cheeks
Gauge
5 sc and 5 rnds = 1 inch (2.5 cm) in single crochet, worked in continuous rounds.
Fabric must be tight so stuffing does not show. Change hook size if needed.
Abbreviations (US)
- MR: magic ring
- ch: chain
- sc: single crochet
- inc: 2 sc in same stitch
- dec: invisible decrease (sc 2 sts together)
- hdc: half double crochet
- sl st: slip stitch
- st(s): stitch(es)
- rnd(s): round(s)
- FO: fasten off
- BLO: back loop only
Notes
- Work in continuous spirals unless stated. Place a stitch marker in the first stitch of each round and move it up.
- Do not join or turn unless instructed.
- Stuff firmly as you go, especially the head, to keep the face round.
- Safety eyes are a choking hazard. Do not use them on toys for children under 3 years; embroider eyes instead.
- Invisible decrease: insert hook through front loops of next 2 sts, yarn over, pull through both, yarn over, pull through 2.
Head (Yarn A)
Stuff firmly and keep the shape round as you decrease.
Rnd 1: 6 sc in MR. (6)
Rnd 2: Inc in each st around. (12) (6 inc → 6 + 6 = 12 ✓)
Rnd 3: *Sc, inc; repeat from * around. (18) (6 inc → 12 + 6 = 18 ✓)
Rnd 4: *2 sc, inc; repeat from * around. (24) (6 inc → 18 + 6 = 24 ✓)
Rnd 5: *3 sc, inc; repeat from * around. (30) (6 inc → 24 + 6 = 30 ✓)
Rnd 6: *4 sc, inc; repeat from * around. (36) (6 inc → 30 + 6 = 36 ✓)
Rnd 7: *5 sc, inc; repeat from * around. (42) (6 inc → 36 + 6 = 42 ✓)
Rnd 8: *6 sc, inc; repeat from * around. (48) (6 inc → 42 + 6 = 48 ✓)
Rnds 9–16: Sc in each st around. (48) 8 rounds
Safety eyes: Insert 12 mm safety eyes between Rnds 13 and 14, with 8 stitches between the posts (count the stitches of the round that sit between the two eyes). Check placement on the round face before snapping the washers. Eyes should sit low and fairly close for a cute look.
Rnd 17: *6 sc, dec; repeat from * around. (42) (6 dec → 48 − 6 = 42 ✓)
Rnd 18: *5 sc, dec; repeat from * around. (36) (6 dec → 42 − 6 = 36 ✓)
Rnd 19: *4 sc, dec; repeat from * around. (30) (6 dec → 36 − 6 = 30 ✓)
Rnd 20: *3 sc, dec; repeat from * around. (24) (6 dec → 30 − 6 = 24 ✓)
Continue stuffing firmly, pushing fill into the cheeks so the face stays round.
Rnd 21: *2 sc, dec; repeat from * around. (18) (6 dec → 24 − 6 = 18 ✓)
Rnd 22: *Sc, dec; repeat from * around. (12) (6 dec → 18 − 6 = 12 ✓)
Rnd 23: Dec around. (6) (6 dec → 12 − 6 = 6 ✓)
FO. Thread tail through remaining 6 front loops, pull closed, and weave in.
Body (Yarn A)
Rnd 1: 6 sc in MR. (6)
Rnd 2: Inc in each st around. (12) (6 inc → 12 ✓)
Rnd 3: *Sc, inc; repeat from * around. (18) (6 inc → 18 ✓)
Rnd 4: *2 sc, inc; repeat from * around. (24) (6 inc → 24 ✓)
Rnd 5: *3 sc, inc; repeat from * around. (30) (6 inc → 30 ✓)
Rnd 6: *4 sc, inc; repeat from * around. (36) (6 inc → 36 ✓)
Rnds 7–14: Sc in each st around. (36) 8 rounds
Rnd 15: *4 sc, dec; repeat from * around. (30) (6 dec → 36 − 6 = 30 ✓)
Rnd 16: Sc in each st around. (30)
FO, leaving a 18 inch (46 cm) tail for sewing. Stuff firmly.
Legs (make 2, Yarn A)
Rnd 1: 6 sc in MR. (6)
Rnd 2: Inc in each st around. (12) (6 inc → 12 ✓)
Rnd 3: *Sc, inc; repeat from * around. (18) (6 inc → 18 ✓)
Rnds 4–13: Sc in each st around. (18) 10 rounds
FO, leaving a 12 inch (30 cm) tail. Stuff firmly, leaving the last 2 rounds lightly stuffed so the tops flatten for sewing.
Arms (make 2, Yarn A)
Rnd 1: 6 sc in MR. (6)
Rnd 2: Inc in each st around. (12) (6 inc → 12 ✓)
Rnds 3–15: Sc in each st around. (12) 13 rounds
FO, leaving a 12 inch (30 cm) tail. Stuff lightly (leave the top 3 rounds almost empty so the arms sit flat against the body).
Hair Cap (Yarn B)
Worked like the top of the head so it fits snugly.
Rnds 1–8: Work exactly as Head Rnds 1–8. (48)
Rnds 9–14: Sc in each st around. (48) 6 rounds
FO, leaving a 24 inch (61 cm) tail for sewing the cap to the head.
Corkscrew Curls (Yarn B)
Make 40 curls, plus 8 shorter bangs.
Standard curl (make 40): Ch 18. Work 3 sc in the 2nd ch from hook and in each remaining ch across. (51 sc) FO, leaving a 6 inch (15 cm) tail. The strip will spiral into a tight ringlet; give it a gentle twist if needed.
Bangs (make 8): Ch 12. Work 3 sc in the 2nd ch from hook and in each remaining ch. (33 sc) FO, leaving a tail.
Assembly
- Legs to body: Pin the open tops of the legs to the bottom of the body, side by side, with about 4 stitches of body fabric between them at the center front. The legs should point slightly forward. Sew around each 18-st opening with the yarn tails, adding a pinch of extra stuffing at the hips if the join looks hollow.
- Arms to body: Pin arms to the sides of the body at Rnds 12–13 (just below the neck decrease). Angle them slightly forward. Sew around each 12-st opening.
- Head to body: Pin the 30-st opening of the body to the underside of the head, centered, covering Head Rnds 20–22. The face should look straight forward. Sew all around with the body tail, adding stuffing to the neck as you close so the head does not wobble.
- Hair cap: Place the cap on the head like a beanie. In front, the cap edge should sit about 2 rounds above the eyes (leaving the round face open). In back, pull it down to the nape. Pin, then sew the cap rim to the head with the long tail.
- Curls: Using the yarn tails, sew the inner end of each standard curl to the cap. Cover the entire cap densely so no cap stitches show; cluster extra curls at the sides and crown for volume. Sew the 8 shorter bangs across the front hairline, leaving a small center part or sweeping them to one side. The curls should frame the round face without covering the eyes.
- Face details: With dark yarn, embroider a small curved smile (3–4 stitches wide) 2 rounds below the eyes, centered. Optional: 2–3 tiny eyelash stitches above the outer corner of each eye. Add a touch of pink to the cheeks with yarn stitches or pastel.
Weave in all remaining ends. Shape the head with your fingers so the cheeks stay round.
Finishing
- If desired, tie a small yarn bow (ch 30, sl st in 2nd ch and each ch, then knot) and sew it among the curls.
- The doll stands with support from the stuffed legs; she also sits nicely.
Enjoy your curly-haired girl!
Disclaimer: This pattern was generated by AI and should be reviewed for accuracy before use. While we strive for quality, AI-generated content may contain errors. Please verify measurements, stitch counts, charts, and instructions before beginning your project. Generated by purlJam.uk
Love this pattern?
Save this pattern to your free PurlJam libraryAccess your pattern anytime
Bookmark this page to access your pattern anytime