Type
Knitting
Difficulty
intermediate
Category
hat
AI Thinking Process
Planning
Verification
Pattern
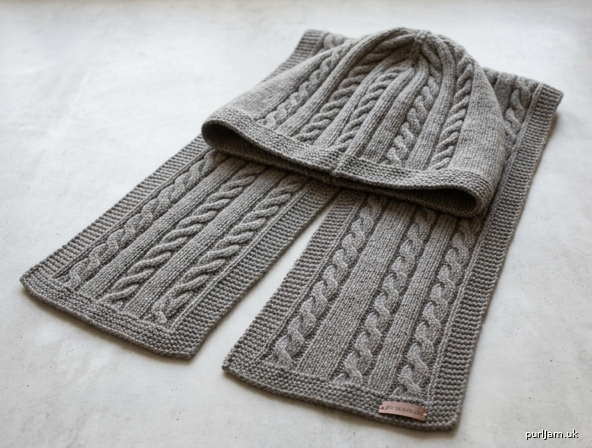
Ashbourne Cabled Hooded Scarf
A long worsted hooded scarf (scoodie) with five rope-cable panels on the tails and twelve matching cables on the hood. The scarf is worked flat as a rectangle. Stitches for the hood are picked up along the centre of one long edge so the hood cables run at right angles to the scarf cables — up toward the crown. Reverse-stocking gutters are decreased at the top of the hood so the cables draw together, then the top is closed with a three-needle cast off.
Skill level: Intermediate (cables, picking up stitches, three-needle cast off)
Size
One size, adult.
To make a longer or shorter scarf, work more or fewer pattern repeats on each tail; keep the centre 52 cm (20½ in) for the hood.
Finished measurements (after blocking)
- Scarf width: 24 cm (9½ in)
- Scarf length: 180 cm (71 in)
- Hood width at neck (pick-up): 52 cm (20½ in)
- Hood depth (neck to top seam): 30 cm (12 in)
- Face opening (along hood selvedges): approx. 58 cm (23 in)
Schematic (not to scale):
<------------------------ 180 cm (71 in) ------------------------>
+--------------------------- scarf ----------------------------+
|  24 cm   tail      |   hood sits here 52 cm  |     tail      |
|  (9½ in)           |   12 cables, 30 cm deep |               |
+--------------------+-----------/\------------+---------------+
                     |          /  \  top seam
                     |         /    \
                     |        / hood \
                     +-------+------+
                      face opening
Yarn
Worsted / aran (medium weight; approx. 10–12 ply)
900 metres (985 yards) / 400 g
Allow a little extra if you add fringe or lengthen the tails.
Suggested fibre: wool or wool-blend with good stitch definition so the cables stay crisp. A lightly heathered or solid colour shows the twist; a strong variegated yarn will hide it.
Needles and notions
- 5 mm needles (UK 6 / US 8) — straight, or a circular 80 cm (32 in) for the hood
- Cable needle
- 2 stitch markers (hood placement on the scarf)
- 1 stitch marker (centre of hood, optional)
- Spare 5 mm needle for three-needle cast off
- Tapestry needle
- Blocking mats and pins
Tension (gauge)
22 stitches and 28 rows = 10 cm (4 in) over Cable Pattern, after wet blocking, using 5 mm needles.
The 52-stitch scarf panel measures 24 cm (9½ in) wide after blocking.
Check tension on a swatch at least 16 cm (6¼ in) square, including at least two full cable panels and two cable crosses. If you have too many stitches to 10 cm, switch to 5.5 mm; too few, switch to 4.5 mm. Row tension affects scarf length and hood depth — adjust how far you knit rather than fighting the row gauge.
Abbreviations
| Abbreviation | Meaning |
|---|---|
| cn | cable needle |
| C6B | cable 6 back: slip next 3 sts to cn and hold at back of work, k3, then k3 from cn |
| C6F | cable 6 front: slip next 3 sts to cn and hold at front of work, k3, then k3 from cn |
| k | knit |
| k2tog | knit 2 together (right-leaning decrease) |
| p | purl |
| p2tog | purl 2 together |
| RS | right side |
| st(s) | stitch(es) |
| WS | wrong side |
| * … ; rep from * | repeat the instructions between the asterisks |
Stocking stitch: knit RS rows, purl WS rows.
Reverse stocking stitch: purl RS rows, knit WS rows.
Garter selvedge: knit the first 2 and last 2 stitches of every row.
Special stitches
C6B (rope cable, twists to the right)
Slip 3 sts to cn, hold at back, k3, k3 from cn.
C6F (rope cable, twists to the left)
Slip 3 sts to cn, hold at front, k3, k3 from cn.
Three-needle cast off
Hold two needles parallel, RS together. Insert a third needle into the first st of each needle, knit those 2 sts together, *knit the next st of each needle together, pass the first st on the third needle over the second; rep from * until all sts are cast off. Fasten off.
Pattern notes
- The scarf is worked flat from one tail to the other. Do not join.
- Selvedge stitches are worked in garter stitch (k2 at each end of every row) so the long edges lie flat and are easy to pick up from.
- Between cables, reverse stocking stitch (purl on RS, knit on WS) makes the ropes stand out.
- Cable crosses fall on Row 5 of an 8-row repeat. Place a marker after each cable panel if you find that helpful.
- On the scarf, five cables alternate C6B and C6F so the fabric does not bias. On the hood, twelve cables do the same.
- When picking up the hood, pick up 4 stitches for every 5 row-ends, then adjust on the next row if needed so you have exactly 115 sts.
- The hood is worked flat. The two selvedges form the face opening; the last row is folded in half and joined for the top of the head.
- Top-of-hood decreases are worked in the reverse-stocking gutters first, so the cables travel all the way to the crown and then sit closer together — the same idea as decreasing a cabled hat crown, adapted to an open hood.
Cable Pattern — Scarf (worked over 52 sts)
Stitch layout, RS: k2, p3, C6B-panel, p3, C6F-panel, p3, C6B-panel, p3, C6F-panel, p3, C6B-panel, p3, k2
(5 cables of 6 + 6 reverse-stocking gutters of 3 + 4 garter selvedge = 30 + 18 + 4 = 52 ✓)
Row 1 (RS): k2, p3, k6, p3, k6, p3, k6, p3, k6, p3, k6, p3, k2.
Row 2 and all WS rows: k2, k3, p6, k3, p6, k3, p6, k3, p6, k3, p6, k3, k2.
(Knit the knits and purl the purls as they face you, keeping the 2-st garter selvedges.)
Row 3: As Row 1.
Row 5 (cable row): k2, p3, C6B, p3, C6F, p3, C6B, p3, C6F, p3, C6B, p3, k2.
Row 7: As Row 1.
Row 8: As Row 2.
Repeat Rows 1–8 for Cable Pattern.
Scarf cable chart (12-st excerpt: one C6B panel + gutter; 8 rows)
Read RS rows (odd) from right to left; WS rows (even) from left to right. Repeat the 6-st cable + 3-st gutter across the inner 48 sts; always work k2 garter at each edge.
        9  8  7  6  5  4  3  2  1
Row 8   k  k  k  p  p  p  p  p  p     WS
Row 7   p  p  p  k  k  k  k  k  k     RS
Row 6   k  k  k  p  p  p  p  p  p     WS
Row 5   p  p  p  / / /  C6B  / / /    RS  ← cable cross
Row 4   k  k  k  p  p  p  p  p  p     WS
Row 3   p  p  p  k  k  k  k  k  k     RS
Row 2   k  k  k  p  p  p  p  p  p     WS
Row 1   p  p  p  k  k  k  k  k  k     RS
        └ gutter┘ └─ 6-st cable ─┘
On C6F panels, work the same chart but cross the cable to the front on Row 5. Empty cells are not used; k/p describe how the stitch is worked on that row (chart is a reminder, not a second set of numbers). Follow the written rows for exact stitch counts.
Scarf
Using 5 mm needles and a firm long-tail or cable cast on, cast on 52 sts.
Work Cable Pattern (Rows 1–8) until the piece measures 180 cm (71 in) from the cast-on edge, ending with a Row 8 (WS).
At 28 rows = 10 cm this is about 504 rows, or 63 full 8-row repeats (63 × 8 = 504 ✓). If your row tension differs, knit to the measured length rather than counting repeats.
Cast off loosely in pattern (knit the knit sts, purl the purl sts, knit the selvedge sts).
Weave in the two tail ends later, after the hood is attached.
Place hood markers
Lay the scarf flat, RS facing you, with one long edge at the top. Find the centre of that long edge and mark it. Place a marker 26 cm (10¼ in) to the right of centre and another 26 cm (10¼ in) to the left of centre. The 52 cm (20½ in) between markers is the hood pick-up (26 + 26 = 52 ✓).
Hood
With RS of scarf facing, 5 mm needle, and starting at the right-hand marker, pick up and knit 115 sts evenly between the two markers.
Pick-up guide: that 52 cm edge holds about 146 row-ends (52 ÷ 10 × 28 = 145.6 ✓). Pick up 4 sts from every 5 row-ends (4/5 × 146 ≈ 117) and skip 2 extra row-ends so you land on 115. Do not pick up from the markers themselves; they only mark the span.
Set-up row (WS): k2, k3, *p6, k3; rep from * to last 2 sts, k2.
(You should have 12 purl-6 panels on this WS row, which will be the 12 knit-6 cables on the RS.)
Confirm 115 sts: 4 garter edge + 13 reverse-stocking gutters of 3 + 12 cables of 6
= 4 + 39 + 72 = 115 ✓
Hood Cable Pattern (worked over 115 sts)
Stitch layout, RS: k2, p3, (k6, p3) 11 times, k6, p3, k2
(12 cables: C6B, C6F, C6B, C6F … ending C6F)
Row 1 (RS): k2, p3, *k6, p3; rep from * to last 2 sts, k2.
Row 2 and all WS rows: k2, knit the knit sts and purl the purl sts as they face you, to last 2 sts, k2.
Row 3: As Row 1.
Row 5 (cable row): k2, p3, *C6B, p3, C6F, p3; rep from * to last 2 sts, k2.
(6 × C6B and 6 × C6F = 12 cables ✓)
Row 7: As Row 1.
Row 8: As Row 2.
Repeat Rows 1–8 until the hood measures 28.5 cm (11¼ in) from the pick-up row, ending with Row 8 (WS).
10 repeats × 8 rows = 80 rows; 80 ÷ 28 × 10 = 28.6 cm ✓.
For a slouchier hood, work 1 or 2 extra repeats (each repeat adds about 3 cm / 1¼ in of depth and about 6 cm / 2½ in to the face opening).
Shape top of hood (crown)
Decreases are worked in the reverse-stocking gutters so the twelve cables stay intact and draw together, as they would at the crown of a cabled hat. The fabric becomes a gentle trapezoid; the selvedges (face opening) slant only over these last few rows.
Row 1 (RS, decrease gutters 3 → 2): k2, p2tog, p1, *k6, p2tog, p1; rep from * to last 2 sts, k2.
13 gutters decreased (1 at the start of the row + 12 in the repeat, with the last gutter sitting before the last k2 as written below if your alignment is: k2, [p2tog, p1, k6] 12 times, p2tog, p1, k2).
115 − 13 = 102 sts ✓
Row 2 (WS): k2, work sts as they appear to last 2 sts, k2.
(Each former p3 gutter is now 2 sts: knit those 2 on WS.)
Row 3 (RS, decrease gutters 2 → 1): k2, p2tog, *k6, p2tog; rep from * to last 2 sts, k2.
102 − 13 = 89 sts ✓
Row 4 (WS): k2, work sts as they appear to last 2 sts, k2.
Row 5 (RS, close the centre and prepare an even count): work 43 sts in pattern as set (k the cable sts, p the single gutter sts, k the selvedge), k2tog, work in pattern to end.
43 + 2 + 44 = 89 sts used ✓ → 88 sts remain ✓
Row 6 (WS): k2, work sts as they appear to last 2 sts, k2.
Cables now sit on single-stitch reverse-stocking ribs, gathered toward the crown.
Close the top
Slip the first 44 sts to a spare 5 mm needle. Hold the two needles parallel, right sides together, so the two face-edge corners meet (this point sits at the centre forehead). The fold sits at centre back.
Work a three-needle cast off across all 44 pairs (44 + 44 = 88 ✓). Fasten off.
If you prefer a softer join, graft (Kitchener stitch) the 44 pairs instead, matching cable knit sts to cable knit sts where you can. The very centre will not be a perfect panel-for-panel match after the gutter decreases; that gathering is intentional.
Finishing
- Weave in all ends on the WS.
- Seams: the only seam is the three-needle join at the top of the hood. If any gap remains where the hood pick-up meets the scarf at the two markers, close it with a couple of mattress-stitch stitches.
- Block. Soak in lukewarm water with a little wool wash for 15–20 minutes. Roll in a towel to remove excess water. Pin the scarf to 24 × 180 cm (9½ × 71 in). Pin the hood to 52 cm (20½ in) across the pick-up and 30 cm (12 in) deep to the top seam, easing the cables so they are plump, not flattened. Dry fully.
- Optional fringe. For each tail end, cut 30 strands of yarn 30 cm (12 in) long. Attach 15 groups of 2 strands along each cast-on or cast-off edge with a lark’s head knot. Trim to 12 cm (4¾ in). Fringe uses about 50–60 extra metres.
No pompom is used on this design; the gathered cabled crown is the focal point.
How to wear
Drape the scarf around the neck with the hood at the back, tails hanging evenly in front. The 64 cm (25 in) tails on either side of the 52 cm hood span (180 − 52 = 128; 128 ÷ 2 = 64 ✓) will sit at about hip length on most adults. Cross the tails, or wrap one tail across the chest, as you like. The hood should settle so the top seam runs from mid-forehead to the back of the head and the face opening rests comfortably around the hairline.
Customising
| Change | What to do |
|---|---|
| Longer tails | Knit the scarf to 190–200 cm (75–79 in) before casting off. Each extra 10 cm uses about 40 m of yarn. |
| Narrower scarf | Use 4 cable panels: cast on 43 sts (2 + 3 + [6+3]×4 + 2 = 2+3+36+2 = 43). Width ≈ 20 cm (8 in). Recalculate hood pick-up if you also want a smaller hood. |
| Wider, wrap-like scarf | Use 6 cable panels: cast on 61 sts (4 edge + 6×6 cables + 7×3 gutters = 4+36+21 = 61 ✓). Width ≈ 28 cm (11 in). |
| Deeper hood | Work 11 or 12 pattern repeats before shaping (88 or 96 even rows). Face opening grows by ~6 cm per extra repeat. |
| Child size | Cast on 43 sts (4 cables); scarf length 140 cm (55 in); pick up 97 sts for the hood over 44 cm (17¼ in) and work even for 22 cm (8¾ in) before the same style of gutter decreases, then three-needle the remainder in half. |
Always keep a multiple of the 9-st (k6 + p3) unit plus 4 selvedge sts plus one extra p3 gutter when rewriting the hood, and recount decreases so the final stitch count is even before the three-needle cast off.
Disclaimer: This pattern was generated by AI and should be reviewed for accuracy before use. While we strive for quality, AI-generated content may contain errors. Please verify measurements, stitch counts, charts, and instructions before beginning your project. Generated by purlJam.uk
Love this pattern?
Save this pattern to your free PurlJam libraryAccess your pattern anytime
Bookmark this page to access your pattern anytime