Type
Crochet
Difficulty
intermediate
Category
amigurumi
AI Thinking Process
Planning
Verification
Pattern
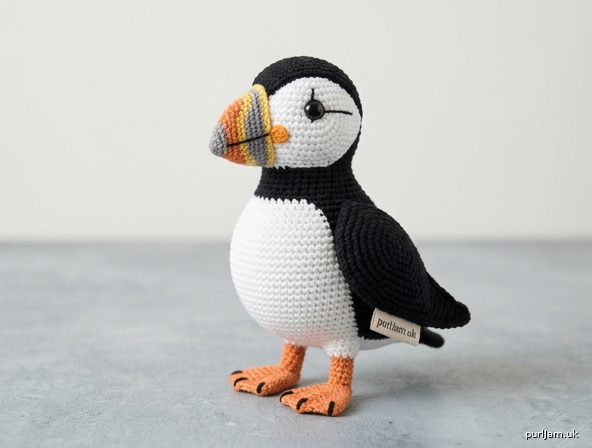
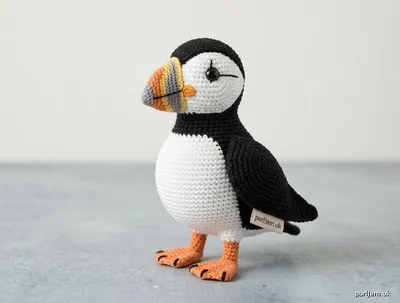
Atlantic Puffin Amigurumi
Difficulty: Advanced
Finished size: approx. 13 cm (5 in) tall when made in DK yarn
Construction: Worked in continuous spirals of UK double crochet (dc). Pieces made separately and sewn together.
Materials
- DK-weight yarn (100 % cotton or acrylic recommended for stitch definition):
- Colour A (black): 25 g
- Colour B (white): 20 g
- Colour C (bright orange): 10 g
- Colour D (yellow or mustard): 5 g
- Colour E (slate grey): small amount
- 2.5 mm or 3.0 mm crochet hook (go down a size from yarn band for dense fabric)
- 8 mm black safety eyes (pair)
- Polyester fibre filling
- Yarn needle
- Stitch marker
- Scissors
- Optional: black embroidery thread for eye rings / claw lines
Abbreviations (UK terminology)
- ch – chain
- dc – double crochet (US single crochet)
- htr – half treble
- inc – 2 dc in same stitch
- invdec – invisible decrease (insert hook in front loops only of next 2 sts, yarn over, pull through both, yarn over, pull through 2 loops)
- st(s) – stitch(es)
- rnd(s) – round(s)
- BLO – back loop only
- FLO – front loop only
- […] – stitch count at end of round
- … – repeat instructions between asterisks
- MR – magic ring (adjustable ring)
Tension (Gauge)
26 dc and 28 rounds = 10 cm (4 in) measured over dc in the round with 2.5–3 mm hook.
Dense fabric is essential; adjust hook size until stuffing does not show through.
Notes
- Work in continuous spiral unless stated. Do not join rounds. Mark first stitch of every round.
- Stuff firmly as you go, especially head and body, before openings become too small.
- Colour changes: work last yarn-over of previous stitch in the new colour. Carry unused yarn inside for short runs or fasten off and weave ends for clean blocks.
- Invisible decrease keeps surface smooth.
- Safety: Use proper safety eyes (not buttons) if the toy is for a child under 3. Sew all parts very securely. The beak and feet are small parts — check attachment strength.
Head (start with Colour B – white)
Rnd 1: 6 dc in MR. [6]
Rnd 2: inc in each st around. [12]
Rnd 3: 1 dc, inc around. [18]
Rnd 4: 2 dc, inc around. [24]
Rnd 5: 3 dc, inc around. [30]
Rnd 6: 4 dc, inc around. [36]
Rnds 7–11: dc in each st around. [36] (5 rounds)
Place safety eyes between Rnds 9 and 10, approximately 8–9 sts apart, centred on the front white face.
Rnd 12: 4 dc, invdec around. [30]
Change to Colour A (black) in last st of Rnd 12.
Rnd 13: dc in each st around. [30]
Rnd 14: 3 dc, invdec around. [24]
Rnd 15: 2 dc, invdec around. [18]
Stuff head firmly, shaping a slight cheek fullness at the white section.
Rnd 16: 1 dc, invdec around. [12]
Rnd 17: invdec around. [6]
Fasten off, leaving a long tail. Thread tail through front loops of remaining 6 sts and pull tight to close. Weave in end.
(Head is white lower face/cheeks + black crown.)
Beak (worked in rows then joined; advanced colour changes)
Begin with Colour E (grey).
Rnd 1: 4 dc in MR. [4]
Rnd 2: 1 dc, inc around. [6]
Rnd 3: dc in each st around. [6]
Change to Colour D (yellow).
Rnd 4: 2 dc, inc around. [8]
Rnd 5: dc in each st around. [8]
Change to Colour C (orange).
Rnd 6: 3 dc, inc around. [10]
Rnd 7: dc in each st around. [10]
Rnd 8: 4 dc, inc around. [12]
Rnds 9–10: dc in each st around. [12]
Lightly stuff tip only. Flatten opening. Fasten off, leaving a long tail for sewing.
Optional: with black thread embroider a thin vertical line down the centre of the beak for the characteristic groove.
Body (start with Colour B – white for belly)
Rnd 1: 6 dc in MR. [6]
Rnd 2: inc in each st around. [12]
Rnd 3: 1 dc, inc around. [18]
Rnd 4: 2 dc, inc around. [24]
Rnd 5: 3 dc, inc around. [30]
Rnd 6: 4 dc, inc around. [36]
Rnd 7: 5 dc, inc around. [42]
Rnds 8–12: dc in each st around. [42] (5 rounds)
Colour-block transition for black back:
On Rnd 13, work first 21 sts in Colour B (belly), change to Colour A and work remaining 21 sts (back). Continue this 21-white / 21-black split for the next rounds, twisting yarns at the colour junctions to keep a clean vertical line.
Rnds 13–18: continuing split colour, dc in each st around. [42] (6 rounds)
Rnd 19: (still split) 5 dc, invdec around. [36]
Rnd 20: 4 dc, invdec around. [30]
Rnd 21: 3 dc, invdec around. [24]
Stuff body very firmly, emphasising a rounded belly so the bird can stand.
Rnd 22: 2 dc, invdec around. [18]
Rnd 23: 1 dc, invdec around. [12]
Rnd 24: invdec around. [6]
Fasten off and close as for head. Weave in ends.
(White front, black back; neck opening is the closed top — head will sit on the upper rounds.)
Wings (make 2 – Colour A black)
Rnd 1: 6 dc in MR. [6]
Rnd 2: 1 dc, inc around. [9]
Rnd 3: 2 dc, inc around. [12]
Rnds 4–8: dc in each st around. [12] (5 rounds)
Rnd 9: 2 dc, invdec around. [9]
Rnd 10: 1 dc, invdec around. [6]
Do not stuff (or stuff very lightly at base only). Flatten and fasten off, leaving a long tail for sewing.
Optional shaping: on final round work 1 htr, 1 tr, 1 htr across the tip to create a slight pointed wing tip before closing.
Feet (make 2 – Colour C orange)
Rnd 1: 6 dc in MR. [6]
Rnd 2: inc in each st around. [12]
Rnd 3: 1 dc, inc around. [18]
Rnd 4: dc in each st around. [18]
Now create three simple toes (worked across the opening):
- Toe 1: ch 4, starting in 2nd ch from hook work 1 dc, 1 htr, 1 dc; slip-stitch into next st of Rnd 4.
- Toe 2: ch 5, 1 dc, 1 htr, 1 tr, 1 htr along ch; slip-stitch into next st.
- Toe 3: ch 4, 1 dc, 1 htr, 1 dc; slip-stitch into next st.
Fasten off, leaving a long tail. Lightly stuff the pad only. Flatten the back of the foot.
(Webbed look is suggested by the three toes sitting close together.)
Assembly
- Head to body: Pin head centred on top of body so the white face looks forward and the black crown aligns with the black back. Add a little extra stuffing at the neck join if needed. Whip-stitch securely all around with matching yarn (use black at back, white at front or one continuous black tail and cover front stitches later).
- Beak: Centre the flat open edge of the beak on the white face, just below and between the eyes (approximately spanning Rnds 10–12 of the head). Sew firmly with the orange tail, stitching through several layers.
- Wings: Position one wing on each side of the body, upper edge roughly level with the neck join and angled slightly backward/downward. Sew along the top edge and a few stitches down the front so the wings lie flat against the body (or leave a tiny gap for a more 3-D look).
- Feet: Place both feet under the front half of the body, toes pointing forward and slightly outward for stability. Sew the pads securely to the underside so the bird stands upright without rocking. Add a couple of stitches through the body if needed for balance.
- Facial details: With black embroidery thread or thin black yarn, stitch a small neat circle or arc around each safety eye to suggest the puffin’s eye ring. Optionally add two or three short straight stitches on each foot for claw definition.
- Weave in every remaining end securely. Shape the bird by rolling it gently between your hands so the belly is round and the feet sit flat.
Finishing & Care
- Check that eyes, beak, wings and feet cannot be pulled free.
- Spot-clean only; do not machine-wash if safety eyes are used.
- For display, the bird stands independently when feet are correctly placed and body is firmly stuffed.
Design Notes (Advanced Tips)
- Colour-change line on the body should run straight up each side; count stitches carefully at the junctions.
- If the bird tips forward, move the feet slightly farther back or add a tiny bit more stuffing to the rear of the body.
- For a larger puffin, move up to worsted-weight yarn and a 3.5 mm hook (increase all round counts by one full increase round on head and body).
- Tension must stay consistent — loose stitches will allow white stuffing to show through black sections.
Enjoy your Atlantic puffin!
Disclaimer: This pattern was generated by AI and should be reviewed for accuracy before use. While we strive for quality, AI-generated content may contain errors. Please verify measurements, stitch counts, charts, and instructions before beginning your project. Generated by purlJam.uk
Love this pattern?
Save this pattern to your free PurlJam libraryAccess your pattern anytime
Bookmark this page to access your pattern anytime