Type
Crochet
Difficulty
beginner
Category
amigurumi
AI Thinking Process
Planning
Verification
Pattern
Autumn Harvest Pumpkin
A Beginner Amigurumi Pattern
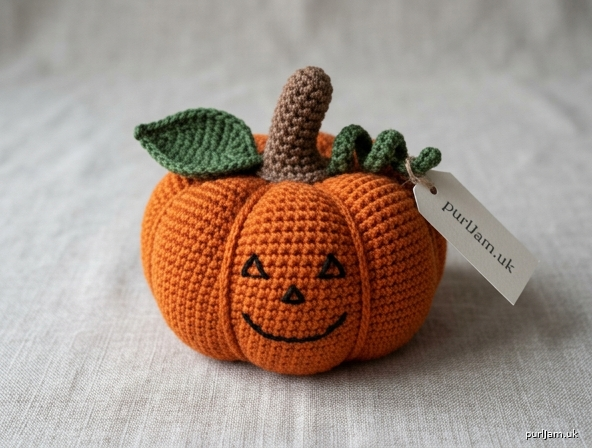
A plump little pumpkin with classic vertical ridges, a short brown stem, and optional leaf, tendril, and jack-o’-lantern face. Worked from basic amigurumi shapes—sphere, small cylinder, and a flat leaf—so it is a friendly first toy project for fall décor, a bowl filler, or a handmade gift.
Skill Level: Beginner
Finished Measurements: About 3.5 inches (9 cm) tall × 4 inches (10 cm) wide after shaping, excluding stem. About 4.5 inches (11.5 cm) tall including stem. Size will vary with yarn, hook, and how firmly you stuff and pull the ridges.
Materials
Yarn: Worsted weight (category 4), acrylic or wool blend
- MC (pumpkin orange): 70 yards (64 m)
- A (brown): 10 yards (9 m)
- B (forest or sage green): 8 yards (7 m)
- C (black, optional face): 2 yards (2 m) or embroidery floss
Hook: US F-5 (3.75 mm), or a hook that gives a dense fabric with no gaps between stitches. If stuffing shows through, go down to US E-4 (3.5 mm). A US G-6 (4.0 mm) makes a slightly larger, softer pumpkin.
Notions:
- Polyester fiberfill
- Yarn needle
- Stitch marker
- Scissors
- Straight pins (for placing ridges, stem, and leaf)
- Optional: black embroidery floss and embroidery needle for a face
Yarn note: One standard worsted skein of orange is more than enough. Tight stitches matter more than exact yardage.
Gauge
5 sc and 5 rounds = 1 inch (2.5 cm) in single crochet, worked in the round.
Gauge is not critical for this toy, but a dense fabric (no visible holes) keeps stuffing inside and helps the ridges look crisp. If your swatch is looser than 5 sc per inch, use a smaller hook.
Abbreviations (US Terms)
| Abbreviation | Meaning |
|---|---|
| ch | chain |
| sc | single crochet |
| hdc | half double crochet |
| dc | double crochet |
| inc | increase — 2 sc in the same stitch |
| dec | decrease — invisible single-crochet 2 together (see Special Stitches) |
| sl st | slip stitch |
| st(s) | stitch(es) |
| rnd(s) | round(s) |
| MR | magic ring |
| FO | fasten off |
| MC, A, B, C | yarn colors as listed |
| [ ] | stitch count at end of round |
Special Stitches
Magic ring (MR): Wrap yarn around your index finger to form a ring. Insert hook into the ring, yarn over, pull up a loop, and ch 1 (does not count as a stitch). Work the stitches of Rnd 1 into the ring, then pull the tail to close.
Magic-ring alternative: Ch 2, work 6 sc into the 2nd ch from the hook. Use the tail to cinch any remaining hole closed.
Invisible decrease (dec): Insert hook under the front loop only of the next st, then under the front loop only of the following st (2 loops on hook from the fabric, plus the loop already on the hook). Yarn over and pull through both front loops (2 loops on hook). Yarn over and pull through both loops. This sits flatter than a standard sc2tog.
Increase (inc): Work 2 sc into the same stitch.
Pattern Notes
- Body and stem are worked in continuous spirals. Do not join and do not turn at the end of a round.
- Place a stitch marker in the first stitch of every round and move it up as you go.
- Work tightly. Amigurumi should feel firm, not drapey.
- Stuff as directed. It is hard to add stuffing after the opening is small.
- The pumpkin body is a sphere that becomes pumpkin-shaped when you wrap and pull six vertical ridges.
- The leaf uses hdc and dc. If you have not learned those stitches yet, work the entire leaf in sc; it will be a simpler oval and still look fine.
- Instructions in parentheses are repeated the number of times stated. Example: (sc, inc) around means sc in the next st, inc in the next st, repeated all the way around.
Pumpkin Body
With MC, work in continuous rounds.
Rnd 1: 6 sc in MR. [6]
Rnd 2: Inc in each st around. [12] (6 increases → 6 + 6 = 12 ✓)
Rnd 3: (Sc, inc) around. [18] (6 increases → 12 + 6 = 18 ✓)
Rnd 4: (2 sc, inc) around. [24] (6 increases → 18 + 6 = 24 ✓)
Rnd 5: (3 sc, inc) around. [30] (6 increases → 24 + 6 = 30 ✓)
Rnd 6: (4 sc, inc) around. [36] (6 increases → 30 + 6 = 36 ✓)
Rnd 7: (5 sc, inc) around. [42] (6 increases → 36 + 6 = 42 ✓)
Rnd 8: (6 sc, inc) around. [48] (6 increases → 42 + 6 = 48 ✓)
Rnds 9–14: Sc in each st around. [48] (6 even rounds)
Rnd 15: (6 sc, dec) around. [42] (6 decreases → 48 − 6 = 42 ✓)
Rnd 16: (5 sc, dec) around. [36] (6 decreases → 42 − 6 = 36 ✓)
Rnd 17: (4 sc, dec) around. [30] (6 decreases → 36 − 6 = 30 ✓)
Rnd 18: (3 sc, dec) around. [24] (6 decreases → 30 − 6 = 24 ✓)
Stuff firmly, pushing filling into a slightly flattened ball (wider than it is tall). Do not under-stuff; the ridges will compress the shape.
Rnd 19: (2 sc, dec) around. [18] (6 decreases → 24 − 6 = 18 ✓)
Rnd 20: (Sc, dec) around. [12] (6 decreases → 18 − 6 = 12 ✓)
Add more stuffing so the pumpkin is plump and there are no collapsed spots.
Rnd 21: Dec around. [6] (6 decreases → 12 − 6 = 6 ✓)
FO, leaving an 8-inch (20 cm) tail. Thread the tail onto a yarn needle, weave through the front loops only of the remaining 6 sts, and pull tight to close the hole. Weave in the end, burying it inside the pumpkin. This closed end is the bottom. The opposite pole (the original magic ring) is the top, where the stem will sit.
Set the body aside. Cut a separate 72-inch (183 cm / 2 yard) length of MC and keep it for the ridges in Assembly.
Stem
With A, work in continuous rounds. Rnd 1 is the tip of the stem; the last round is the base that you sew to the pumpkin.
Rnd 1: 6 sc in MR. [6]
Rnds 2–4: Sc in each st around. [6]
Rnd 5: (Sc, inc) around. [9] (3 increases → 6 + 3 = 9 ✓)
(Sc, inc) is worked 3 times: sc, inc, sc, inc, sc, inc.)
Rnd 6: Sc in each st around. [9]
FO, leaving a 12-inch (30 cm) tail for sewing. Stuff the stem lightly so it holds its shape but is not stiff.
Leaf (optional)
Worked flat, not in the round. With B, ch 8.
Work into the 2nd ch from the hook and across one side of the chain: sl st, sc, hdc, dc, dc, hdc, (sc, ch 2, sc) in the last ch.
Rotate the piece and work along the opposite side of the same foundation chain: hdc, dc, dc, hdc, sc, sl st in the same ch as the first sl st.
FO, leaving an 8-inch (20 cm) tail for sewing.
The ch-2 at the tip makes a small point. Gently tug the leaf into a teardrop shape. Make a second leaf if you want a fuller top.
Tendril (optional)
With B, ch 18.
2 sc in the 2nd ch from the hook and in each ch across. [34] (17 chains × 2 sc = 34 ✓)
The strip will curl on its own. FO, leaving an 8-inch (20 cm) tail. Tug the curl into a loose spiral.
Assembly and Shaping
1. Mark the six ridges
The equator of the pumpkin is 48 stitches. Six ridges divide it into six equal sections of 8 stitches (48 ÷ 6 = 8 ✓).
Around the middle of the pumpkin (about Rnds 11–12), place 6 pins (or removable stitch markers), 8 stitches apart. These marks are your groove lines. Step back and adjust until the spacing looks even.
2. Wrap the ridges
Thread the reserved 72-inch (183 cm) length of MC onto a yarn needle.
- Insert the needle into the center bottom (the closed hole) and bring it straight up through the center top (the magic ring). Leave a 4-inch (10 cm) tail at the bottom to tie off later, or hold it with a finger.
- Lay the yarn along the outside of the pumpkin, lining it up with one pin.
- Insert the needle back into the center bottom and up through the center top again.
- Pull firmly until a clear groove forms. Do not pull so hard that the fabric distorts into a bow-tie; the pumpkin should look like a plump squash with indented sections.
- Repeat steps 2–4 five more times, using each remaining pin as a guide, always entering at the bottom center and exiting at the top center.
- When all 6 ridges are in place, tie the working yarn to the starting tail at the top or bottom with a secure square knot. Weave the ends inside the pumpkin.
You should now have six pumpkin-like segments. If one groove is shallower than the others, give that wrap an extra tug before weaving in.
3. Attach the stem
Pin the stem over the gathered center top, covering the ridge-yarn bundle. Using the brown tail, sew the last round of the stem to the pumpkin with small whip stitches, catching pumpkin stitches just outside the gathered hole. Weave in the end.
4. Attach leaf and tendril
Pin the leaf at the base of the stem so it sits slightly off to one side. Sew the wide end of the leaf in place with a few stitches; leave the tip free.
Tuck one end of the tendril under the stem next to the leaf and sew it down. Let the curl spring out naturally.
Optional Jack-o’-Lantern Face
With C (black yarn or embroidery floss) and a yarn or embroidery needle, stitch a face on one pumpkin segment after shaping, so the ridges frame it.
Simple beginner face:
- Eyes: Two small triangles, each about ½ inch (1.3 cm) tall, using satin stitch or stacked straight stitches. Place them in the upper half of the chosen segment, about ½ inch (1.3 cm) apart.
- Nose (optional): A smaller triangle centered below the eyes.
- Mouth: A shallow V or a wide shallow curve in backstitch, about 1 inch (2.5 cm) across.
Keep stitches on the surface; do not pull so tightly that you create extra dents. Weave ends into the stuffing.
Skip the face if you prefer a plain harvest pumpkin.
Finishing
- Weave in any remaining ends, burying them inside the body or under the stem.
- Roll the pumpkin between your palms to even out the stuffing.
- If a ridge looks off-center, you can pop the needle back through the same path and re-tension that wrap before the ends are fully buried.
- For a decorative bowl, make three in mixed oranges, rust, and cream.
Toy safety: If this pumpkin is for a child under 3 years, sew the stem, leaf, and tendril especially securely and skip any glued-on extras. Check sewn parts periodically.
Quick Reference — Stitch Counts
| Round | Stitches | Change |
|---|---|---|
| 1 | 6 | start |
| 2 | 12 | +6 |
| 3 | 18 | +6 |
| 4 | 24 | +6 |
| 5 | 30 | +6 |
| 6 | 36 | +6 |
| 7 | 42 | +6 |
| 8 | 48 | +6 |
| 9–14 | 48 | even |
| 15 | 42 | −6 |
| 16 | 36 | −6 |
| 17 | 30 | −6 |
| 18 | 24 | −6 |
| 19 | 18 | −6 |
| 20 | 12 | −6 |
| 21 | 6 | −6 |
Stem: 6, 6, 6, 6, 9, 9.
Happy harvest stitching.
Disclaimer: This pattern was generated by AI and should be reviewed for accuracy before use. While we strive for quality, AI-generated content may contain errors. Please verify measurements, stitch counts, charts, and instructions before beginning your project. Generated by purlJam.uk
Love this pattern?
Save this pattern to your free PurlJam libraryAccess your pattern anytime
Bookmark this page to access your pattern anytime