Type
Crochet
Difficulty
advanced
Category
blanket
AI Thinking Process
Planning
Pattern
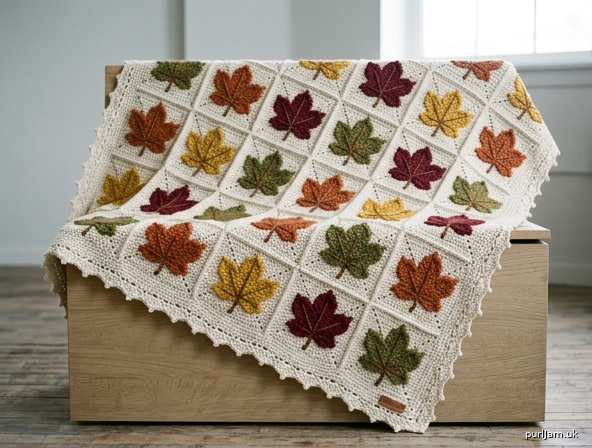
Autumn Maple Leaf Blanket
Skill level: Advanced
Finished size: 53½" × 63½" (136 × 161 cm), including border
Construction: 30 maple-leaf squares, 10" × 10" (25.5 × 25.5 cm) blocked, joined 5 wide × 6 long, plus a 3-round border
A chunky throw of five-lobe maple leaves, each squared with textured rounds and scattered like a forest floor. Surface veins, picot tips, and a leaf-shell border keep the work firmly in advanced territory.
Materials
Yarn: Bulky weight (CYC 5), 1,650 yd (1,510 m) total
| Color | Role | Amount |
|---|---|---|
| MC Oatmeal, cream, or charcoal | Square backgrounds + border | 1,050 yd (960 m) |
| A Rust | Leaves | 140 yd (128 m) |
| B Gold / mustard | Leaves | 140 yd (128 m) |
| C Burgundy | Leaves | 120 yd (110 m) |
| D Olive | Leaves | 120 yd (110 m) |
| E Warm brown | Stems and veins | 80 yd (73 m) |
Solid-leaf variation: drop A–D and E; use 520 yd (475 m) of one contrast for every leaf and work stems in that same color.
Hooks
- US K/10.5 (6.5 mm) — leaves and veins
- US L/11 (8 mm) — squaring rounds, joining, border
Notions
- 4 stitch markers (plus extras for side counting)
- Yarn needle
- Blocking mats and rustproof pins
- Scissors
Gauge
With 8 mm hook, in hdc: 11 hdc × 8 rows = 4" × 4" (10 × 10 cm)
In pattern: 1 blocked maple-leaf square = 10" × 10" (25.5 × 25.5 cm)
Swatch one full square, not plain hdc. If your square is larger than 10", drop to 6.5 mm for Rnds 3–5. If smaller, add an extra even hdc round (31 hdc per side).
Abbreviations (US)
| Abbr. | Meaning |
|---|---|
| BLO | back loop only |
| ch | chain |
| dc | double crochet |
| FPdc | front post double crochet |
| hdc | half double crochet |
| MC | main color |
| PM | place marker |
| rep | repeat |
| rnd | round |
| RS | right side |
| sc | single crochet |
| sk | skip |
| sl st | slip stitch |
| sp | space |
| st(s) | stitch(es) |
| tr | treble crochet |
| WS | wrong side |
| yo | yarn over |
Special Stitches
Magic ring: Wrap yarn around index finger, insert hook under the wrap, yo, pull up a loop, ch as directed, work sts into the ring, then pull the tail to close.
Picot: Ch 2, sl st in the top of the stitch just made.
Surface sl st (vein): With RS facing, insert hook from RS to WS, yo with contrast, pull up a loop. *Insert hook into the next gap along the intended vein, yo, pull through the fabric and through the loop on the hook; rep from * along the vein.
Beginning hdc: Ch 2. Does not count as a stitch when it is only a join-step; it does count as the first hdc when the pattern says “ch 2 (counts as hdc).”
Notes
- US crochet terms throughout. Do not substitute UK double crochet for sc.
- Leaves are worked with the smaller hook so the lobes stay crisp in bulky yarn. Switch to 8 mm when the background begins.
- The 64-sc frame is the most important number in the square. Count it every time.
- Stems may point in any direction (fallen-leaf look) or all point down (hanging-leaf look). Pick one before you join.
- Weave bulky tails as you go — a 10" square can hide only so many.
- Wet-block every square to 10" before joining. Unblocked leaves will not sit square.
Maple Leaf Square
Make 30. Color assignment: A × 8, B × 8, C × 7, D × 7.
Keep RS facing for the entire leaf.
Leaf (6.5 mm hook, leaf color)
Rnd 1 (center): Magic ring, 12 sc in ring, join with sl st to first sc. (12 sc ✓)
Do not fasten off. The 12 sc are used in pairs:
| Pair | Placement (stem at 6 o’clock) |
|---|---|
| Sc 1–2 | Large lobe (top) |
| Sc 3–4 | Medium lobe (upper right) |
| Sc 5–6 | Small lobe (lower right) |
| Sc 7–8 | Stem (bottom) |
| Sc 9–10 | Small lobe (lower left) |
| Sc 11–12 | Medium lobe (upper left) |
Work each lobe into both sides of the chain (back bumps going out, remaining loops coming back).
Large lobe (top): Sl st in sc 1, ch 8.
Working in back bumps: sc in 2nd ch from hook, hdc in next, dc in next, tr in next 2, dc in next, hdc in last ch. (7 sts ✓)
Picot.
Working in remaining loops of the same chain: hdc in first, dc in next, tr in next 2, dc in next, hdc in next, sc in last. (7 sts ✓)
Sl st in sc 2.
Medium lobe (upper right): Sl st in sc 3, ch 6.
Back bumps: sc in 2nd ch from hook, hdc, dc, tr, dc. (5 sts ✓)
Picot.
Remaining loops: dc, tr, dc, hdc, sc. (5 sts ✓)
Sl st in sc 4.
Small lobe (lower right): Sl st in sc 5, ch 5.
Back bumps: sc in 2nd ch from hook, hdc, dc, hdc. (4 sts ✓)
Picot.
Remaining loops: hdc, dc, hdc, sc. (4 sts ✓)
Sl st in sc 6.
Stem: Sl st in sc 7, ch 6. Sc in 2nd ch from hook and in each remaining ch. (5 sc ✓) Sl st in sc 8.
Small lobe (lower left): Work as lower-right small lobe on sc 9–10.
Medium lobe (upper left): Work as upper-right medium lobe on sc 11–12.
Join with sl st to the first sl st of the large lobe. Fasten off leaf color.
Veins (6.5 mm hook or yarn needle, E)
With RS facing, surface-sl-st (or embroidery chain stitch) from the stem tip through the magic ring and out to the large-lobe picot. Add shorter branch veins into each medium and small lobe. Fasten off and weave tails to the WS.
Frame and squaring (8 mm hook, MC)
Rnd 2 (even sc frame): Join MC with sl st in any lobe junction. Work 64 sc evenly around the whole leaf. Suggested distribution (64 sc ✓):
| Section | Sc |
|---|---|
| Large lobe (incl. 3 sc in picot) | 12 |
| Each medium lobe (incl. 3 sc in picot) | 10 × 2 = 20 |
| Each small lobe (incl. 3 sc in picot) | 8 × 2 = 16 |
| Stem (incl. 3 sc in tip) | 10 |
| Six junctions | 1 × 6 = 6 |
| Total | 12 + 20 + 16 + 10 + 6 = 64 ✓ |
Join to first sc. (64 sc ✓)
Place 4 corner markers on sts 1, 17, 33, and 49, rotated so the stem sits toward the middle of one side, not in a corner:
- St 1 = upper right
- St 17 = lower right
- St 33 = lower left
- St 49 = upper left
Check: 15 sc between each marked corner (64 − 4 = 60; 60 ÷ 4 = 15 ✓).
Rnd 3 (varied-height squaring — do not work all hdc): Join is already in place. Ch 1. Starting at the upper-right marker and working clockwise:
- Corner (each of 4): (2 hdc, ch 2, 2 hdc) in marked st.
- Right side (add width): tr in next 2, dc in next 11, tr in next 2. (15 ✓)
- Bottom side (stem already long): sc in next 3, hdc in next 9, sc in next 3. (15 ✓)
- Left side (add width): tr in next 2, dc in next 11, tr in next 2. (15 ✓)
- Top side: sc in next 3, hdc in next 9, sc in next 3. (15 ✓)
Join to first hdc. Each side now has 15 + 2 + 2 = 19 sts between ch-2 spaces ✓.
If the motif is still taller than it is wide, replace 2 dc on each long side with tr on the next round only.
Rnd 4: Sl st into next ch-2 sp, ch 2 (counts as hdc), (hdc, ch 2, 2 hdc) in same sp, hdc in next 19 sts, *(2 hdc, ch 2, 2 hdc) in ch-2 sp, hdc in next 19 sts; rep from * around, join to top of beg ch-2.
(19 + 4 = 23 hdc per side ✓)
Rnd 5: Sl st into next ch-2 sp, ch 2 (counts as hdc), (hdc, ch 2, 2 hdc) in same sp, hdc in next 23 sts, *(2 hdc, ch 2, 2 hdc) in ch-2 sp, hdc in next 23 sts; rep from * around, join.
(23 + 4 = 27 hdc per side ✓)
Square should measure 10" × 10" after blocking. If it is under 9½", work Rnd 6: (2 hdc, ch 2, 2 hdc) in each corner, hdc in next 27 sts. (27 + 4 = 31 hdc per side ✓). Fasten off unless you are using join-as-you-go.
Color Layout
5 columns × 6 rows. Row 1 is the bottom edge as worn / displayed.
Row 6 (top):    A  B  C  D  A
Row 5:          D  A  B  C  B
Row 4:          C  D  A  B  C
Row 3:          B  C  D  A  D
Row 2:          A  B  C  D  A
Row 1 (bottom): D  A  B  C  B
Counts: A 8, B 8, C 7, D 7 ✓
Rotate individual leaves randomly for a fallen-leaf floor, or keep every stem pointing toward Row 1 for hanging leaves.
Joining
Block every square to 10" × 10" first.
Method 1 — Mattress stitch (recommended for bulky yarn)
Lay squares RS up in the charted grid. With MC and yarn needle, mattress-stitch through the outer hdc loops of adjacent edges, matching stitch for stitch (27 to 27). At corners, take one extra stitch through both ch-2 spaces so holes do not open. Join into 6 horizontal strips of 5, then join the strips.
Method 2 — Join-as-you-go (work on Rnd 5 of each new square)
Make Square 1 complete through Rnd 5. For each following square, work Rnd 5 until you reach a side that touches a finished square, then:
- Along a side: *Hdc in next st of current square, sl st into the matching hdc of the finished square; rep from * across the 23 side sts, keeping the join relaxed.
- At a shared corner: (2 hdc, ch 1, sl st into finished square’s ch-2 sp, ch 1, 2 hdc) in the current ch-2 sp.
- At a 4-square junction: Sl st into the same corner space already shared by previous squares.
Work first row of 5 squares left to right, then add rows 2–6 the same way.
Joined body measures 50" × 60" (127 × 152 cm) ✓.
Border
Use 8 mm hook and MC. RS facing. Join in any blanket-corner.
Rnd 1: Ch 1, sc evenly around the entire blanket, working 3 sc in each of the 4 blanket corners.
Target counts between the 3-sc corner groups (adjust by 1–2 sc at seams if needed):
- Short sides (50"): 138 sc (138 ÷ 6 = 23 ✓)
- Long sides (60"): 168 sc (168 ÷ 6 = 28 ✓)
Total including 3 sc in each corner: 138 × 2 + 168 × 2 + 12 = 624 sc ✓. Join.
Rnd 2: Ch 2 (counts as hdc), hdc in each sc around, working (2 hdc, ch 2, 2 hdc) in the center sc of each 3-sc corner. Join to top of beg ch-2.
Rnd 3 (maple-point shells): Sl st into the first ch-2 corner sp.
In each ch-2 corner: (hdc, dc, tr, picot, tr, dc, hdc).
Then along each side, over every 6 sts: *sk 2, (hdc, dc, tr, picot, tr, dc, hdc) in next st, sk 2, sl st in next st; rep from * to the next corner.
Repeats: 23 shells per short side, 28 per long side, plus 1 shell in each of 4 corners. (23 × 2 + 28 × 2 + 4 = 106 shells ✓)
Join to first hdc. Fasten off.
Finishing
- Weave in every remaining tail on the WS. Bulky tails should be split and woven in two directions.
- Wet-block the finished blanket. Soak 15–20 minutes in cool water with a drop of wool wash. Press out water in towels (do not wring). Pin to 53½" × 63½" (136 × 161 cm), opening each picot and each leaf lobe. Dry flat, out of sun.
- If you prefer not to soak the whole piece, steam-block: hover the iron above the fabric, never crushing the leaves or picots.
- After dry, tug each shell picot once so the maple points stand.
Stitch Diagrams & Legend
Legend
| Symbol | Stitch |
|---|---|
| ○ | magic ring / ch |
| ● | sc |
| T | hdc |
| † | dc |
| ‡ | tr |
| ∧ | picot (ch 2, sl st) |
| ◇ | ch-2 corner space |
| — | sl st |
| ╱ ╲ | surface sl st vein |
Maple leaf (one motif, RS)
                    ∧
                   /‡‡\
                  †    †
                 T      T
                ●        ●          LARGE LOBE
                 \      /
            ∧     \    /     ∧
           /‡\     \  /     /‡\
          †   †    ●●●    †   †     MEDIUM LOBES
          T   T           T   T
          ●   ●           ●   ●
           \ /             \ /
            ●               ●
        ∧   |               |   ∧
       /‡\  |     12 sc     |  /‡\
      T   T |    CENTER     | T   T  SMALL LOBES
      ●   ● |               | ●   ●
       \ /  |               |  \ /
        ●   ●               ●   ●
            ●               ●
             \     ●●●     /
              ●  STEM 5 sc ●
                   ●●●
                    ∧
Work each lobe out and back on one chain; picot sits at the tip. Stem is a single 5-sc chain.
Square construction
Rnd 5  hdc  (2 hdc, ch 2, 2 hdc) corners   27 hdc / side
Rnd 4  hdc  even                            23 hdc / side
Rnd 3  mixed heights (tr/dc on sides,
       sc/hdc on top & bottom)              19 sts / side
Rnd 2  64 sc, markers on 1 / 17 / 33 / 49
Leaf   5 lobes + stem on 12-sc ring
Blanket schematic (each cell = 10")
50"  ←——————————————→
A B C D A  ↑
D A B C B  |
C D A B C  60"
B C D A D  |
A B C D A  |
D A B C B  ↓
+ 1¾" border all around
= 53½" × 63½"
JAYG corner (optional method)
Current square              Finished square
(2 hdc, ch 1, sl st into ◇, ch 1, 2 hdc)
         └── join in the same ch-2 space
Inline Count Recap
| Step | Count | Check |
|---|---|---|
| Leaf center | 12 sc | 6 pairs × 2 = 12 ✓ |
| Large lobe each side | 7 | ch-8, start in 2nd ch ✓ |
| Medium lobe each side | 5 | ch-6, start in 2nd ch ✓ |
| Small lobe each side | 4 | ch-5, start in 2nd ch ✓ |
| Stem | 5 sc | ch-6, start in 2nd ch ✓ |
| Sc frame | 64 | 12+20+16+10+6 = 64 ✓ |
| Sts between corners | 15 | (64 − 4) ÷ 4 = 15 ✓ |
| Rnd 3 side | 19 | 15 + 2 + 2 = 19 ✓ |
| Rnd 4 side | 23 | 19 + 4 = 23 ✓ |
| Rnd 5 side | 27 | 23 + 4 = 27 ✓ |
| Squares | 30 | 5 × 6 = 30 ✓ |
| Body | 50" × 60" | 5 × 10, 6 × 10 ✓ |
| Border sides | 138 / 168 sc | 138 ÷ 6 = 23, 168 ÷ 6 = 28 ✓ |
| Border total | 624 sc | 276 + 336 + 12 = 624 ✓ |
| Finished | 53½" × 63½" | 50 + 3½, 60 + 3½ ✓ |
Disclaimer: This pattern was generated by AI and should be reviewed for accuracy before use. While we strive for quality, AI-generated content may contain errors. Please verify measurements, stitch counts, charts, and instructions before beginning your project. Generated by purlJam.uk
Love this pattern?
Save this pattern to your free PurlJam libraryAccess your pattern anytime
Bookmark this page to access your pattern anytime