Type
Crochet
Difficulty
beginner
Category
amigurumi
AI Thinking Process
Planning
Verification
Pattern
BABY DRAGON AMIGURUMI PATTERN
Cute Mini Dragon – Beginner Friendly
[Your Brand Name] Instant Download PDF
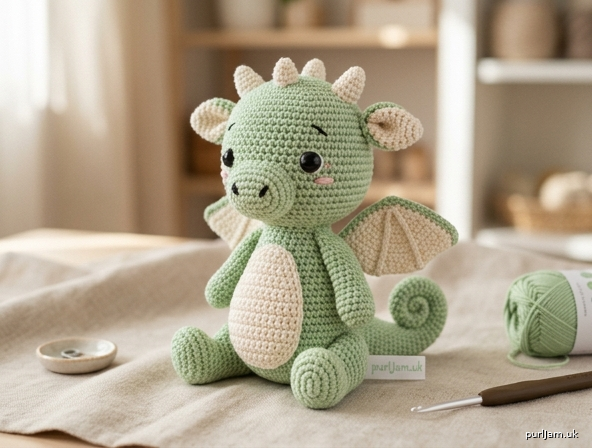
A chubby little sitting dragon with a pastel green body, cream belly, tiny wings, and four small horns. Worked in basic amigurumi stitches — perfect for a first toy.
MATERIALS
Yarn — Cotton DK (light worsted / 3):
- Color A — Light Green: 45 yd / 41 m (about 20 g)
- Color B — Cream: 30 yd / 27 m (about 15 g)
- Scrap pink (any light DK or embroidery floss) for blush
Suggested: Paintbox Yarns Cotton DK, Paintbox Pistachio Green and Champagne White, or any similar cotton DK.
Hook: US E-4 (3.5 mm) — go down a size if your fabric is loose
Eyes: 10 mm safety eyes (pair)
Notions: stitch marker, polyester fiberfill, yarn needle, scissors, pins
Optional: pink or peach embroidery floss for blush; black embroidery floss for nostrils/smile
Gauge (worked tightly in sc): 6 sts and 7 rnds = 1" (2.5 cm)
Gauge is not critical, but fabric must be dense so stuffing does not show.
Finished size: approx 4.5" (12 cm) tall when seated.
ABBREVIATIONS (US TERMS)
MR — magic ring (adjustable loop; work the stated sc into the ring, then pull closed)
SC — single crochet
INC — increase (2 sc in the same stitch)
DEC — decrease (sc 2 stitches together; use an invisible decrease for a smoother look)
SL ST — slip stitch
CH — chain
Also used: st(s) stitch(es) · rnd(s) round(s) · FO fasten off · rep repeat
SKILL LEVEL
Beginner. You should be comfortable with a magic ring, single crochet, increases, decreases, and sewing pieces together. Step-by-step tips are included.
SIZE
Approx 4.5" (12 cm) tall, seated, in cotton DK with a 3.5 mm hook. Size will change with yarn, hook, and how tightly you crochet.
NOTES BEFORE YOU START
- Work in a continuous spiral unless a row is specified. Do not join or chain up at the end of a round.
- Place a stitch marker in the first stitch of every round and move it up as you go.
- Stuff firmly as you decrease — it is hard to add stuffing later.
- Use an invisible decrease (insert hook through front loops only of the next 2 sts, yarn over, pull through both, yarn over, pull through 2) for a smooth surface.
- Safety eyes are a choking hazard. They are not suitable for children under 3 years. For a baby-safe toy, embroider the eyes with black yarn instead.
- Numbers in [brackets] are the stitch count at the end of that round. Check every round.
PATTERN INSTRUCTIONS
Work all pieces in a spiral unless noted. Leave a long tail on every piece that will be sewn on.
HEAD
Color A (light green). Do not stuff until stated.
R1: 6 sc in MR [6]
R2: inc in each st around [12] (6 increases → 6 + 6 = 12 ✓)
R3: (1 sc, inc) 6 times [18] (6 increases → 12 + 6 = 18 ✓)
R4: (2 sc, inc) 6 times [24] (6 increases → 18 + 6 = 24 ✓)
R5: (3 sc, inc) 6 times [30] (6 increases → 24 + 6 = 30 ✓)
R6: (4 sc, inc) 6 times [36] (6 increases → 30 + 6 = 36 ✓)
R7–R14: sc in each st around [36] (8 rounds even)
Place safety eyes between R10 and R11, 7 stitches apart, centered on the face. Do not attach the washers until you are happy with the spacing. For embroidered eyes, mark the same spots and stitch after the head is closed.
R15: (4 sc, dec) 6 times [30] (6 decreases → 36 − 6 = 30 ✓)
R16: (3 sc, dec) 6 times [24] (6 decreases → 30 − 6 = 24 ✓)
R17: (2 sc, dec) 6 times [18] (6 decreases → 24 − 6 = 18 ✓)
Stuff the head firmly, pushing filling up into the top so it is round, not flat.
R18: (1 sc, dec) 6 times [12] (6 decreases → 18 − 6 = 12 ✓)
R19: dec 6 times [6] (6 decreases → 12 − 6 = 6 ✓)
FO. Weave the tail through the front loops of the remaining 6 sts and pull closed. Weave in.
BODY
Color A (light green).
R1: 6 sc in MR [6]
R2: inc in each st around [12] (6 increases → 6 + 6 = 12 ✓)
R3: (1 sc, inc) 6 times [18] (6 increases → 12 + 6 = 18 ✓)
R4: (2 sc, inc) 6 times [24] (6 increases → 18 + 6 = 24 ✓)
R5: (3 sc, inc) 6 times [30] (6 increases → 24 + 6 = 30 ✓)
R6–R12: sc in each st around [30] (7 rounds even)
R13: (3 sc, dec) 6 times [24] (6 decreases → 30 − 6 = 24 ✓)
R14: sc in each st around [24]
R15: (2 sc, dec) 6 times [18] (6 decreases → 24 − 6 = 18 ✓)
Stuff firmly, with extra filling in the base so the dragon sits. FO, leaving a 12" (30 cm) tail for sewing the head on.
BELLY PATCH
Color B (cream). Worked in the round around a starting chain to make a small oval.
Ch 7.
R1: sc in 2nd ch from hook, sc in next 4 ch, 3 sc in last ch; rotate and work along the other side of the chain: sc in next 4 ch, 2 sc in the last ch (the first chain) [14]
R2: inc, 4 sc, inc in next 3 sts, 4 sc, inc in next 2 sts [20] (6 increases → 14 + 6 = 20 ✓)
R3: 1 sc, inc, 4 sc, (1 sc, inc) 3 times, 4 sc, (1 sc, inc) 2 times [26] (6 increases → 20 + 6 = 26 ✓)
FO, leaving a 14" (35 cm) tail for sewing. Do not stuff.
EARS
Color B (cream). Make 2. Do not stuff. Flatten when sewing.
R1: 6 sc in MR [6]
R2: (1 sc, inc) 3 times [9] (3 increases → 6 + 3 = 9 ✓)
R3: (2 sc, inc) 3 times [12] (3 increases → 9 + 3 = 12 ✓)
R4: sc in each st around [12]
FO, leaving an 8" (20 cm) tail. Flatten into a semi-circle.
WINGS
Color B (cream). Make 2. Do not stuff.
R1: 6 sc in MR [6]
R2: inc in each st around [12] (6 increases → 6 + 6 = 12 ✓)
R3: (1 sc, inc) 6 times [18] (6 increases → 12 + 6 = 18 ✓)
R4: (2 sc, inc) 6 times [24] (6 increases → 18 + 6 = 24 ✓)
Do not stuff. Fold the circle in half to make a half-moon. Working through both layers, sc in each st across [12]. FO, leaving a 10" (25 cm) tail.
SMALL HORNS
Color B (cream). Make 4. Stuff very lightly.
R1: 4 sc in MR [4]
R2: (1 sc, inc) 2 times [6] (2 increases → 4 + 2 = 6 ✓)
R3–R4: sc in each st around [6] (2 rounds even)
FO, leaving an 8" (20 cm) tail. Stuff with a tiny pinch of fiberfill (a yarn needle helps). These are little nubs — do not overstuff.
ARMS
Color A (light green). Make 2.
R1: 6 sc in MR [6]
R2: (1 sc, inc) 3 times [9] (3 increases → 6 + 3 = 9 ✓)
R3–R8: sc in each st around [9] (6 rounds even)
Stuff the lower half only (the “hand”), leaving the top open and softly filled so the arm sits flat against the body. FO, leaving a 10" (25 cm) tail.
LEGS
Color A (light green). Make 2.
R1: 6 sc in MR [6]
R2: inc in each st around [12] (6 increases → 6 + 6 = 12 ✓)
R3: sc in each st around [12]
R4: (2 sc, dec) 3 times [9] (3 decreases → 12 − 3 = 9 ✓)
R5–R8: sc in each st around [9] (4 rounds even)
Stuff the foot firmly and the leg lightly. FO, leaving a 10" (25 cm) tail.
TAIL (WITH CURL)
Color A (light green).
R1: 4 sc in MR [4]
R2: sc in each st around [4]
R3: (1 sc, inc) 2 times [6] (2 increases → 4 + 2 = 6 ✓)
R4–R6: sc in each st around [6] (3 rounds even)
R7: (2 sc, inc) 2 times [8] (2 increases → 6 + 2 = 8 ✓)
R8–R12: sc in each st around [8] (5 rounds even)
R13: (3 sc, inc) 2 times [10] (2 increases → 8 + 2 = 10 ✓)
R14–R16: sc in each st around [10] (3 rounds even)
Stuff only the wider half (R10–R16, the body end). Leave the tip empty so it bends. FO, leaving a 12" (30 cm) tail. Curve the unstuffed tip into a spiral and tack the curl in place with 2–3 tiny stitches on the inside of the coil before sewing the tail to the body.
ASSEMBLY
Pin every piece before you sew. Use Color A yarn for green-to-green joins and Color B for cream pieces. Whipstitch through the outside loops for a neat seam.
1. Face (do this first)
Safety eyes should already sit between R10 and R11, 7 sts apart. If you are embroidering eyes instead, stitch two small filled ovals or French-knot pupils in the same spots.
Blush: With pink yarn or floss, embroider 2–3 short horizontal satin stitches on each cheek, about 1 round below the eye and 1 st toward the side. Keep them small and even.
Optional snout: With Color A or a scrap of black, stitch two tiny vertical nostrils on the lower front of the head (around R14–R15, 2 sts apart) and a small curved smile between them.
2. Belly
Center the cream oval on the front of the body, covering roughly R6–R13. The wider end of the oval sits toward the bottom. Whipstitch all around.
3. Head to body
The open [18] edge of the body is the neck. Pin the head on so the face looks slightly down (cuter than staring straight ahead). Sew all the way around, adding a last pinch of stuffing in the neck before closing.
4. Legs
Sew the legs to the lower front of the body (around R4–R6), angled forward and slightly out so the dragon sits. The stuffed “foot” faces forward.
5. Arms
Sew the arms to the sides of the body, just below the neck seam (around body R13–R14), 1–2 rounds under the head. Angle them slightly forward.
6. Wings
Sew the folded (straight) edge of each wing to the upper back, one on each side of the spine, around body R12–R14. The curved edge points up and out.
7. Tail
Sew the wide [10] end to the lower back of the body, centered, around R4–R6. The curl should sit to one side. Add a hidden stitch or two to hold the coil.
8. Ears
Flattened edge against the head, sew between R8 and R11, one on each side, just behind the eye line.
9. Horns (all 4)
- Front pair: top of the head between R4 and R6, about 4 sts apart, slightly in front of center.
- Back pair: one round behind the first pair (around R5–R7), or sew them as two tiny spikes down the upper back behind the head.
Weave in every remaining tail.
TIPS FOR BEGINNERS
- Magic ring too fiddly? Ch 2, then work R1 into the 2nd ch from the hook. Pull the starting tail to close the hole.
- Count every round. If you are short or over, the next increase/decrease round will spiral. Frog back one round rather than “make it work.”
- Tight stitches win. If you can see stuffing, go down to a 3.25 mm or 3.0 mm hook.
- Invisible decrease keeps the head and body smooth. Regular sc2tog is fine if you prefer; it just leaves a slight ridge.
- Stuff in small pinches, not one big wad. Push filling into the cheeks of the head with the back of your hook.
- Pin, then sew. Step back and look at both sides. Matching left and right (eyes, ears, arms, wings, horns) is what makes it look “store-bought.”
- Closing the last hole: thread the tail through the front loop of each remaining st, pull like a drawstring, then poke the needle through the piece and snip.
- Baby-safe version: skip safety eyes and embroider them. Sew all parts extra securely and check for loose yarn ends.
- Yarn under vs yarn over: either works. Stay consistent so your stitches match.
COPYRIGHT
You can sell finished products made from this pattern, but you may not sell, copy, share, or distribute the pattern itself (in print or digital form).
Please credit [Your Brand Name] as the designer when selling finished dragons.
Designed by [Your Brand Name]
Personal use and handmade-sales of finished toys permitted. Pattern copyright reserved.
PRODUCT DESCRIPTION (Etsy / Payhip)
Baby Dragon Amigurumi Crochet Pattern — Cute Mini Dragon PDF — Beginner Friendly
Meet the tiniest member of the dragon family. This sitting baby dragon is about 4.5" (12 cm) tall, with a pastel green body, cream belly, little wings, four small horns, and a curled tail. The pattern is written for true beginners — only single crochet, increases, and decreases, with stitch counts at the end of every round.
This is a digital PDF pattern, not a finished toy.
You will receive:
- Instant-download PDF written in US crochet terms
- Complete materials list (cotton DK, 3.5 mm hook, 10 mm safety eyes)
- Abbreviations with plain-English explanations
- Step-by-step rounds for head, body, belly patch, ears, wings, 4 horns, arms, legs, and curly tail
- Assembly guide with exact eye placement (between rounds 10–11, 7 stitches apart) and blush embroidery
- Beginner tips for magic ring, stuffing, and sewing
Skill level: Beginner
Size: Approx 4.5 inches (12 cm) seated
Yarn: Cotton DK in light green and cream
Language: English
Make one for a nursery shelf, a baby shower (embroider the eyes for under-3s), or a kawaii desk buddy. Finished toys may be sold; please credit [Your Brand Name] as the designer. The pattern file itself may not be resold or shared.
Please note: This is an instant digital download. No physical item will be shipped. Due to the nature of digital files, refunds cannot be given once the PDF has been downloaded.
13 SEO TAGS
- baby dragon crochet
- amigurumi pattern
- crochet dragon
- beginner crochet
- amigurumi dragon
- dragon plushie
- baby shower gift
- kawaii crochet
- stuffed animal PDF
- cute dragon toy
- nursery crochet
- instant download
- pastel amigurumi
Disclaimer: This pattern was generated by AI and should be reviewed for accuracy before use. While we strive for quality, AI-generated content may contain errors. Please verify measurements, stitch counts, charts, and instructions before beginning your project. Generated by purlJam.uk
Love this pattern?
Save this pattern to your free PurlJam libraryAccess your pattern anytime
Bookmark this page to access your pattern anytime