Type
Crochet
Difficulty
beginner
Category
amigurumi
AI Thinking Process
Planning
Verification
Pattern
Baby Sea Turtle Plush
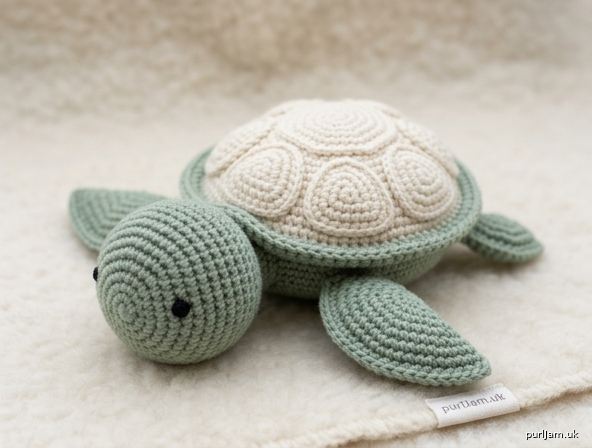
A cute hatchling sea turtle worked in worsted-weight yarn from simple amigurumi shapes. The oversized sage-green head has two small black eyes and no mouth. A softly flattened oval body carries two large front flippers, two smaller rear flippers, and a tiny centered tail. The signature shell is a shallow cream dome with one raised center panel, six surrounding padded wedges, and a thick sage-green rim.
Skill level: Beginner
Finished size: About 5½ in (14 cm) long from head to tail, 5½ in (14 cm) wide including front flippers, and 2½ in (6.5 cm) tall, using the yarn and hook given.
Materials
- Worsted weight (4) yarn
- Sage green: 70 yd (64 m) — head, body, flippers, tail, and shell rim
- Cream: 45 yd (41 m) — shell base, center panel, and wedges
- Black: small scrap — embroidered eyes (omit if using safety eyes)
- US E-4 / 3.5 mm crochet hook (or size needed to obtain a tight fabric with no gaps)
- 6 mm black safety eyes (optional; see Safety)
- Polyester fiberfill stuffing
- Yarn needle
- Stitch marker
- Straight pins
- Scissors
Gauge
5 sc and 5 rnds = 1 in (2.5 cm) in single crochet, worked tightly in the round.
Gauge is a fabric check, not a fit check. If stuffing shows through, go down a hook size. A slightly looser gauge makes a larger turtle; a tighter gauge makes a smaller one.
Abbreviations (US)
- ch — chain
- sc — single crochet
- hdc — half double crochet
- inc — increase (2 sc in the same stitch)
- dec — invisible decrease (single crochet 2 stitches together)
- sl st — slip stitch
- MR — magic ring
- BLO — back loop only
- st(s) — stitch(es)
- rnd(s) — round(s)
- FO — fasten off
- [ ] — stitch count at end of round
Pattern Notes
- Use US crochet terms throughout.
- Work in a continuous spiral unless told to join. Place a stitch marker in the first stitch of each round and move it up as you go.
- Work tightly so stuffing does not show. Invisible decreases keep the surface smooth.
- Magic-ring alternative: ch 2, work the stated number of sc into the 2nd ch from the hook, then continue as written.
- Stuff the head firmly and the body only moderately so the body stays softly flattened.
- Do not stuff the flippers; flatten them into paddles.
- Do not embroider a mouth. The face is two small eyes only.
- Pin every piece before sewing. Use whip stitch in matching yarn unless noted.
Safety
If this toy is for a child under 3 years, do not use safety eyes. Embroider the eyes with black yarn instead, and sew all parts on securely. Safety eyes are a choking hazard if they work loose.
Head
Oversized round head. Sage green. Make 1.
Rnd 1: 6 sc in MR. [6]
Rnd 2: Inc in each st around. [12] (6 increases → 6 + 6 = 12 ✓)
Rnd 3: (Sc, inc) around. [18] (6 increases → 12 + 6 = 18 ✓)
Rnd 4: (2 sc, inc) around. [24] (6 increases → 18 + 6 = 24 ✓)
Rnd 5: (3 sc, inc) around. [30] (6 increases → 24 + 6 = 30 ✓)
Rnd 6: (4 sc, inc) around. [36] (6 increases → 30 + 6 = 36 ✓)
Rnds 7–12: Sc around. [36] (6 rounds)
Rnd 13: (4 sc, dec) around. [30] (6 decreases → 36 − 6 = 30 ✓)
Rnd 14: (3 sc, dec) around. [24] (6 decreases → 30 − 6 = 24 ✓)
Eyes: Insert 6 mm safety eyes between Rnds 10 and 11, 8 stitches apart, centered on the face. If embroidering, wait until the head is closed, then stitch two small filled ovals or French knots in the same spot. Do not add a mouth.
Rnd 15: (2 sc, dec) around. [18] (6 decreases → 24 − 6 = 18 ✓)
Stuff the head firmly, filling the top first and keeping the sphere round.
Rnd 16: (Sc, dec) around. [12] (6 decreases → 18 − 6 = 12 ✓)
Rnd 17: Dec around. [6] (6 decreases → 12 − 6 = 6 ✓)
FO, leaving a 12 in (30 cm) tail. Weave the tail through the front loops of the remaining 6 sts, pull closed, and hide the end. Set aside.
Body
Softly flattened oval. Sage green. Make 1.
Ch 9.
Rnd 1: 3 sc in 2nd ch from hook, sc in next 6 ch, 3 sc in last ch; rotate to work along the other side of the chain, sc in next 6 ch. [18] (3 + 6 + 3 + 6 = 18 ✓)
Rnd 2: Inc in next 3 sts, 6 sc, inc in next 3 sts, 6 sc. [24] (6 increases → 18 + 6 = 24 ✓)
Rnd 3: (Sc, inc) 3 times, 6 sc, (sc, inc) 3 times, 6 sc. [30] (6 increases → 24 + 6 = 30 ✓)
Rnd 4: (2 sc, inc) 3 times, 6 sc, (2 sc, inc) 3 times, 6 sc. [36] (6 increases → 30 + 6 = 36 ✓)
Rnd 5: (3 sc, inc) 3 times, 6 sc, (3 sc, inc) 3 times, 6 sc. [42] (6 increases → 36 + 6 = 42 ✓)
Rnds 6–11: Sc around. [42] (6 rounds)
Rnd 12: (3 sc, dec) 3 times, 6 sc, (3 sc, dec) 3 times, 6 sc. [36] (6 decreases → 42 − 6 = 36 ✓)
Rnd 13: (2 sc, dec) 3 times, 6 sc, (2 sc, dec) 3 times, 6 sc. [30] (6 decreases → 36 − 6 = 30 ✓)
Rnd 14: (Sc, dec) 3 times, 6 sc, (sc, dec) 3 times, 6 sc. [24] (6 decreases → 30 − 6 = 24 ✓)
Stuff moderately. Press the piece between your palms as you stuff so it stays a softly flattened oval — plump, not ball-like. Do not pack it firm.
Rnd 15: Dec in next 3 sts, 6 sc, dec in next 3 sts, 6 sc. [18] (6 decreases → 24 − 6 = 18 ✓)
Rnd 16: (Sc, dec) around. [12] (6 decreases → 18 − 6 = 12 ✓)
FO, leaving a 10 in (25 cm) tail. Weave through the remaining 12 sts, pull closed, and hide the end. The longer axis of the oval is head-to-tail.
Front Flippers
Large paddles. Sage green. Make 2. Do not stuff.
Ch 8.
Rnd 1: 3 sc in 2nd ch from hook, sc in next 5 ch, 3 sc in last ch; rotate, sc in next 5 ch. [16] (3 + 5 + 3 + 5 = 16 ✓)
Rnd 2: Inc in next 3 sts, 5 sc, inc in next 3 sts, 5 sc. [22] (6 increases → 16 + 6 = 22 ✓)
Rnd 3: (Sc, inc) 3 times, 5 sc, (sc, inc) 3 times, 5 sc. [28] (6 increases → 22 + 6 = 28 ✓)
Rnds 4–6: Sc around. [28] (3 rounds)
Rnd 7: (Sc, dec) 3 times, 5 sc, (sc, dec) 3 times, 5 sc. [22] (6 decreases → 28 − 6 = 22 ✓)
Rnd 8: Dec in next 3 sts, 5 sc, dec in next 3 sts, 5 sc. [16] (6 decreases → 22 − 6 = 16 ✓)
Rnds 9–11: Sc around. [16] (3 rounds — narrow base for sewing)
FO, leaving an 12 in (30 cm) tail. Flatten the piece firmly into a paddle: wide rounded end at Rnds 1–6, narrower wrist at Rnds 9–11. Do not stuff.
Rear Flippers
Smaller paddles. Sage green. Make 2. Do not stuff.
Ch 6.
Rnd 1: 3 sc in 2nd ch from hook, sc in next 3 ch, 3 sc in last ch; rotate, sc in next 3 ch. [12] (3 + 3 + 3 + 3 = 12 ✓)
Rnd 2: Inc in next 3 sts, 3 sc, inc in next 3 sts, 3 sc. [18] (6 increases → 12 + 6 = 18 ✓)
Rnds 3–4: Sc around. [18] (2 rounds)
Rnd 5: Dec in next 3 sts, 3 sc, dec in next 3 sts, 3 sc. [12] (6 decreases → 18 − 6 = 12 ✓)
Rnds 6–7: Sc around. [12] (2 rounds)
FO, leaving a 10 in (25 cm) tail. Flatten into a small paddle. Do not stuff.
Tail
Tiny centered tail. Sage green. Make 1.
Rnd 1: 4 sc in MR. [4]
Rnd 2: (Sc, inc) around. [6] (2 increases → 4 + 2 = 6 ✓)
Rnds 3–4: Sc around. [6] (2 rounds)
FO, leaving an 8 in (20 cm) tail. Stuff very lightly, just enough to keep the tube from collapsing.
Shell Base
Shallow cream dome. Cream. Make 1. Leave open.
Rnd 1: 6 sc in MR. [6]
Rnd 2: Inc in each st around. [12] (6 increases → 6 + 6 = 12 ✓)
Rnd 3: (Sc, inc) around. [18] (6 increases → 12 + 6 = 18 ✓)
Rnd 4: (2 sc, inc) around. [24] (6 increases → 18 + 6 = 24 ✓)
Rnd 5: (3 sc, inc) around. [30] (6 increases → 24 + 6 = 30 ✓)
Rnd 6: (4 sc, inc) around. [36] (6 increases → 30 + 6 = 36 ✓)
Rnd 7: (5 sc, inc) around. [42] (6 increases → 36 + 6 = 42 ✓)
Rnd 8: (6 sc, inc) around. [48] (6 increases → 42 + 6 = 48 ✓)
Rnds 9–11: Sc around. [48] (3 rounds — keeps the dome shallow, not bowl-deep)
Do not fasten off if you prefer to change color without cutting; otherwise FO cream and weave in the end. Do not stuff the base yet.
Center Panel
Raised cream oval. Cream. Make 1.
Ch 5.
Rnd 1: 3 sc in 2nd ch from hook, sc in next 2 ch, 3 sc in last ch; rotate, sc in next 2 ch. [10] (3 + 2 + 3 + 2 = 10 ✓)
Rnd 2: Inc in next 3 sts, 2 sc, inc in next 3 sts, 2 sc. [16] (6 increases → 10 + 6 = 16 ✓)
Rnd 3: Sc around. [16]
FO, leaving a 12 in (30 cm) tail. Stuff so the panel is firmly puffy and slightly flattened on the back (the side that will sit on the shell). This is the raised center scute.
Shell Wedges
Padded surrounding scutes. Cream. Make 6.
Rnd 1: 6 sc in MR. [6]
Rnd 2: Inc in each st around. [12] (6 increases → 6 + 6 = 12 ✓)
Rnd 3: (2 sc, inc) around. [16] (4 increases → 12 + 4 = 16 ✓)
Rnd 4: Sc around. [16]
FO, leaving a 12 in (30 cm) tail on each. Stuff very lightly — a pinch of fiberfill only — and flatten each piece into a rounded teardrop (the magic-ring end is the point). These six pads become the wedges around the center panel.
Sage-Green Rim
Thick rim worked onto the shell base. Sage green.
Join sage green with a sl st to any stitch of Shell Base Rnd 11.
Rnd 12: BLO sc around. [48]
Working in the back loops only makes a neat cream shelf above the sage rim.
Rnd 13: Hdc around. [48]
The hdc round adds the extra bulk of a thick rim.
Rnd 14: Sc around. [48]
FO, leaving an 18 in (46 cm) tail for sewing the shell to the body.
Shell Sculpture (do this before attaching the shell to the body)
-
Center panel. Pin the stuffed center panel over the magic ring of the shell base, cream side up. Whip-stitch all the way around the outline, keeping the middle raised. The panel should sit in the exact center of the dome.
-
Six wedges. Arrange the 6 teardrops around the center panel like pie slices: points toward the center, wide ends toward the sage rim. Space them evenly (about 8 stitches of the 48-st rim between the midline of each wedge). Leave a narrow groove between neighboring wedges — do not let them overlap.
-
Sew only the outlines. Whip-stitch around the edge of each wedge, catching the shell base. Do not stitch across the middle of a wedge. The light stuffing plus outline-only sewing is what makes each scute look padded and sculpted.
-
Optional groove definition. With cream yarn, work a line of surface slip stitch in each groove between wedges, from the center panel out to the rim. This is extra, not required.
The finished shell is a shallow cream dome with one raised center, six padded wedges, and a thick sage rim.
Assembly
Pin every piece first. Check both the top view and the side view before sewing. Use matching yarn and small whip stitches.
1. Shell to body
Place the sculpted shell on top of the body, cream side up, sage rim sitting just inside the body’s outer edge. The longer axis of the body should peek out a little at the front (for the head) and a little at the back (for the tail). Add a thin layer of fiberfill under the shell if you want a slightly loftier dome — keep it shallow. Whip-stitch Rnd 14 of the sage rim to the body all the way around.
2. Head
Sew the head to the front end of the body so the lower third of the head sits against the body and the top of the head tucks just under the front of the sage rim. The eyes face forward and slightly down. The head should look oversized next to the flattened body. Sew firmly around the contact ring.
3. Front flippers
Pin one large paddle on each side of the body, just behind the head, wrists against the body and wide ends sweeping slightly forward and out. Angle them so they sit flat, like swimming paddles, not hanging down. Sew around the 16-st wrist (Rnds 9–11), catching body stitches. Repeat on the other side, matching placement.
4. Rear flippers
Pin the two small paddles at the back corners of the body, just in front of where the tail will sit, angled slightly back and out. Sew around each 12-st base. They should read clearly smaller than the front flippers.
5. Tail
Sew the tiny tail to the center back of the body, on the midline, just under the back of the sage rim, between the rear flippers. Attach Rnd 4 against the body so the tip points straight back.
6. Check
From above you should see: oversized round head, two small black eyes, no mouth, cream shell with 1 center panel + 6 wedges, thick sage rim, two large front flippers, two small rear flippers, and a tiny centered tail.
Finishing
- Weave in every remaining end, burying them inside stuffed pieces.
- Steam is optional and light only — do not crush the shell sculpture. A quick hover of steam can relax flipper edges if they curl.
- If a wedge looks flat, add one extra outline stitch to pull the edge down and pop the center up.
- If the body rounded out, massage it flat from underneath; the sewn-on shell will help hold the flattened shape.
Your baby sea turtle is ready.
Disclaimer: This pattern was generated by AI and should be reviewed for accuracy before use. While we strive for quality, AI-generated content may contain errors. Please verify measurements, stitch counts, charts, and instructions before beginning your project. Generated by purlJam.uk
Love this pattern?
Save this pattern to your free PurlJam libraryAccess your pattern anytime
Bookmark this page to access your pattern anytime