Type
Crochet
Difficulty
beginner
Category
amigurumi
AI Thinking Process
Planning
Verification
Pattern
Beginner Amigurumi Fox
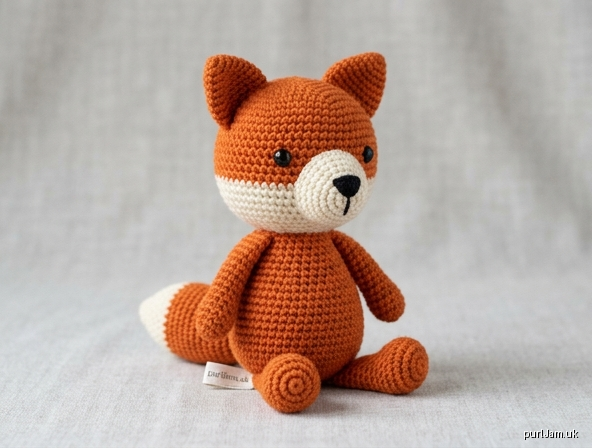
Simple-shapes sitting fox in DK yarn
Skill level: Beginner
Finished size: About 5–6 in (13–15 cm) tall when sitting
Yarn: DK (3) — orange (MC), white or cream (CC), small amount black for nose/eyes
Hook: US E-4 / 3.5 mm (go down 1–2 sizes from the yarn label for tight fabric)
Notions: Stitch marker, yarn needle, polyester fiberfill, optional 6 mm safety eyes (insert before closing the head)
Gauge
24 sc and 24 rnds = 4 in (10 cm) in sc in the round. Gauge is for density, not fit — fabric should be tight with no stuffing showing.
Abbreviations (US)
ch — chain
sc — single crochet
inc — 2 sc in same st
dec — sc2tog (invisible decrease preferred)
st(s) — stitch(es)
rnd — round
MR — magic ring
FO — fasten off
[ ] — stitch count at end of round
Work in continuous spirals unless noted. Mark the first st of each rnd.
Head (MC, sphere)
Rnd 1: 6 sc in MR. [6]
Rnd 2: inc in each st. [12] (6 inc → 6 + 6 = 12 ✓)
Rnd 3: (sc, inc) around. [18] (6 inc → 12 + 6 = 18 ✓)
Rnd 4: (2 sc, inc) around. [24] (6 inc → 18 + 6 = 24 ✓)
Rnds 5–8: sc around. [24]
Rnd 9: (2 sc, dec) around. [18] (6 dec → 24 − 6 = 18 ✓)
Insert safety eyes between Rnds 6 and 7, about 5 sts apart, if using. Stuff firmly.
Rnd 10: (sc, dec) around. [12] (6 dec → 18 − 6 = 12 ✓)
Rnd 11: dec around. [6] (6 dec → 12 − 6 = 6 ✓)
FO, leaving a long tail. Thread tail through remaining 6 sts, pull closed, weave in.
Muzzle (CC, small sphere)
Rnd 1: 6 sc in MR. [6]
Rnd 2: inc in each st. [12]
Rnds 3–4: sc around. [12]
Stuff lightly. FO, leaving a long tail for sewing.
Ears (make 2, MC, cone)
Rnd 1: 4 sc in MR. [4]
Rnd 2: (sc, inc) around. [6] (2 inc → 4 + 2 = 6 ✓)
Rnd 3: sc around. [6]
Rnd 4: (2 sc, inc) around. [8] (2 inc → 6 + 2 = 8 ✓)
Rnd 5: sc around. [8]
FO, leaving a long tail. Do not stuff (or stuff very lightly at the base).
Body (MC, short oval/cylinder)
Rnd 1: 6 sc in MR. [6]
Rnd 2: inc in each st. [12]
Rnd 3: (sc, inc) around. [18]
Rnd 4: (2 sc, inc) around. [24]
Rnds 5–10: sc around. [24]
Rnd 11: (2 sc, dec) around. [18]
Stuff firmly.
Rnd 12: (sc, dec) around. [12]
Rnd 13: dec around. [6]
FO, close hole as for head.
Arms (make 2, MC, short cylinder)
Rnd 1: 6 sc in MR. [6]
Rnd 2: inc in each st. [12]
Rnds 3–6: sc around. [12]
Stuff lightly. Flatten opening; FO, leaving a long tail. Whipstitch the opening closed.
Legs (make 2, MC)
Rnd 1: 6 sc in MR. [6]
Rnd 2: inc in each st. [12]
Rnds 3–7: sc around. [12]
Stuff firmly. Flatten opening; FO, leaving a long tail. Whipstitch closed.
Tail (MC with CC tip)
With CC:
Rnd 1: 6 sc in MR. [6]
Rnd 2: (sc, inc) around. [9]
Rnd 3: sc around. [9]
Switch to MC.
Rnds 4–10: sc around. [9]
Stuff lightly. FO, leaving a long tail.
Face (CC patch, optional)
Rnd 1: 6 sc in MR. [6]
Rnd 2: inc in each st. [12]
Rnd 3: (sc, inc) around. [18]
FO, leaving a long tail. This is a flat circle sewn to the lower face if you want a white cheek area; skip if you prefer a solid orange face.
Assembly
- Pin muzzle to the lower front of the head (covering Rnds 7–10). Sew around, adding a tiny bit of stuffing if needed. Embroider a small black triangle nose on the muzzle and a vertical stitch below. If not using safety eyes, embroider two small black eyes.
- Sew ears to the top of the head, slightly angled outward, spanning about Rnds 3–6.
- If using the CC face patch, sew it under the muzzle before attaching the head, or skip.
- Sew head to the top of the body, centered.
- Sew arms to the sides of the body just below the neck.
- Sew legs to the front-bottom of the body so the fox sits.
- Sew tail to the lower back.
- Weave in all ends. Shape by squeezing.
Finishing notes
Work tightly so stuffing does not show. Pin every piece before sewing. For a keychain size, stop increases at 18 sts on head and body. Safety eyes are a choking hazard for children under 3 — embroider instead.
Disclaimer: This pattern was generated by AI and should be reviewed for accuracy before use. While we strive for quality, AI-generated content may contain errors. Please verify measurements, stitch counts, charts, and instructions before beginning your project. Generated by purlJam.uk
Love this pattern?
Save this pattern to your free PurlJam libraryAccess your pattern anytime
Bookmark this page to access your pattern anytime