Type
Crochet
Difficulty
intermediate
Category
custom
AI Thinking Process
Planning
Verification
Pattern
Beginner Crochet Flowers
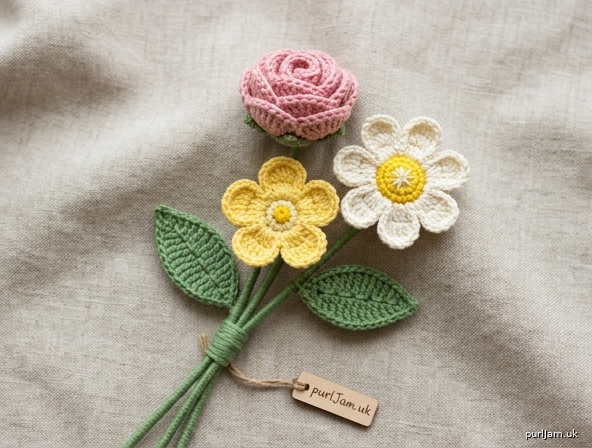
A small set of four easy motifs — a five-petal blossom, a six-petal daisy, a spiral rose, and a leaf — plus simple stems. Make one of each and gather them into a little sprig, sew them on as appliqués, or string blossoms into a short garland. Every motif uses only chains, slip stitches, single crochet, half double crochet, and double crochet.
Skill level: Beginner
Finished project: One meadow sprig (1 blossom, 1 daisy, 1 rose, 2 leaves, 3 stems), or any single motif
Finished measurements
Sizes are approximate and are not critical for appliqué. They match the gauge below.
| Piece | Measurement |
|---|---|
| Five-Petal Blossom | 2½ inches (6.5 cm) across |
| Six-Petal Daisy | 3 inches (7.5 cm) across |
| Spiral Rose | 2¼ inches (5.5 cm) across |
| Leaf | 2¼ inches (5.5 cm) long × 1 inch (2.5 cm) wide |
| Short stem | 2¾ inches (7 cm) |
| Medium stem | 3¾ inches (9.5 cm) |
| Long stem | 4¾ inches (12 cm) |
Longer stems: add 4 chains for each extra 1 inch (2.5 cm).
Materials
- Worsted weight yarn (Category 4), about 1 oz (28 g) / 60 yards (55 m) for one full sprig. Scraps are enough for a single flower. Cotton worsted holds its shape especially well; acrylic worsted works too.
- Suggested split for one sprig: petal colors 40 yards (37 m), green 20 yards (18 m)
- Crochet hook US H/8 (5.0 mm), or the size needed to match gauge
- Yarn needle
- Scissors
- Optional: locking stitch marker, two ½ inch (12 mm) buttons, rustproof pins for a light steam block
Yardage per motif (approximate): blossom 8 yards (7 m); daisy 12 yards (11 m); rose 18 yards (16 m); leaf 5 yards (4.5 m); stems 3, 4, and 5 yards (3, 4, and 4.5 m).
Gauge
16 sc = 4 inches (10 cm), using US H/8 (5.0 mm) hook and worsted yarn. One Five-Petal Blossom should measure about 2½ inches (6.5 cm) across.
Gauge is not critical for these flowers. If the petals look loose or floppy, change to US G/6 (4.0 mm) and accept a slightly smaller flower.
Abbreviations (US)
- ch — chain
- sc — single crochet
- hdc — half double crochet
- dc — double crochet
- sl st — slip stitch
- st(s) — stitch(es)
- rep — repeat
- rnd — round
Special stitches and starts
Magic ring: Wrap the yarn around two fingers to make a loop, insert the hook, yarn over, and pull up a loop. Ch 1 to secure. Work the first round into the center of the loop, then pull the yarn tail until the hole closes.
Chain ring (use this if the magic ring is frustrating): Ch 4, sl st in the first ch to form a ring. Work the first round into the center of the ring, not into the individual chains. The hole will be a little larger than a magic ring. That is fine.
Pattern notes
- US terms and imperial measurements are used throughout. Metric equivalents are in parentheses.
- The blossom and daisy are worked in joined rounds. Do not turn at the end of a round.
- A ch-1 at the start of a round or row does not count as a stitch.
- The ch-2 at each side of a petal is an edge chain. It is not a stitch and is not included in the stitch count.
- Joining slip stitches do not count as stitches. On the next round, work into the sc stitches, not into the joining slip stitch. If you count the join, you will think you have one extra stitch.
- Unless the pattern says otherwise, work into both loops.
- Stitch counts at the end of a row or round are the stitches you should be able to see and count. Petal rounds are counted as petals.
- If a flower will be used on a baby item, embroider the center. Do not use a button.
- Right side (RS) is the side facing you as you work the petals or the rose shells.
Five-Petal Blossom
Use one color, or use a contrast color for Rnd 1 and the petal color for Rnd 2.
Rnd 1: Make a magic ring (or a chain ring). Ch 1 (does not count as a st), work 10 sc in the ring. Pull the magic-ring tail to close the hole. Sl st in the first sc to join. (10 sc)
If you are changing color, fasten off. Join the petal color with a sl st in any sc. You will start Rnd 2 in the next sc, so the stitch you just joined into stays free for the last slip stitch.
Rnd 2: *Ch 2, 3 dc in the next sc, ch 2, sl st in the next sc; rep from * 4 more times. (5 petals; 5 × 2 = 10 center sts used ✓)
The last sl st falls in the same sc that closed Rnd 1 (or in the sc where you joined the new color). Do not make a 6th petal.
Fasten off, leaving an 8-inch (20 cm) tail if you will sew the flower to a stem.
Checkpoint: 5 petals, each with 3 dc in the middle and a ch-2 on either side. Every center sc has been used once. The center hole is no bigger than a pinprick — pull the magic-ring tail again if it is. If one sc is left over, you skipped a stitch. If you run out of sc before 5 petals, two petals went into one stitch.
Optional center: Sew a ½ inch (12 mm) button over the middle, or embroider a few straight stitches in a contrast color.
Six-Petal Daisy
Use one color, or use a contrast color for Rnds 1–2 and the petal color for Rnd 3.
Rnd 1: Make a magic ring (or a chain ring). Ch 1 (does not count as a st), work 6 sc in the ring. Pull the ring closed. Sl st in the first sc to join. (6 sc)
Rnd 2: Ch 1 (does not count as a st), 2 sc in each sc around, sl st in the first sc to join. (12 sc; 6 × 2 = 12 ✓)
If you are changing color, fasten off. Join the petal color with a sl st in any sc of Rnd 2.
Rnd 3: *Ch 2, 4 dc in the next sc, ch 2, sl st in the next sc; rep from * 5 more times. (6 petals; 6 × 2 = 12 center sts used ✓)
The last sl st falls in the first sc of the round (the sc that holds the joining sl st). Do not work a 7th petal, and do not work into the joining slip stitch itself.
Fasten off, leaving an 8-inch (20 cm) tail for sewing.
Checkpoint: 6 petals, each with 4 dc. You can count 12 sc around the center, under the petals. The daisy is a little larger and fuller than the blossom. That difference is intentional.
Optional center: Button or embroidered stitches, same as the blossom.
Easy two-layer flower: Make one blossom and one daisy. Place the blossom on top of the daisy and sew through both centers. No extra rounds are required.
Spiral Rose
Use one color. Leave a long sewing tail at the end.
Foundation: Ch 25.
Row 1 (RS): Sc in the 2nd ch from the hook and in each ch across. Turn. (24 sc; 25 − 1 = 24 ✓)
Row 2: Ch 1 (does not count as a st). *Sc in the next sc, 5 dc in the next sc; rep from * across. The first sc of this row goes into the first sc of Row 1, not into the ch-1. (12 sc and 60 dc; 12 shells; 12 × 2 = 24 sts of Row 1 used ✓)
Do not turn. Fasten off, leaving a 12-inch (30 cm) tail for sewing.
The strip will ruffle. That ruffle becomes the petals. Do not flatten it and do not rip it out for curling.
Shape the rose: With the shell side facing you, roll one short end inward into a tight center, then keep rolling to the other end. The 5-dc shells should flare to the outside. Thread the tail. Sew back and forth through the bottom edge only (the foundation-chain edge), catching every layer. Do not sew through the shell petals, or the rose will not open. Weave the end into the base.
Checkpoint: 12 shells along the strip before you roll. After sewing, the rose holds its spiral when you let go, and the outer petals are free.
Leaf
Use green. Make 2 for the sprig.
Foundation: Ch 9.
Rnd 1: Sc in the 2nd ch from the hook, hdc in the next ch, dc in the next 3 ch, hdc in the next ch, sc in the next ch, 3 sc in the last ch (this is the tip). Rotate the chain so you can work along the unused loops on the opposite side. Sc in the next ch, hdc in the next ch, dc in the next 3 ch, hdc in the next ch, sc in the next ch, sl st in the first sc to join. (17 sts; 7 on the way to the tip + 3 in the tip + 7 on the return ✓)
Do not work into the tip chain again. The return side gets one stitch in each of the 7 chains that already have one stitch. The chain closest to the hook at the very start is not worked; the joining sl st closes the base over it.
Fasten off, leaving an 8-inch (20 cm) tail.
Checkpoint: The leaf is pointed at the 3-sc end and a little wider through the middle. Both long sides have the same stitches: sc, hdc, 3 dc, hdc, sc, meeting at the tip. If one side is longer, a stitch was skipped on the short side.
Optional vein: With the yarn needle, sew one straight line of running stitches from the base toward the tip. Do not pull it tight.
Stems (optional)
Use green. Slip stitches make a firm cord that does not stretch the way an open chain does.
Short stem: Ch 12. Sl st in the 2nd ch from the hook and in each ch across. (11 sl st; 12 − 1 = 11 ✓) Fasten off, leaving an 8-inch (20 cm) tail. About 2¾ inches (7 cm).
Medium stem: Ch 16. Sl st in the 2nd ch from the hook and in each ch across. (15 sl st; 16 − 1 = 15 ✓) Fasten off, leaving a tail. About 3¾ inches (9.5 cm).
Long stem: Ch 20. Sl st in the 2nd ch from the hook and in each ch across. (19 sl st; 20 − 1 = 19 ✓) Fasten off, leaving a tail. About 4¾ inches (12 cm).
Finishing
Weave in ends that will not be used for sewing. Pull any magic-ring tails once more before you weave them, so the centers stay closed.
Light blocking (only if a petal curls): Pin the blossom, daisy, or leaf flat. Steam from above. Do not press the iron onto the yarn. Let it dry. Do not block the rose flat — it is meant to stay rolled. Do not block the stems.
Assemble the sprig:
- Sew one flower to the top of each stem, stitching through the back of the flower center and the top 2 or 3 slip stitches of the stem.
- Suggested pairing: rose on the long stem, daisy on the medium stem, blossom on the short stem.
- Sew one leaf to each of two stems, about 1 inch (2.5 cm) below the flower. Use the base of the leaf (the end opposite the 3-sc tip) and angle the tip outward. Two or three stitches are enough.
- Hold the three stems together. Wrap them with a 12-inch (30 cm) length of green yarn for about 1 inch (2.5 cm), then tie or weave the ends in. A short ribbon works instead of yarn.
Other uses:
- Appliqué: Sew a single motif to a hat, bag, blanket square, or greeting card. Stitch around the center only, so the petals stay a little loose.
- Garland: Ch 80, about 20 inches (51 cm) at this gauge (80 ÷ 4 = 20 ✓). Fasten off. Sew blossoms along the cord about 2 inches (5 cm) apart. Eight blossoms and the cord use about 75 yards (69 m).
- Layered bloom: Stack the blossom on the daisy, as noted above, and put that on the medium stem.
Care
If the yarn label allows, hand wash in cool water and lay flat to dry, shaping the petals with your fingers. Do not wring. If you used a button, do not machine wash.
Disclaimer: This pattern was generated by AI and should be reviewed for accuracy before use. While we strive for quality, AI-generated content may contain errors. Please verify measurements, stitch counts, charts, and instructions before beginning your project. Generated by purlJam.uk
Love this pattern?
Save this pattern to your free PurlJam libraryAccess your pattern anytime
Bookmark this page to access your pattern anytime