Type
Machine Knitting
Difficulty
intermediate
Category
custom
AI Thinking Process
Planning
Verification
Pattern
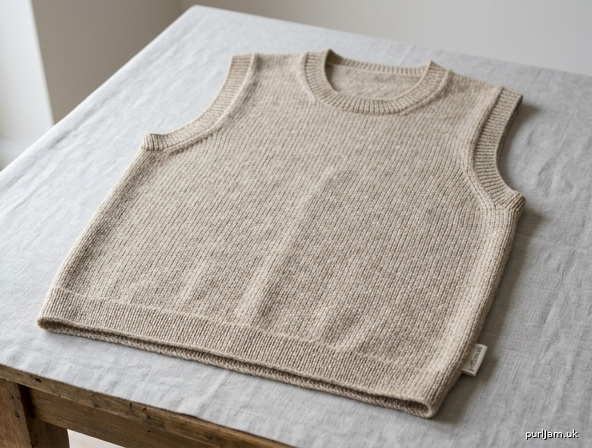
Beginner Stocking-Stitch Vest
Brother KH-836 (standard gauge, 4.5 mm) · every-other-needle · worsted
A sleeveless pullover vest in plain stocking stitch. Folded hem, shallow round neck, and narrow machine-knit bands. No ribber, no punchcard, and no short-row shaping — written for a first garment on the KH-836.
Worsted yarn is too thick for every needle on a 4.5 mm bed. This pattern is knitted every other needle (EON) so the working pitch is 9 mm. The fabric behaves like a mid-gauge stocking stitch.
Materials
Yarn Worsted weight (approx. 18–20 sts / 10 cm in hand knitting; 100 g ≈ 180–220 m).
- S 350 g / 700 m
- M 400 g / 800 m
- L 450 g / 900 m
- XL 500 g / 1 000 m Buy one extra ball for the swatch and bands.
Smooth, contrasting waste yarn of similar or slightly finer thickness, plus a ravel cord.
Machine Brother KH-836 or any Brother/Knitking 4.5 mm standard-gauge machine (KH-830, 840, 860, 890, 910, 930, 940, 950, 965, 970). Ribber not used. Punchcard not used. Single bed, single carriage.
Tools (keep these beside the machine) Cast-on comb and wire, 2–4 claw weights, ravel cord, 1×2 and 2×1 transfer tools, latch tool, tapestry needle, scissors, blocking mats and pins.
Tension / Gauge
Working arrangement: every other needle in B (working position); all skipped needles in A (non-working).
| Tension dial | Fabric | |
|---|---|---|
| Waste yarn | T6 | — |
| Main fabric and hem | T7 | 18 sts × 24 rows = 10 cm (4 in) |
| Bands | T6 | slightly firmer |
T7 is a starting point. Change the dial until the washed and steamed swatch matches 18 sts × 24 rows = 10 cm. If your yarn is heavy, T8 or T9 is normal.
Swatch (mandatory) Bring 50 needles to B, EON, centred. Waste-yarn cast-on, ravel cord, main yarn at T7. Knit 80 rows. Bind off. Rest, steam. Measure the centre 10 cm. Recalculate only if you cannot match this gauge; do not cast on the vest until you match it.
1.8 sts/cm · 2.4 rows/cm.
Sizes
Instructions are for S (M, L, XL). Figures in parentheses always follow that order. Choose by finished chest, not by ready-to-wear labels — this vest has about 8–10 cm of ease.
| S | M | L | XL | |
|---|---|---|---|---|
| To fit chest | 86–91 cm (34–36 in) | 96–102 cm (38–40 in) | 107–112 cm (42–44 in) | 117–122 cm (46–48 in) |
| Finished chest | 96 cm (37¾ in) | 107 cm (42 in) | 116 cm (45¾ in) | 127 cm (50 in) |
| Back length | 58 cm (22¾ in) | 60 cm (23½ in) | 62 cm (24½ in) | 64 cm (25¼ in) |
| Armhole depth | 22 cm (8¾ in) | 23 cm (9 in) | 24 cm (9½ in) | 25 cm (9¾ in) |
| Back neck width | 18 cm (7 in) | 19 cm (7½ in) | 20 cm (8 in) | 21 cm (8¼ in) |
| Working needles (EON) | 86 | 96 | 104 | 114 |
Abbreviations and machine terms
| Term | Meaning |
|---|---|
| RC | Row counter |
| COR / COL | Carriage on right / carriage on left |
| T | Tension dial number |
| EON | Every other needle |
| B / WP | Working position |
| A / NWP | Non-working position (needles out) |
| E / HP | Holding position |
| N | Plain knitting (stocking stitch) |
| MY / WY | Main yarn / waste yarn |
| BO | Bind off |
| dec | Decrease |
| FF | Fully fashioned |
| MB | Main bed |
| st(s) | Stitch(es) |
Carriage for the whole garment: cam lever N, both part buttons out (upper/N position), holding-cam levers N except where a step says H. Knit from left to right and right to left as usual. Do not use KC, slip, tuck, or weave.
Needle count always means needles in B. Needles in A are ignored.
Pattern notes
- Centre every piece on the needle bed.
- Hang the cast-on comb after 4–6 rows of waste knitting. Add claw weights at each edge and move them up every 30–40 rows. EON fabric needs more weight than every-needle knitting or the edges will fail to knit.
- EON decrease (FF): with a 1×2 transfer tool, lift the end working stitch onto the next working needle (skip the A-position needle between them). Push the empty needle to A. One working stitch decreased.
- EON bind-off: transfer the end working stitch onto the next working needle, manually knit that needle through, and repeat. Keep this bind-off slightly firm at underarms, looser at the neck.
- Row-counter numbers restart at RC 000 where stated. Do not skip a reset.
- Both pieces are identical to the armhole. The front adds a round neck; the back does not.
- Steam the finished vest; do not press heavily or the EON fabric will go limp.
Machine setup (do this before every piece)
- Main bed only. Ribber off or fully dropped.
- Push all needles to A.
- Bring 86 (96, 104, 114) needles to B, every other needle, centred on 0. Example for S: odd needles L85–R85 gives 86 working needles. All remaining needles stay in A.
- Carriage cam lever N, part buttons out, holding-cam levers N, tension T6.
- Thread waste yarn. E-wrap or closed-edge waste cast-on across the working needles.
- Knit 8–10 rows waste yarn. Hang cast-on comb and weights. End COR.
- Knit 1 row ravel cord, COR. Set RC to 000. Change to main yarn and T7.
BACK
Hem
MY, T7, COR, RC 000. Knit 20 rows stocking stitch. RC 020, COR. (20 rows ÷ 2.4 = 8.3 cm; this folds to a 4 cm hem.)
Hang the hem. With the transfer tool, pick up the first row of main-yarn stitches (the row immediately above the ravel cord) and hang each loop onto its original working needle — two loops per needle. Pull the ravel cord and discard the waste yarn. Give the comb a tug so both loops sit in the hooks. Knit 1 row across. COR.
Reset RC 000.
Body to armhole
Knit 76 (80, 82, 84) rows even. RC 076 (080, 082, 084), COR. (76 rows ÷ 2.4 = 31.7 cm + 4 cm hem = 35.7 cm to the underarm.)
Stitch count unchanged: 86 (96, 104, 114).
Reset RC 000 for the armhole.
Armhole shaping
COR, RC 000, still T7.
RC 001, COR: BO 4 (5, 6, 7) working stitches at the right edge (carriage side). Knit to the left. COL. RC 002, COL: BO 4 (5, 6, 7) working stitches at the left edge. Knit to the right. COR. Stitches remaining: 86 − 8 = 78 (96 − 10 = 86, 104 − 12 = 92, 114 − 14 = 100) ✓
Next 8 (10, 10, 12) rows: at the beginning of every row, FF decrease 1 working stitch (EON method above). That is 4 (5, 5, 6) decreases each side. RC 010 (012, 012, 014), COR. Stitches remaining: 78 − 8 = 70 (86 − 10 = 76, 92 − 10 = 82, 100 − 12 = 88) ✓
Knit even until RC 052 (056, 058, 060), COR. (52 rows ÷ 2.4 = 21.7 cm armhole depth.)
Shoulders and back neck
All remaining stitches are bound off in one pass, or taken off on waste yarn if you prefer to rehang the shoulders later.
Working from COR:
- BO 19 (21, 23, 25) right shoulder stitches,
- BO 32 (34, 36, 38) back-neck stitches,
- BO 19 (21, 23, 25) left shoulder stitches.
19 + 32 + 19 = 70 (21 + 34 + 21 = 76, 23 + 36 + 23 = 82, 25 + 38 + 25 = 88) ✓
Break yarn. Remove the piece. Set it aside. Do not stretch the armholes.
FRONT
Set the machine up exactly as for the back: 86 (96, 104, 114) needles EON, centred, waste yarn, ravel cord, MY at T7.
Hem and body
Work the hem and body to armhole exactly as the back. RC 076 (080, 082, 084), COR, then reset RC 000.
Armhole shaping
Work the armhole exactly as the back: BO 4 (5, 6, 7) each side, then FF dec 1 st at the beginning of the next 8 (10, 10, 12) rows. RC 010 (012, 012, 014), COR, 70 (76, 82, 88) stitches.
Knit even until RC 032 (036, 036, 038), COR. (Armhole shaping is already finished; you are on the even section.)
Divide for round neck
Mark the centre 12 (14, 14, 16) working needles. This leaves 29 (31, 34, 36) working needles on each side. 29 + 12 + 29 = 70 (31 + 14 + 31 = 76, 34 + 14 + 34 = 82, 36 + 16 + 36 = 88) ✓
COR. Set both holding-cam levers to H.
Push the left 29 (31, 34, 36) working needles and the centre 12 (14, 14, 16) needles to E (hold). Only the right-hand 29 (31, 34, 36) needles remain in B.
Right neck (right-hand side of the bed)
The neck edge is the left edge of this group.
Decrease 1 working stitch at the neck edge every 2 rows, 10 (10, 11, 11) times, using the EON FF decrease. Do not decrease at the armhole edge.
- Knit 1 row (neck decrease on this pass when the carriage starts at the neck), knit 1 row even. Repeat.
After 10 (10, 11, 11) neck decreases: 19 (21, 23, 25) stitches remain. 29 − 10 = 19 (31 − 10 = 21, 34 − 11 = 23, 36 − 11 = 25) ✓
Continue even, if needed, until RC 052 (056, 058, 060). BO the 19 (21, 23, 25) shoulder stitches. Break yarn.
Centre neck and left neck
Return holding-cam levers to N.
Push the remaining right-shoulder needles (already bound off) to A.
Bring the centre 12 (14, 14, 16) needles from E back to B. With MY, knit one row across them and BO those 12 (14, 14, 16) stitches. (They will be picked up for the neckband.) Break yarn.
Bring the left 29 (31, 34, 36) needles from E to B. Push any empty needles to A. Thread MY, tension T7.
Reset the carriage on the side that lets you knit across this group. Set holding-cam levers to N.
Decrease 1 working stitch at the neck edge every 2 rows, 10 (10, 11, 11) times — neck edge is now the right edge of this group. When 19 (21, 23, 25) stitches remain, work even to RC 052 (056, 058, 060) to match the right side and the back. BO the 19 (21, 23, 25) shoulder stitches.
Remove the front.
FINISHING (on the machine where noted)
1. Block the pieces
Pin back and front to the schematic measurements. Steam lightly from the reverse. Let dry. Do not stretch the armholes wider than 22 (23, 24, 25) cm deep.
2. Join shoulders on the machine
Wrong sides together, or right sides together for a bound-off ridge on the inside — either is acceptable.
Bring 19 (21, 23, 25) needles to B, EON, centred. Hang the back right-shoulder stitches, one stitch per needle. Hang the front right-shoulder stitches into the same hooks (two loops per needle). T6. Knit 1 row. Latch-tool bind off. Repeat for the left shoulder.
The neck is now a single opening; the side seams are still open.
3. Neckband
With the garment wrong side facing the machine (so the band public side will be stocking stitch on the outside), hang the neck opening onto the MB, EON:
- 1 stitch per bound-off stitch along back neck and front centre,
- 2 stitches for every 3 rows along each front neck slope.
Aim for 88 (94, 100, 106) working needles, centred. If you are 1–2 stitches off, that is fine — distribute extra stitches at the shoulders, not at centre front.
T6, COR, RC 000. Knit 8 rows. RC 008. Latch-tool bind off fairly firmly so the neck sits in. If the neck feels loose, rehang at T5 and knit 8 rows again.
Tip: on the two shoulder corners, hang 2 stitches together on one needle once; this takes in the corner.
4. Side seams
Mattress-stitch the side seams from hem to underarm, matching the hang-hem row and the underarm bind-offs. 1 stitch in from the edge. Fasten off securely at the underarm.
5. Armhole bands
Work one armhole at a time. Wrong side facing the machine.
Hang the entire armhole onto the MB, EON:
- 1 stitch per underarm bind-off stitch,
- 2 stitches for every 3 rows up the vertical/shaped edge,
- 1 stitch per remaining shoulder-seam stitch.
Aim for 86 (92, 98, 104) working needles. T6, RC 000. Knit 8 rows. Latch-tool bind off firmly. Repeat for the second armhole.
6. Ends and final steam
Darn in all yarn tails on the reverse. Steam the bands so they lie flat; do not flatten the stocking-stitch body.
Schematic (finished measurements)
                    shoulder 19 (21, 23, 25) sts
                    ≈ 10.5 (11.5, 13, 14) cm
              |------|                    |------|
              |      \______ 32 (34, 36, 38) sts ______/
              |           back neck 18 (19, 20, 21) cm
              |  armhole depth
              |  22 (23, 24, 25) cm
              |
              |  width 48 (53, 58, 63) cm
              |  86 (96, 104, 114) sts
              |
              |  length to underarm
              |  36 (37, 38, 39) cm incl. 4 cm hem
              |______________________________
Chest = two panels seamed = 96 (107, 116, 127) cm.
Quick RC map
| Section | RC | Ending | Stitches |
|---|---|---|---|
| Hem | 000 → 020 | COR | 86 (96, 104, 114) |
| Hang hem, reset | 000 | COR | same |
| Body | 000 → 076 (080, 082, 084) | COR | same |
| Armhole BO | 000 → 002 | COR | 78 (86, 92, 100) |
| Armhole dec | → 010 (012, 012, 014) | COR | 70 (76, 82, 88) |
| Back: even to top | → 052 (056, 058, 060) | COR | 70 (76, 82, 88) |
| Front: even to neck | → 032 (036, 036, 038) | COR | 70 (76, 82, 88) |
| Front: each neck | → 052 (056, 058, 060) | — | 19 (21, 23, 25) per shoulder |
| Bands | 8 rows at T6 | — | see finishing |
Beginner checkpoints
- If a needle in A knits by accident, the fabric will snag. Run a finger along the bed before every carriage pass.
- If the carriage jams, you are probably trying to knit a needle that should be in A, or the yarn is looping behind an out-of-work needle. Unpick that row; do not force the carriage.
- Edge stitches on EON want to unknit. Keep a claw weight on each edge at all times.
- Count working needles after every bind-off and after every decrease sequence. The counts in the table above must match before you continue.
Disclaimer: This pattern was generated by AI and should be reviewed for accuracy before use. While we strive for quality, AI-generated content may contain errors. Please verify measurements, stitch counts, charts, and instructions before beginning your project. Generated by purlJam.uk
Love this pattern?
Save this pattern to your free PurlJam libraryAccess your pattern anytime
Bookmark this page to access your pattern anytime