Type
Crochet
Difficulty
intermediate
Category
cardigan
AI Thinking Process
Planning
Verification
Pattern
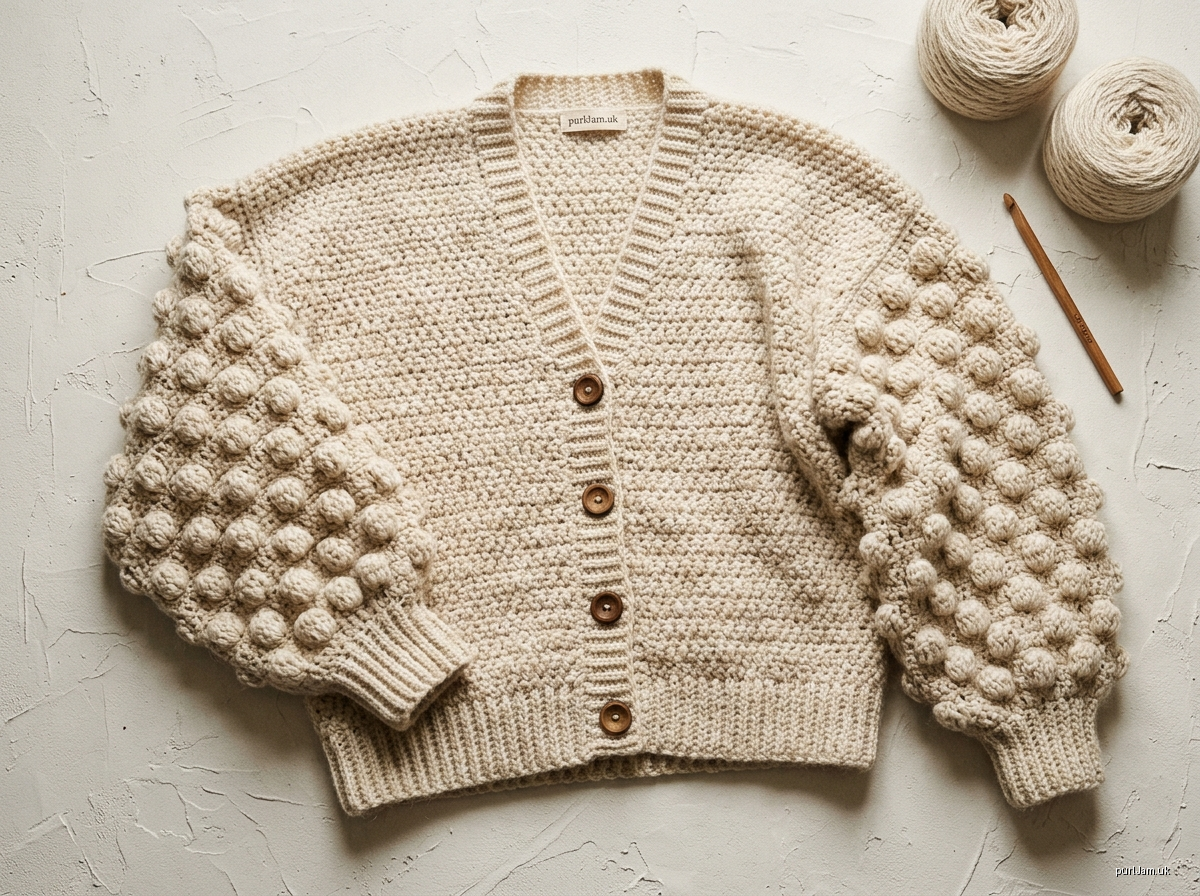
BLOCK & BALLOON — Rectangle Cardigan in Suzette & Bobble Stitch
Construction: Route A uses flat pieces worked bottom-up and seamed. Every piece is a simple rectangle, with drop shoulders. Because each block is a plain rectangle, you can lengthen or widen any piece mid-project just by adding rows or clusters.
Cardigan, not kimono: The sleeves are gathered into fitted ribbed cuffs (balloon shape), and the fronts carry a worked buttonband. That makes this a drop-shoulder cardigan.
Skill level: Intermediate. You need to manage gathering, a picked-up band and evenly spaced buttonholes.
Terminology: US crochet terms.
SIZES & FINISHED MEASUREMENTS
Sizes are written XS (S, M, L, XL, 2XL, 3XL). When only one figure is given, it applies to all sizes.
Fit: Relaxed, about 6 in (15 cm) positive ease.
| XS | S | M | L | XL | 2XL | 3XL | |
|---|---|---|---|---|---|---|---|
| To fit bust (in) | 30 | 34 | 38 | 42 | 46 | 50 | 54 |
| Finished bust, buttoned (in) | 36 | 40 | 44 | 48 | 52 | 56 | 60 |
| Body length incl. hem (in) | 21 | 21.5 | 22 | 22.5 | 23 | 23.5 | 24 |
| Armhole depth (in) | 7.5 | 8 | 8.5 | 9 | 9.5 | 10 | 10.5 |
| Upper arm / sleeve width (in) | 15 | 16 | 17 | 18 | 19 | 20 | 21 |
| Cuff circumference (in) | 7.5 | 8 | 8.5 | 9 | 9.5 | 10 | 10.5 |
| Sleeve length incl. cuff (in) | 16 | 16 | 16.5 | 16.5 | 17 | 17 | 17 |
How the sleeve length works: Sleeve length is measured from the dropped shoulder seam. The drop shoulder adds 2–4 in to the effective arm length. The balloon blouses over the cuff by about 1 in.
MATERIALS
Yarn: Wollissima, 100% extrafine merino, sport weight (2), 50 g / 200 m (219 yd) per ball.
| XS | S | M | L | XL | 2XL | 3XL | |
|---|---|---|---|---|---|---|---|
| Meters (approx.) | 1800 | 2000 | 2220 | 2430 | 2650 | 2870 | 3090 |
| Balls | 9 | 10 | 12 | 13 | 14 | 15 | 16 |
Important: Your 12 balls are enough for sizes XS, S and M. For L–3XL, buy the extra balls from the same dye lot now. The bobble sleeves use about 30% more yarn per square inch than the body.
Hooks:
- US E/4 (3.5 mm) for the main pieces.
- US D/3 (3.25 mm) for the ribbing and front band.
- Adjust hook size to obtain gauge.
Notions:
- 5 buttons, 5/8 in (15 mm). This count is the same for all sizes.
- Locking stitch markers (10).
- Tapestry needle.
- Blocking mats and pins.
GAUGE
All gauges are worked flat and measured after blocking.
- Suzette stitch (E/4 hook): 11 clusters (22 sts) and 18 rows = 4 in (10 cm).
- Bobble pattern (E/4 hook): 20 sts and 20 rows = 4 in (10 cm).
- FPdc/BPdc rib (D/3 hook): 22 sts = 4 in (10 cm).
Swatches:
- For Suzette, ch 30 and work 24 rows.
- For bobble, ch 27 and work 24 rows.
STITCH GUIDE
| Abbreviation | Meaning |
|---|---|
| ch | chain |
| sc | single crochet |
| sc2tog | single crochet 2 together |
| dc | double crochet |
| hdc | half double crochet |
| sl st | slip stitch |
| sk | skip |
| st(s) | stitch(es) |
| RS / WS | right side / wrong side |
| FPdc | front post dc: yo, insert hook front to back to front around the post of the st, complete dc |
| BPdc | back post dc: yo, insert hook back to front to back around the post of the st, complete dc |
| bob | bobble: (yo, insert hook in st, pull up loop, yo, draw through 2 loops) 5 times in the same st, yo, draw through all 6 loops on hook |
| cl | Suzette cluster: (sc, dc) in the same st |
Suzette stitch (worked over an even chain; 1 cl = 2 sts):
- Row 1: Make the cl in the 2nd ch from the hook. Then sk 1 ch, cl in next ch; repeat from * to the end.
- Row 2: Ch 1, turn. Sk dc, cl in next sc; repeat from * to the end.
- Repeat Row 2 for the pattern.
- The cluster count never changes, so count clusters (sc stitches) every few rows.
Bobble pattern (worked over an odd number of sts):
- Row 1 (RS): Ch 1, sc in each st across.
- Row 2 (WS): Ch 1, sc in first st. Bob in next st, sc in next st; repeat from * to the end.
- The bobbles pop toward the RS.
- Push each bobble to the back (RS) as you go.
- Repeat Rows 1–2 for the pattern.
PATTERN NOTES
- Turning chains: The ch-1 turning chain never counts as a stitch.
- Adjusting rectangles:
- To change the length, add or remove rows. Make matching changes on the Back and both Fronts.
- Each extra cluster adds about 0.36 in (0.9 cm) of width.
- Fronts: The Right and Left Fronts are identical rectangles. The front edge is chosen at seaming. The buttonholes go on the Right Front (women's wear).
- Neckline: The neckline is formed by the unseamed back neck and the inner tops of the fronts. Together with the band, these lie in a soft open V.
BACK
- With the E/4 hook, ch 100 (110, 120, 132, 144, 154, 166). The chain is 2 × the cluster count.
- Row 1: Work Suzette Row 1. You should have 50 (55, 60, 66, 72, 77, 83) cl = 100 (110, 120, 132, 144, 154, 166) sts.
- Rows 2 to end: Repeat Suzette Row 2 until the piece measures 19 (19.5, 20, 20.5, 21, 21.5, 22) in. This is about 86 (88, 90, 92, 94, 96, 98) rows.
- Check: 19 in × 4.5 rows/in ≈ 86 ✓.
- Fasten off.
- Place armhole markers:
- Measure down 7.5 (8, 8.5, 9, 9.5, 10, 10.5) in from the top edge.
- Place a marker on each side edge at that point.
- Place shoulder markers:
- On the top edge, count 15 (18, 20, 23, 26, 29, 32) cl in from each side and mark.
- The center 20 (19, 20, 20, 20, 19, 19) cl form the back neck.
- Check: 15 + 20 + 15 = 50 ✓ (XS); 32 + 19 + 32 = 83 ✓ (3XL).
FRONTS (make 2 alike)
- With the E/4 hook, ch 42 (48, 54, 60, 64, 70, 76).
- Row 1: Work Suzette Row 1. You should have 21 (24, 27, 30, 32, 35, 38) cl = 42 (48, 54, 60, 64, 70, 76) sts.
- Work the same number of rows as the Back, to the same length. Fasten off.
- Place armhole marker: Mark one side edge at the same depth as on the Back.
- Place shoulder marker:
- Starting from the marked (armhole) side, count 15 (18, 20, 23, 26, 29, 32) cl along the top edge and mark.
- The remaining 6 (6, 7, 7, 6, 6, 6) cl are the neck edge.
- Check: 15 + 6 = 21 ✓ (XS); 32 + 6 = 38 ✓ (3XL).
SLEEVES (make 2)
- With the E/4 hook, ch 76 (82, 86, 92, 96, 102, 106).
- Foundation row (WS): Sc in 2nd ch from hook and in each ch across. You should have 75 (81, 85, 91, 95, 101, 105) sts.
- Check: 15 in × 5 sts/in = 75 ✓.
- Work the bobble pattern, starting with Row 1 (RS).
- Continue until the sleeve measures 14 (14, 14.5, 14.5, 15, 15, 15) in from the start, ending after a Row 1. This is about 70 (70, 72, 72, 76, 76, 76) rows.
- Do not fasten off. Ch 1, turn, and work 1 row of sc across the top edge (smooths the seam line). Fasten off.
Edge orientation:
- The foundation edge is the cuff end.
- The last row is the top edge, which is sewn into the armhole.
Balloon cuff (worked onto the foundation edge)
- With the RS facing and the D/3 hook, join yarn at the corner of the foundation edge.
- Gathering row: Ch 1 and work into the foundation-chain loops:
- Work sc2tog 35 (37, 39, 41, 43, 45, 47) times.
- Work sc 5 (7, 7, 9, 9, 11, 11) times.
- Spread the single sc evenly between the decreases. For example, in XS work 1 sc after every 7th sc2tog.
- You should have 40 (44, 46, 50, 52, 56, 58) sts.
- Check (XS): 35 sc2tog use 70 sts + 5 sc use 5 sts = 75 used; 35 + 5 = 40 sts made ✓.
- Rib Row 1: Ch 2 (does not count), turn, dc in each st across. You should have 40 (44, 46, 50, 52, 56, 58) sts.
- Rib Row 2: Ch 2, turn, hdc in first st. FPdc, BPdc; repeat from * to the last st, hdc in last st. Stitch count is unchanged.
- Rib Rows 3–5: Ch 2, turn, hdc in first st. Work FPdc over the FPdc and BPdc over the BPdc as they face you, hdc in last st.
- The cuff measures about 2 in. Fasten off, leaving a long tail for seaming.
SEAMING
Block all pieces to the schematic measurements before seaming. Spray or wet-block, and do not press the bobbles flat.
Use mattress stitch throughout.
- Shoulders:
- Lay the Fronts on the Back with RS together, armhole edges aligned.
- Seam each shoulder from the outer edge to the shoulder markers: 15 (18, 20, 23, 26, 29, 32) cl.
- Set in sleeves:
- Fold a sleeve in half along its top edge and match the fold to the shoulder seam.
- Sew the top edge between the armhole markers. The sleeve top equals 2 × armhole depth, so it fits without easing.
- Side and underarm seams:
- Seam from the hem up to the armhole marker on each side.
- Continue the seam along the sleeve underside and through the cuff.
HEM RIB
- With the RS facing and the D/3 hook, join yarn at the lower front edge.
- Row 1: Work 1 dc into each foundation-chain loop across the Left Front, Back and Right Front. Work 1 dc into each side seam. You should have 186 (208, 230, 254, 274, 296, 320) sts.
- XS check: 42 + 100 + 42 = 184, + 2 seam sts = 186 ✓.
- The count is even ✓.
- Rows 2–5: Work as for Rib Rows 2–5 of the cuff. The hem rib measures about 2 in.
- Fasten off.
FRONT BAND & BUTTONHOLES
Use the D/3 hook throughout.
Row 1 (RS):
- Join yarn at the lower Right Front corner. Ch 1.
- Work sc evenly up the Right Front edge:
- 2 sc per rib row end.
- 1 sc per Suzette row end.
- Work 1 sc per st across the front neck, to the shoulder seam.
- Work 1 sc per st across the back neck: 40 (38, 40, 40, 40, 38, 38) sc. This is 2 sc per cluster.
- Work across the Left Front neck and down the Left Front edge to match the right side.
- Count check: Each front edge should have the same number of sts, about 96 (98, 100, 102, 104, 106, 108) sc.
- XS check: 10 (rib) + 86 (rows) = 96 ✓.
Rows 2–3: Ch 1, turn, sc in each st.
Mark buttonholes:
- On the Right Front, mark the first buttonhole 2 sts from the hem edge (about 0.5 in).
- Mark the top buttonhole at the armhole-marker height, where the V begins.
- Mark 3 more evenly between those two.
- To space them, count the sts between the top and bottom markers and divide by 4. For XS this is about 13 sts between buttonholes.
Row 4 (buttonhole row): Work in sc. At each marker, ch 2 and sk 2 sts. Remove the markers.
Row 5: Ch 1, turn, sc in each st, working 2 sc into each ch-2 space. The count returns to the Row 3 total ✓.
Row 6: Ch 1, turn, sc in each st.
Finishing the band:
- Before fastening off, check that the band lies flat against the front length.
- If it ripples, rework Row 1 with fewer sts.
- If it pulls, rework Row 1 with more sts.
- Fasten off. The band is 6 rows, about 1.25 in wide.
FINISHING
- Sew the buttons to the Left Front band opposite the buttonholes.
- Weave in all ends along the stitch columns. Hide the ends inside the bobbles on the sleeves.
- Lightly re-steam the seams and band. Do not flatten the bobbles.
Schematic summary (per piece, before ribbing):
| Piece | Width (in) | Length (in) |
|---|---|---|
| Back | 18.2 (20, 21.8, 24, 26.2, 28, 30.2) | 19 (19.5, 20, 20.5, 21, 21.5, 22) |
| Front | 7.6 (8.7, 9.8, 10.9, 11.6, 12.7, 13.8) | Same as Back |
| Sleeve | 15 (16, 17, 18, 19, 20, 21) | 14 (14, 14.5, 14.5, 15, 15, 15) |
Plus a 2 in cuff gathered to 7.5 (8, 8.5, 9, 9.5, 10, 10.5) in.
Disclaimer: This pattern was generated by AI and should be reviewed for accuracy before use. While we strive for quality, AI-generated content may contain errors. Please verify measurements, stitch counts, charts, and instructions before beginning your project. Generated by purlJam.uk
Love this pattern?
Save this pattern to your free PurlJam libraryAccess your pattern anytime
Bookmark this page to access your pattern anytime