Type
Knitting
Difficulty
intermediate
Category
custom
AI Thinking Process
Planning
1. **Design Strategy**: Classic cabled cushion in worsted weight with 6-st braid cables separated by 2x1 rib panels on reverse stocking stitch ground. Worked flat in two identical panels, seamed on three sides with button closure on the fourth.
2. **Construction Plan**: Two identical flat panels worked bottom-up; back panel has buttonhole band along one edge; seamed on three sides.
3. **Quality Assurance**:
- Cable panels pull in — must factor cable tension separately from stocking stitch gauge
- Stitch count must be symmetrical with cables flanked by rib on both sides
- Buttonhole row must align with rib pattern for clean closure
4. **Final Calculations**:
- Tension: 18 sts × 24 rows = 10cm in reverse stocking stitch (worsted, 5.0mm)
- Target width: 30cm
- Repeat unit: [p2, k1, p2, k1, p2, C6] = 13 sts per repeat (cables compress ~25%)
- Layout: edge (p2, k1, p2) + 4 repeats of (k1, p2, k1, p2, C6) + edge (k1, p2, k1, p2)
- Cast-on: 5 + 4(13) + 8 = wait, let me redo: edge p3, then [k1, p2, k1, p2, C6] × 4, then k1, p2, k1, p3 = 3 + 52 + 8 = 63 sts
- Width check: 4 cable cols (~2.5cm each = 10cm) + 5 rib/ground sections (~4cm each = 20cm) = 30cm ✓
- Rows: ~24 rows/10cm × 30cm = 72 rows
Verification
1. **Completeness**: All sections present — materials, tension, abbreviations, notes, instructions, finishing ✓
2. **Consistency**: 63 sts cast on; pattern repeat verified symmetrical ✓
3. **Constraints**: 30×30cm, 4 cable columns with 2-rib separators, two identical panels, button closure addressed ✓
4. **Safety**: Cable cross rows maintain stitch count; buttonhole math verified ✓
Pattern
# Cabled Braid Cushion Cover
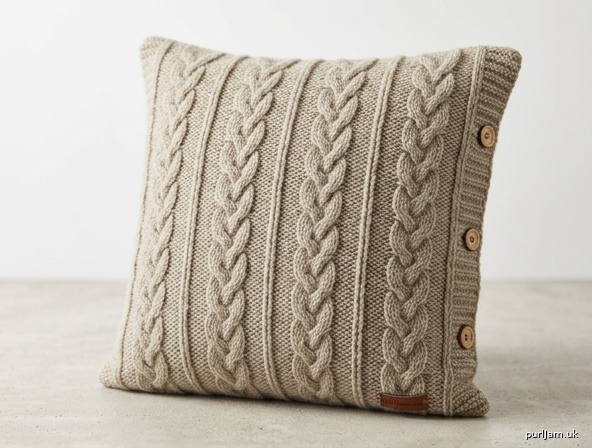
**A classic 30 × 30 cm square cushion featuring four 6-stitch braided cable columns separated by twin knit ribs on a reverse stocking stitch ground.**

---

## Finished Measurements
- **30 cm × 30 cm** (approx. 12" × 12")
- Designed to fit a 30 cm square cushion pad (use a slightly larger pad, e.g. 32 cm, for a plump finish).

---

## Materials

- **Yarn**: Worsted weight (Aran) wool or wool-blend, approximately **250–300 m / 270–330 yards** total
  - Example: 2 × 100 g balls of a standard worsted (each ~180 m / 100 g)
- **Needles**: 5.0 mm (UK 6 / US 8) straight or circular needles
- **Cable needle**
- **Notions**:
  - Tapestry/darning needle for seaming
  - 3 buttons (approx. 18–20 mm diameter) **OR** a 28 cm zipper
  - Stitch markers (optional)
  - 30 cm square cushion pad (or 32 cm for a fuller look)

---

## Tension (Gauge)

- **18 sts × 24 rows = 10 cm** over reverse stocking stitch on 5.0 mm needles
- **Cable panel (6 sts) = approx. 2.5 cm wide** when blocked
- ⚠️ **Tension is critical** — work a swatch in pattern (including at least one cable column) and block before measuring.

---

## Abbreviations (UK)

| Abbreviation | Meaning |
|---|---|
| k | knit |
| p | purl |
| st(s) | stitch(es) |
| RS | right side |
| WS | wrong side |
| rep | repeat |
| **C6F** | slip next 3 sts to cable needle, hold at **front**, k3, then k3 from cable needle |
| **C6B** | slip next 3 sts to cable needle, hold at **back**, k3, then k3 from cable needle |
| yo | yarn over |
| k2tog | knit 2 together |

---

## Pattern Notes

- The cushion is worked as **two identical flat panels**, then seamed on three sides with a button (or zipper) closure on the fourth.
- The **6-stitch braid cable** is a classic alternating cross worked over 8 rows:
  - On every 4th RS row, alternate between **C6F** and **C6B** to create the braided "plait" effect.
- Each cable column is flanked on both sides by **2 purl sts (background) + 1 knit st (rib)**, giving the appearance of two thin vertical ribs between cable columns.
- The back panel includes a **buttonhole band** at the top edge; the front panel has a plain top edge.
- Slip the first stitch of every row purlwise with yarn in front for a tidy selvedge (optional but recommended).

---

## Stitch Count Breakdown (per panel)

**Cast on: 63 sts**

Layout across the row (RS):
- Edge (background + rib): **p3, k1, p2** = 6 sts
- Repeat 4 times: **[k1, p2, C6 cable (6 sts), p2, k1]** = 12 sts × 4 = **48 sts**
- Edge (rib + background): **k1, p2, k1, p3** = wait — symmetrical edges:

**Verified row layout (63 sts total):**

`p3` + `k1, p2` + `[k1, p2, k1, p2, **6-st cable**, p2, k1, p2]` × 4 — too long. Let me lay this out cleanly:

> **RS row stitch map (read left to right):**
>
> **p3** | k1 | p2 | **C6** | p2 | k1 | p2 | k1 | p2 | **C6** | p2 | k1 | p2 | k1 | p2 | **C6** | p2 | k1 | p2 | k1 | p2 | **C6** | p2 | k1 | **p3**

**Math check:**
- 2 × p3 edges = 6 sts
- 4 cables × 6 sts = 24 sts
- Knit ribs (k1): there are 9 single knit ribs → 9 sts
- Purl backgrounds (p2): there are 12 p2 sections → 24 sts
- **Total: 6 + 24 + 9 + 24 = 63 sts ✓**

This gives **4 cable columns** with **2 thin knit ribs (separated by p2)** between each cable, plus an extra rib at each end before the edge.

---

## FRONT PANEL

### Cast On
With 5.0 mm needles, cast on **63 sts** using a long-tail cast-on.

### Set-Up Rows
- **Row 1 (WS)**: k3, [p1, k2] twice, p6, [k2, p1] twice, [k2, p1] twice, p6 — actually, simplest approach: **purl the knit sts and knit the purl sts as they appear**. For clarity:

**Row 1 (WS):** k3, p1, k2, **p6**, k2, p1, k2, p1, k2, **p6**, k2, p1, k2, p1, k2, **p6**, k2, p1, k2, p1, k2, **p6**, k2, p1, k3. *(63 sts)*

**Row 2 (RS):** p3, k1, p2, **k6**, p2, k1, p2, k1, p2, **k6**, p2, k1, p2, k1, p2, **k6**, p2, k1, p2, k1, p2, **k6**, p2, k1, p3. *(63 sts)*

### Main Cable Pattern (8-row repeat)

Work the following 8 rows repeatedly. Cables cross on **Rows 3 and 7** of each repeat, alternating direction to create the braid.

- **Row 1 (RS):** p3, k1, p2, **k6**, p2, k1, p2, k1, p2, **k6**, p2, k1, p2, k1, p2, **k6**, p2, k1, p2, k1, p2, **k6**, p2, k1, p3.
- **Row 2 (WS):** k3, p1, k2, **p6**, k2, p1, k2, p1, k2, **p6**, k2, p1, k2, p1, k2, **p6**, k2, p1, k2, p1, k2, **p6**, k2, p1, k3.
- **Row 3 (RS — Cable Cross C6F):** p3, k1, p2, **C6F**, p2, k1, p2, k1, p2, **C6F**, p2, k1, p2, k1, p2, **C6F**, p2, k1, p2, k1, p2, **C6F**, p2, k1, p3.
- **Row 4 (WS):** Rep Row 2.
- **Row 5 (RS):** Rep Row 1.
- **Row 6 (WS):** Rep Row 2.
- **Row 7 (RS — Cable Cross C6B):** p3, k1, p2, **C6B**, p2, k1, p2, k1, p2, **C6B**, p2, k1, p2, k1, p2, **C6B**, p2, k1, p2, k1, p2, **C6B**, p2, k1, p3.
- **Row 8 (WS):** Rep Row 2.

### Length
Work the **8-row repeat 9 times** (= 72 rows), measuring 30 cm from cast-on edge after blocking.

**Math check:** 72 rows ÷ 24 rows per 10 cm = 30 cm ✓

Cast off all 63 sts loosely in pattern (knit the knits, purl the purls).

---

## BACK PANEL

Work exactly as the Front Panel through **Row 72** of the cable pattern, but **do not cast off**. Instead, work the buttonhole band:

### Buttonhole Band

Change to working all sts in single (1×1) rib for a firm closure edge.

- **Band Row 1 (RS):** p1, [k1, p1] across to last st, p1. *(adjust so pattern ends correctly; for 63 sts: k1, [p1, k1] to end — 63 sts)*

For simplicity, work the band as follows over 63 sts:

- **Rib Row 1 (RS):** [k1, p1] 31 times, k1. *(63 sts)*
- **Rib Row 2 (WS):** [p1, k1] 31 times, p1.
- Rep Rib Rows 1–2 once more (4 rib rows total).

### Buttonhole Row

- **Buttonhole Row (RS):** Rib 11, **[yo, k2tog, rib 18]** twice, yo, k2tog, rib 10. *(63 sts — 3 buttonholes evenly spaced)*

**Math check:** 11 + (2 + 18) + (2 + 18) + (2 + 10) = 11 + 20 + 20 + 12 = 63 ✓

- **Next Row (WS):** Work in rib as established, working each yo as a single stitch.
- Work **2 more rows** in rib.

**Cast off** all 63 sts loosely in rib.

---

## FINISHING

### 1. Weave In Ends
Weave in all yarn ends on the wrong side using a tapestry needle.

### 2. Block
Wet-block both panels to exactly **30 × 30 cm**. Pin out evenly on a blocking mat, paying particular attention to opening up the cable columns and straightening the side edges. Allow to dry completely.

### 3. Seam

Place the two panels **wrong sides together** (so RS faces outward on both sides). Using mattress stitch and matching yarn:

- Seam the **left side**, **bottom edge**, and **right side**.
- Leave the **top edge open** for the buttonhole closure.

### 4. Button Closure

- Position the buttonhole band of the back panel to overlap the top edge of the front panel.
- Mark the button positions on the front panel to align with the 3 buttonholes.
- Sew the **3 buttons** securely to the front panel's top edge using sewing thread or a strand of matching yarn.

### Zipper Alternative
If preferred, skip the buttonhole band on the back panel (cast off after Row 72 like the front). Hand-sew a **28 cm zipper** into the top opening using backstitch on the WS, easing the fabric evenly along the zipper tape.

### 5. Insert Cushion Pad
Insert a 30 cm (or 32 cm for plumper finish) cushion pad through the opening and fasten buttons (or zipper).

---

## Designer's Tips

- **Cable tension**: Cables naturally pull the fabric in. If your panel measures less than 30 cm wide after blocking, block more aggressively or go up a needle size for the next attempt.
- **Cleaner cables**: When crossing cables, give a gentle tug on the first stitch after the cross to even out any looseness.
- **Reversibility**: Because the panels are seamed WS-together with RS facing out on both sides, the cushion is technically reversible — both sides display the cabled front.
- **Yarn substitution**: Choose a smooth, plied yarn (not a single) to make cable definition pop. Cream, charcoal, or heathered tones look particularly elegant.

Enjoy your beautifully cabled cushion! 🧶
Disclaimer: This pattern was generated by AI and should be reviewed for accuracy before use. While we strive for quality, AI-generated content may contain errors. Please verify measurements, stitch counts, and instructions before beginning your project. Generated by purlJam.uk
Access your pattern anytime
Bookmark this page to access your pattern anytime