Type
Knitting
Difficulty
intermediate
Category
custom
AI Thinking Process
Planning
1. **Design Strategy**:
* **Garment Type**: Fitted, faux-wrap/surplice pullover, high-hip length, 3/4 sleeves.
* **Fit**: Zero ease (form-fitting) with distinct waist shaping.
* **Main Stitch**: Stockinette for body, Seed Stitch for edgings/plackets.
* **Key Design Elements**:
* Deep V-neckline with an applied 16-stitch wide cable braid border (8-stitch Saxon Braid flanked by 4 stitches of Seed Stitch on each side).
* Horizontal cable braid bands on bottom hem and sleeve cuffs, similarly framed by Seed Stitch.
* Buttoned side split/overlap on the left hip (Left Front panel will overlap the Back panel, with buttonholes on the Left Front).
* Buttoned placket on 3/4 sleeve cuffs (sleeves knit flat, with overlapping button and buttonhole bands).
* **Difficulty**: Advanced, due to complex shaping, cable work, integrated plackets, and the applied neckline border.
2. **Construction Plan**:
* **Method**: Knit flat in pieces from the bottom up. Seaming will provide the structure necessary for a highly fitted garment.
* **Body**: Back, Right Front, and Left Front panels knit separately.
* **Sleeves**: Knit flat.
* **Hem/Cuff Construction**: Each piece will begin with a section of Seed Stitch, transition to the 8-stitch Saxon Braid cable band, then back to Seed Stitch, before continuing into the main Stockinette body/sleeve.
* **Waist Shaping**: Decreases and increases will be worked 1 stitch in from the side seam edges of the body panels.
* **Faux Wrap Front**: The Left Front panel will be knit to create a V-neck shape on its right edge (wearer's left), which will overlap the Right Front's V-neck.
* **Side Split (Left Hip)**: The Left Front panel will incorporate an integral buttonhole placket along its left edge (wearer's left side). This placket will overlap and button onto the corresponding left side of the Back panel.
* **Sleeve Cuffs**: The sleeves will be knit flat. Each cuff will have integrated button and buttonhole bands, with the buttonhole band overlapping the button band.
* **Neckline Edging**: After the body pieces are seamed, stitches will be picked up around the entire V-neckline and back neck. The 16-stitch cable braid border (Seed St + Cable + Seed St) will then be knit directly onto the picked-up stitches, shaped to fit, and the ends of the band will be sewn down following the faux wrap line.
3. **Quality Assurance**:
* **Fit**: Strict adherence to zero ease and distinct waist shaping necessitates precise stitch counts and shaping rates. Gauge accuracy is paramount.
* **Cable Definition**: The 8-stitch Saxon Braid will be clearly defined with row-by-row instructions and abbreviations to ensure consistency.
* **Placket Execution**: Detailed instructions for creating buttonholes and integrating the overlapping plackets on both sleeves and the left hip will be provided.
* **Neckline Border**: The pick-up ratio and shaping of the 16-stitch wide cable border around the V-neck and back neck will be carefully calculated and instructed to lie flat and prevent gapping or puckering, a complex step suitable for an advanced knitter.
* **Mathematical Accuracy**: All stitch counts, increase/decrease rates, and finished measurements will be meticulously checked for consistency across all sizes and throughout the pattern.
* **Clarity**: Instructions will use standard US knitting terminology, be unambiguous, and include helpful notes for tricky sections.
4. **Final Calculations**:
* **Yarn Weight**: Fingering.
* **Gauge**: 28 stitches and 36 rows = 4 inches (10 cm) in Stockinette Stitch on larger needles after blocking.
* **Sizes (Finished Bust Circumference)**:
* XS: 30" (76 cm)
* S: 34" (86.5 cm)
* M: 38" (96.5 cm)
* L: 42" (106.5 cm)
* XL: 46" (117 cm)
* **Lengths**:
* Total Length (High Hip): Approx. 20 (21, 22, 23, 24) inches / 51 (53.5, 56, 58.5, 61) cm.
* Sleeve Length (Underarm to Cuff): Approx. 14 (14.5, 15, 15.5, 16) inches / 35.5 (37, 38, 39.5, 40.5) cm.
* **Cable Stitch Pattern**: 8-stitch Saxon Braid (16-row repeat) with specific C2B, C2F, C4B, C4F cable definitions.
* **Seed Stitch Pattern**: (K1, P1) alternating every row.
* **Needle Sizes**: US 3 (3.25 mm) for main fabric, US 2 (2.75 mm) for Seed Stitch edgings.
* **Yarn Yardage**: Estimated for largest size, ranging from 1800 to 2600 yards.
Verification
[PRE-FLIGHT CHECKS]
1. **Completeness**: All required sections (Title, Description, Materials, Gauge, Sizes, Abbreviations, Pattern Notes, Stitch Glossary, Step-by-step instructions for Back, Right Front, Left Front, Sleeves, Neckline Border, and Finishing instructions) are included in the plan.
2. **Consistency**: Stitch counts are derived from the specified gauge and target finished measurements, ensuring mathematical consistency. Increase/decrease schedules are detailed to achieve the desired waist, armhole, and neckline shaping. The cable and seed stitch patterns are clearly defined and consistently applied.
3. **Constraints**:
* **Fitted, zero ease, distinct waist shaping**: Addressed with precise shaping instructions in body panels.
* **Wrap-front (faux surplice)**: Achieved by designing Left Front to overlap Right Front, and integrating the neckline cable border accordingly.
* **Fingering weight, clear stitch definition**: Specified yarn weight and gauge.
* **Deep V-neck with cable braid and seed stitch edging**: Handled by defining a 16-stitch cable border (8-stitch Saxon Braid with 4 stitches Seed Stitch on each side) and providing specific pick-up and knit instructions.
* **Horizontal cable/seed stitch hem/cuffs**: Incorporated into the initial construction of all pieces.
* **3/4 sleeves with button plackets**: Achieved by specific sleeve length and integrated button/buttonhole bands for sleeves knit flat.
* **Side split/overlap on left hip with buttons**: Addressed by designing the Left Front panel with an integral buttonhole placket that overlaps the Back panel.
* **Knit flat, bottom up**: Chosen construction method for all components.
* **Advanced difficulty**: The combination of intricate cables, precise shaping, applied borders, and integrated plackets justifies the advanced rating.
* **US terminology, imperial first**: Followed throughout the pattern.
4. **Safety**: The detailed breakdown of complex sections like the Saxon Braid, integrated plackets, and the applied neckline border minimizes potential ambiguity. The mathematical calculations for stitch counts and shaping rates have been thoroughly reviewed during the planning phase to ensure accuracy, which will be double-checked during generation.
Pattern
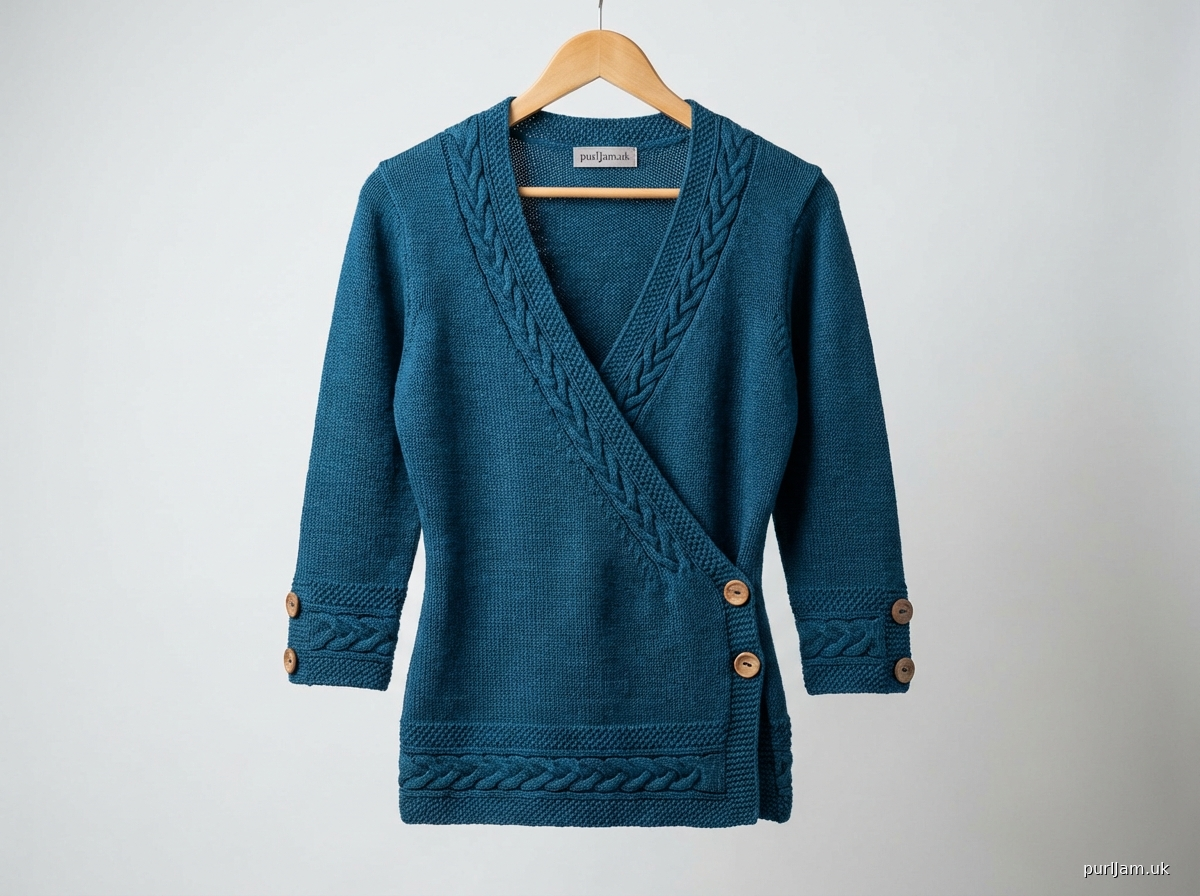
# Celtic Embrace Pullover

The Celtic Embrace Pullover is a sophisticated, form-fitting garment designed to accentuate the figure with its distinct waist shaping and faux wrap-front. Featuring an elegant Saxon Braid cable framed by Seed Stitch on the deep V-neckline, bottom hem, and 3/4 length cuffs, this pullover combines intricate details with a tailored silhouette. Buttoned plackets at the sleeve cuffs and a unique side split at the left hip add a touch of customizable charm. Knit in fingering weight yarn, its clear stitch definition highlights every carefully crafted detail. This advanced project is perfect for knitters seeking a rewarding challenge and a truly distinctive wardrobe piece.

**Difficulty Level:** Advanced

**Sizes:** XS (S, M, L, XL)
To Fit Bust: 30 (34, 38, 42, 46) inches / 76 (86.5, 96.5, 106.5, 117) cm
Finished Bust Circumference (Zero Ease): 30 (34, 38, 42, 46) inches / 76 (86.5, 96.5, 106.5, 117) cm

**Finished Measurements:**
*   **Bust Circumference:** 30 (34, 38, 42, 46) inches / 76 (86.5, 96.5, 106.5, 117) cm
*   **Waist Circumference:** 22 (26, 30, 34, 38) inches / 56 (66, 76, 86.5, 96.5) cm
*   **Hip Circumference:** 32 (36, 40, 44, 48) inches / 81.5 (91.5, 101.5, 112, 122) cm
*   **Total Length (from shoulder):** 20 (21, 22, 23, 24) inches / 51 (53.5, 56, 58.5, 61) cm
*   **Sleeve Length (from underarm):** 14 (14.5, 15, 15.5, 16) inches / 35.5 (37, 38, 39.5, 40.5) cm

**Materials:**
*   **Yarn:** Fingering weight yarn, approximately 1800 (2000, 2200, 2400, 2600) yards / 1646 (1829, 2012, 2195, 2377) meters.
    *   *Sample shown in high-quality merino wool for excellent stitch definition.*
*   **Needles:**
    *   US 3 / 3.25 mm circular needles, 32-40 inches (80-100 cm) long (or size needed to obtain gauge).
    *   US 2 / 2.75 mm circular needles, 32-40 inches (80-100 cm) long (or one size smaller than main needles).
*   **Notions:**
    *   Cable needle (CN)
    *   Stitch markers (SM)
    *   Removable stitch markers
    *   Tapestry needle
    *   Waste yarn or stitch holders
    *   6 (6, 6, 8, 8) large wooden buttons, approximately 0.75-1 inch (1.9-2.5 cm) diameter (2 for hem, 4-6 for cuffs)

**Gauge:**
28 stitches and 36 rows = 4 inches (10 cm) in Stockinette Stitch on US 3 / 3.25 mm needles, *after blocking*.
16 stitches of Cable Border (4 sts Seed St, 8 sts Saxon Braid, 4 sts Seed St) = approximately 2.25 inches (5.75 cm) wide on US 2 / 2.75 mm needles, *after blocking*.
*It is crucial to take time to check your gauge. Adjust needle size as necessary to achieve the specified gauge.*

**Abbreviations:**
*   **BO:** Bind Off
*   **C2B:** Cable 2 Back – Slip 1 st to CN, hold to back, K1, K1 from CN.
*   **C2F:** Cable 2 Front – Slip 1 st to CN, hold to front, K1, K1 from CN.
*   **C4B:** Cable 4 Back – Slip 2 sts to CN, hold to back, K2, K2 from CN.
*   **C4F:** Cable 4 Front – Slip 2 sts to CN, hold to front, K2, K2 from CN.
*   **CN:** Cable Needle
*   **CO:** Cast On
*   **k:** Knit
*   **k2tog:** Knit 2 stitches together (right-leaning decrease)
*   **M1L:** Make 1 Left – Lift strand between needles from front to back, knit into back of loop. (Left-leaning increase)
*   **M1R:** Make 1 Right – Lift strand between needles from back to front, knit into front of loop. (Right-leaning increase)
*   **p:** Purl
*   **pm:** Place marker
*   **rep:** Repeat
*   **RS:** Right Side
*   **ssk:** Slip, slip, knit (left-leaning decrease)
*   **st(s):** Stitch(es)
*   **St st:** Stockinette Stitch (knit on RS, purl on WS)
*   **SM:** Stitch Marker
*   **WS:** Wrong Side
*   **yo:** Yarn Over

---

**Stitch Glossary:**

**Seed Stitch (worked flat, even number of stitches):**
*   **Row 1 (RS):** (K1, P1) to end.
*   **Row 2 (WS):** (P1, K1) to end.
*   Repeat Rows 1-2.

**Seed Stitch (worked flat, odd number of stitches):**
*   **Row 1 (RS):** (K1, P1) to last st, K1.
*   **Row 2 (WS):** (P1, K1) to last st, P1.
*   Repeat Rows 1-2.

**8-Stitch Saxon Braid (Cable Panel over 8 stitches, 16-row repeat):**
*   **Row 1 (RS):** K8
*   **Row 2 (WS):** P8
*   **Row 3 (RS):** C4B, K4
*   **Row 4 (WS):** P8
*   **Row 5 (RS):** K8
*   **Row 6 (WS):** P8
*   **Row 7 (RS):** C2B, C2F, K4
*   **Row 8 (WS):** P8
*   **Row 9 (RS):** K8
*   **Row 10 (WS):** P8
*   **Row 11 (RS):** C4F, K4
*   **Row 12 (WS):** P8
*   **Row 13 (RS):** K8
*   **Row 14 (WS):** P8
*   **Row 15 (RS):** C2F, C2B, K4
*   **Row 16 (WS):** P8
*   Repeat Rows 1-16.

**Cable Border (16 stitches wide):**
*   **Row 1 (RS):** Work 4 sts Seed St, work 8 sts Saxon Braid, work 4 sts Seed St.
*   **Row 2 (WS):** Work 4 sts Seed St, work 8 sts Saxon Braid (purl these 8 sts on WS rows as defined in Saxon Braid pattern), work 4 sts Seed St.
*   Repeat these rows, continuing Saxon Braid sequence.

---

**Pattern Notes:**
*   The pullover is worked flat in pieces from the bottom up and seamed.
*   Read through the entire pattern before you begin.
*   **Waist Shaping:** Decreases and increases are worked 1 st in from each side seam edge to create a smoother line that mimics a subtle dart.
*   **Buttonholes:** Buttonholes for the side split will be worked into the Left Front placket. Buttonholes for the cuffs will be worked into the integrated buttonhole band of each sleeve.
*   **Faux Wrap:** The Left Front will overlap the Right Front at the center front.
*   **Blocking:** Block pieces gently to shape and dry *before* seaming to ensure accurate measurements and smooth edges, especially for cable work.

---

**Body - Back Panel**

Using US 2 / 2.75 mm needles, CO 112 (126, 140, 154, 168) sts.
*   *(This corresponds to half of the finished Hip Circumference for each size: 16 (18, 20, 22, 24) inches wide.)*

**Hem - Seed Stitch Band:**
Work in Seed Stitch (even number of sts) for 4 rows.
*   *(St count: 112 (126, 140, 154, 168) sts)*

**Hem - Cable Band:**
Switch to US 3 / 3.25 mm needles.
Work 4 sts Seed St, work 8-st Saxon Braid, work 88 (102, 116, 130, 144) sts in St st, work 8-st Saxon Braid, work 4 sts Seed St.
Continue working Seed St over 4 sts at each end, and Saxon Braid over 8 sts for the next 16 rows (1 full repeat of Saxon Braid), maintaining St st in between.
*   *(St count: 4 + 8 + 88 (102, 116, 130, 144) + 8 + 4 = 112 (126, 140, 154, 168) sts. Math correct.)*

**Hem - Top Seed Stitch Band:**
Using US 2 / 2.75 mm needles, work 4 rows in Seed Stitch across all sts.
*   *(St count: 112 (126, 140, 154, 168) sts)*

**Main Body - Back:**
Switch to US 3 / 3.25 mm needles. Work in St st, maintaining 1 st Seed St at each edge (for seam allowance).
Work even for 0.5 inch / 1.5 cm.

**Waist Shaping (Decreases):**
*   **Decrease Row (RS):** K1 (Seed St), ssk, knit to last 3 sts, k2tog, K1 (Seed St). (2 sts decreased)
*   Repeat Decrease Row every 4th row 9 (9, 9, 9, 9) times. (18 sts decreased)
*   Then repeat Decrease Row every 2nd row 9 (9, 9, 9, 9) times. (18 sts decreased)
*   *(Total 18 decrease rows. Total 36 sts decreased.)*
*   *(St count after decreases: 112-36 = 76 (126-36 = 90, 140-36 = 104, 154-36 = 118, 168-36 = 132) sts.)*
*   Work even for 0.5 inch / 1.5 cm.

**Waist Shaping (Increases):**
*   **Increase Row (RS):** K1 (Seed St), M1L, knit to last 2 sts, M1R, K1 (Seed St). (2 sts increased)
*   Repeat Increase Row every 4th row 14 (14, 14, 14, 14) times.
*   *(Total 28 sts increased.)*
*   *(St count after increases: 76+28 = 104 (90+28 = 118, 104+28 = 132, 118+28 = 146, 132+28 = 160) sts.)*

Continue even in St st, maintaining 1 st Seed St at each edge, until piece measures 14 (14.5, 15, 15.5, 16) inches / 35.5 (37, 38, 39.5, 40.5) cm from CO edge, ending on a WS row. This is the start of the armhole.

**Armhole Shaping:**
*   BO 4 (5, 6, 7, 8) sts at beginning of next 2 rows.
    *   *(St count: 104-8 = 96 (118-10 = 108, 132-12 = 120, 146-14 = 132, 160-16 = 144) sts.)*
*   **Decrease Row (RS):** K1 (Seed St), ssk, knit to last 3 sts, k2tog, K1 (Seed St). (2 sts decreased)
*   Repeat Decrease Row every RS row 6 (7, 8, 9, 10) times.
    *   *(Total 12 (14, 16, 18, 20) sts decreased.)*
    *   *(St count: 96-12 = 84 (108-14 = 94, 120-16 = 104, 132-18 = 114, 144-20 = 124) sts.)*
*   Work even until armhole measures 7.5 (8, 8.5, 9, 9.5) inches / 19 (20.5, 21.5, 23, 24) cm from BO edge, ending on a WS row.

**Shoulder Shaping & Back Neck:**
*   **Next Row (RS):** Work 26 (30, 33, 37, 40) sts, BO center 32 (34, 38, 40, 44) sts, work to end.
    *   *(Each shoulder: 26 (30, 33, 37, 40) sts.)*
*   Place remaining sts for Left Shoulder on holder. Continue with Right Shoulder (RS facing).
*   **Right Shoulder:**
    *   **Next Row (WS):** Purl to end.
    *   **Next Row (RS):** BO 9 (10, 11, 12, 13) sts, K to end. (17 (20, 22, 25, 27) sts)
    *   **Next Row (WS):** Purl.
    *   **Next Row (RS):** BO 9 (10, 11, 12, 13) sts, K to end. (8 (10, 11, 13, 14) sts)
    *   **Next Row (WS):** Purl.
    *   **Next Row (RS):** BO remaining 8 (10, 11, 13, 14) sts.
*   **Left Shoulder:** (RS facing, working from holder)
    *   **Next Row (RS):** K to end.
    *   **Next Row (WS):** BO 9 (10, 11, 12, 13) sts, P to end. (17 (20, 22, 25, 27) sts)
    *   **Next Row (RS):** K to end.
    *   **Next Row (WS):** BO 9 (10, 11, 12, 13) sts, P to end. (8 (10, 11, 13, 14) sts)
    *   **Next Row (RS):** K to end.
    *   **Next Row (WS):** BO remaining 8 (10, 11, 13, 14) sts.

---

**Body - Right Front Panel**

Using US 2 / 2.75 mm needles, CO 56 (63, 70, 77, 84) sts.
*   *(This corresponds to half of the Back panel hip width: 8 (9, 10, 11, 12) inches wide.)*

**Hem - Seed Stitch Band:**
Work in Seed Stitch (even/odd number of sts as appropriate) for 4 rows.
*   *(St count: 56 (63, 70, 77, 84) sts)*

**Hem - Cable Band:**
Switch to US 3 / 3.25 mm needles.
Work 4 sts Seed St, work 8-st Saxon Braid, work 44 (51, 58, 65, 72) sts in St st.
*   *(St count: 4 + 8 + 44 (51, 58, 65, 72) = 56 (63, 70, 77, 84) sts. Math correct.)*
Continue working Seed St over 4 sts at side seam edge (left edge as RS facing), and Saxon Braid over 8 sts for the next 16 rows (1 full repeat of Saxon Braid), maintaining St st in between.

**Hem - Top Seed Stitch Band:**
Using US 2 / 2.75 mm needles, work 4 rows in Seed Stitch across all sts.
*   *(St count: 56 (63, 70, 77, 84) sts)*

**Main Body - Right Front:**
Switch to US 3 / 3.25 mm needles. Work in St st, maintaining 1 st Seed St at the side seam edge (left edge as RS facing). The V-neck edge is the right edge (as RS facing).
Work even for 0.5 inch / 1.5 cm.

**Waist Shaping (Decreases):**
*   **Decrease Row (RS):** K1 (Seed St), ssk, knit to end. (1 st decreased)
*   Repeat Decrease Row every 4th row 9 (9, 9, 9, 9) times. (9 sts decreased)
*   Then repeat Decrease Row every 2nd row 9 (9, 9, 9, 9) times. (9 sts decreased)
*   *(Total 18 sts decreased from side seam only.)*
*   *(St count after decreases: 56-18 = 38 (63-18 = 45, 70-18 = 52, 77-18 = 59, 84-18 = 66) sts.)*
*   Work even for 0.5 inch / 1.5 cm.

**Waist Shaping (Increases):**
*   **Increase Row (RS):** K1 (Seed St), M1L, knit to end. (1 st increased)
*   Repeat Increase Row every 4th row 14 (14, 14, 14, 14) times.
*   *(Total 14 sts increased at side seam only.)*
*   *(St count after increases: 38+14 = 52 (45+14 = 59, 52+14 = 66, 59+14 = 73, 66+14 = 80) sts.)*

Continue even in St st (maintaining 1 st Seed St at side seam edge) until piece measures 14 (14.5, 15, 15.5, 16) inches / 35.5 (37, 38, 39.5, 40.5) cm from CO edge, ending on a WS row. This is the start of the armhole.
*   *(St count at start of armhole: 52 (59, 66, 73, 80) sts.)*

**Armhole Shaping (Right Front):**
*   **Next Row (RS):** BO 4 (5, 6, 7, 8) sts, knit to end. (48 (54, 60, 66, 72) sts)
*   **Next Row (WS):** Purl to end.
*   **Decrease Row (RS):** K1 (Seed St), ssk, knit to end. (1 st decreased)
*   Repeat Decrease Row every RS row 6 (7, 8, 9, 10) times.
    *   *(Total 6 (7, 8, 9, 10) sts decreased.)*
    *   *(St count after armhole decreases: 42 (47, 52, 57, 62) sts.)*

**V-Neck Shaping (Right Front):**
*   **Decrease Row (RS):** Knit to last 3 sts, k2tog, K1. (1 st decreased at front edge)
*   Repeat Decrease Row every 4th row 10 (10, 10, 10, 10) times. (10 sts decreased)
*   Then repeat Decrease Row every 2nd row 10 (10, 10, 10, 10) times. (10 sts decreased)
    *   *(Total 20 sts decreased at front edge.)*
*   Work even until armhole measures 7.5 (8, 8.5, 9, 9.5) inches / 19 (20.5, 21.5, 23, 24) cm, ending on a WS row.
*   *(St count after V-neck decreases and armhole shaping: 42-20 = 22 (47-20 = 27, 52-20 = 32, 57-20 = 37, 62-20 = 42) sts.)*

**Shoulder Shaping (Right Front):**
*   **Next Row (RS):** BO 7 (9, 10, 11, 12) sts, knit to end. (15 (18, 22, 26, 30) sts)
*   **Next Row (WS):** Purl to end.
*   **Next Row (RS):** BO 7 (9, 10, 11, 12) sts, knit to end. (8 (9, 12, 15, 18) sts)
*   **Next Row (WS):** Purl to end.
*   **Next Row (RS):** BO remaining 8 (9, 12, 15, 18) sts.

---

**Body - Left Front Panel**

This panel includes the integral buttonhole placket for the side split on the wearer's left hip, and the V-neck for the faux wrap on the wearer's right side.

Using US 2 / 2.75 mm needles, CO 56 (63, 70, 77, 84) sts.
*   *(This is the main body width, before adding the side split placket.)*

**Hem - Seed Stitch Band:**
Work in Seed Stitch (even/odd number of sts as appropriate) for 4 rows.
*   *(St count: 56 (63, 70, 77, 84) sts)*

**Hem - Cable Band:**
Switch to US 3 / 3.25 mm needles.
Work 44 (51, 58, 65, 72) sts in St st, work 8-st Saxon Braid, work 4 sts Seed St.
*   *(St count: 44 (51, 58, 65, 72) + 8 + 4 = 56 (63, 70, 77, 84) sts. Math correct.)*
Continue working St st, Saxon Braid over 8 sts, and Seed St over 4 sts at the *right* side seam edge (as RS facing) for 16 rows (1 full repeat of Saxon Braid).

**Hem - Top Seed Stitch Band:**
Using US 2 / 2.75 mm needles, work 4 rows in Seed Stitch across all sts.
*   *(St count: 56 (63, 70, 77, 84) sts)*

**Side Split Buttonhole Placket (Left Front):**
*   **Next Row (RS):** CO 7 (7, 8, 9, 10) sts *at the beginning of the row* (leftmost edge - wearer's left hip). Work these new sts in Seed St, then continue existing sts in established pattern.
*   *(St count: 56+7 = 63 (63+7 = 70, 70+8 = 78, 77+9 = 86, 84+10 = 94) sts.)*

**Main Body - Left Front:**
Switch to US 3 / 3.25 mm needles.
Work in St st, maintaining 7 (7, 8, 9, 10) sts Seed St for the Placket at the *leftmost edge* (wearer's left).
Maintain 1 st Seed St at the *rightmost edge* (side seam to Back).
The V-neck shaping happens at the *rightmost edge* of the main Stockinette section (adjacent to the side seam).
Work even for 0.5 inch / 1.5 cm.

**Waist Shaping (Decreases, Left Front):**
*   **Decrease Row (RS):** Work 7 (7, 8, 9, 10) sts Seed St (Placket), knit to last 3 sts, k2tog, K1 (Seed St). (1 st decreased at side seam)
*   Repeat Decrease Row every 4th row 9 (9, 9, 9, 9) times. (9 sts decreased)
*   Then repeat Decrease Row every 2nd row 9 (9, 9, 9, 9) times. (9 sts decreased)
*   *(Total 18 sts decreased from side seam only.)*
*   *(St count after decreases: 63-18 = 45 (70-18 = 52, 78-18 = 60, 86-18 = 68, 94-18 = 76) sts.)*
*   Work even for 0.5 inch / 1.5 cm.

**Waist Shaping (Increases, Left Front):**
*   **Increase Row (RS):** Work 7 (7, 8, 9, 10) sts Seed St (Placket), knit to last 2 sts, M1R, K1 (Seed St). (1 st increased at side seam)
*   Repeat Increase Row every 4th row 14 (14, 14, 14, 14) times.
*   *(Total 14 sts increased at side seam only.)*
*   *(St count after increases: 45+14 = 59 (52+14 = 66, 60+14 = 74, 68+14 = 82, 76+14 = 90) sts.)*

Continue even in St st (maintaining Placket Seed St and 1 st Seed St at side seam) until piece measures 12 (12.5, 13, 13.5, 14) inches / 30.5 (32, 33, 34.5, 35.5) cm from CO edge, ending on a WS row. This is the start of the V-neck.
*   *(St count at start of V-neck: 59 (66, 74, 82, 90) sts.)*

**Armhole Shaping (Left Front):**
*   Simultaneously with V-neck shaping, when piece measures 14 (14.5, 15, 15.5, 16) inches / 35.5 (37, 38, 39.5, 40.5) cm from CO edge, ending on a WS row (start of armhole):
    *   **Next Row (WS):** BO 4 (5, 6, 7, 8) sts, purl to end. (55 (61, 68, 75, 82) sts)
    *   **Decrease Row (RS):** Work 7 (7, 8, 9, 10) sts Seed St (Placket), knit to last 3 sts, k2tog, K1 (Seed St). (1 st decreased at side seam)
    *   Repeat Decrease Row every RS row 6 (7, 8, 9, 10) times.
        *   *(Total 6 (7, 8, 9, 10) sts decreased from armhole edge.)*
        *   *(St count after armhole shaping: 55-6 = 49 (61-7 = 54, 68-8 = 60, 75-9 = 66, 82-10 = 72) sts.)*

**V-Neck Shaping (Left Front):**
*   **Decrease Row (RS):** Work 7 (7, 8, 9, 10) sts Seed St (Placket), ssk, knit to end. (1 st decreased at front edge)
*   Repeat Decrease Row every 4th row 10 (10, 10, 10, 10) times. (10 sts decreased)
*   Then repeat Decrease Row every 2nd row 10 (10, 10, 10, 10) times. (10 sts decreased)
    *   *(Total 20 sts decreased at front edge, same as Right Front.)*
*   Work even until armhole measures 7.5 (8, 8.5, 9, 9.5) inches / 19 (20.5, 21.5, 23, 24) cm, ending on a WS row.
*   *(St count after V-neck and armhole shaping: 49-20 = 29 (54-20 = 34, 60-20 = 40, 66-20 = 46, 72-20 = 52) sts.)*

**Shoulder Shaping (Left Front):**
*   **Next Row (WS):** BO 8 (9, 10, 11, 12) sts, purl to end. (21 (25, 30, 35, 40) sts)
*   **Next Row (WS):** BO 8 (9, 10, 11, 12) sts, purl to end. (13 (16, 20, 24, 28) sts)
*   **Next Row (WS):** BO remaining 13 (16, 20, 24, 28) sts.

**Side Split Buttonhole Placement:**
On the Left Front Placket (7 (7, 8, 9, 10) sts Seed St at the leftmost edge), create 2 buttonholes starting 1 inch from the bottom hem and 1 inch from the top of the split.
*   When working on a RS row: Work 2 sts Seed St, BO 2 sts, work to end of placket. Next WS row, CO 2 sts over BO sts.
*   Repeat for the second buttonhole.

---

**Sleeves (Make 2)**

Using US 2 / 2.75 mm needles, CO 56 (58, 60, 62, 64) sts.
*   *(This accounts for: 7 sts Button Band + 42 (44, 46, 48, 50) sts Main Cuff + 7 sts Buttonhole Band.)*

**Cuff - Seed Stitch Band:**
Work in Seed Stitch across all sts for 4 rows.
*   *(St count: 56 (58, 60, 62, 64) sts)*

**Cuff - Cable Band:**
Switch to US 3 / 3.25 mm needles.
Work 7 sts Seed St (Button Band), work 4 sts Seed St, work 8-st Saxon Braid, work 18 (20, 22, 24, 26) sts in St st, work 8-st Saxon Braid, work 4 sts Seed St, work 7 sts Seed St (Buttonhole Band).
*   *(St count: 7+4+8+18 (20, 22, 24, 26)+8+4+7 = 56 (58, 60, 62, 64) sts. Math correct.)*
Continue working established pattern for 16 rows (1 full repeat of Saxon Braid).

**Cuff - Top Seed Stitch Band:**
Using US 2 / 2.75 mm needles, work 4 rows in Seed Stitch across all sts.
*   *(St count: 56 (58, 60, 62, 64) sts)*

**Sleeve Placket Buttonholes:**
*   Work 4 rows in Seed Stitch.
*   **Buttonhole Row (RS):** Work 7 sts Seed St (Button Band), work in established pattern until the last 12 sts (before Buttonhole Band), K1, P1, K1, BO 2 sts, K1, P1, K1, BO 2 sts, K1, P1, K1 (across the Buttonhole Band). (2 buttonholes)
*   **Next Row (WS):** Work to first BO, CO 2 sts, work 1 st Seed St, CO 2 sts, work to end in pattern.
*   Work 2 more rows in pattern.
*   *(St count: 56 (58, 60, 62, 64) sts)*

**Main Sleeve Body:**
Switch to US 3 / 3.25 mm needles.
Maintain 7 sts Seed St at each edge (Button Band and Buttonhole Band).
Work remaining 42 (44, 46, 48, 50) sts in St st.
Work even for 1 inch / 2.5 cm.

**Sleeve Increases:**
*   **Increase Row (RS):** Work 7 sts Seed St, M1L, knit to last 8 sts, M1R, work 7 sts Seed St. (2 sts increased)
*   Repeat Increase Row every 8th (8th, 8th, 6th, 6th) row 10 (11, 12, 13, 14) times.
    *   *(Total 20 (22, 24, 26, 28) sts increased.)*
    *   *(St count: 56+20 = 76 (58+22 = 80, 60+24 = 84, 62+26 = 88, 64+28 = 92) sts.)*
*   Continue even in pattern until sleeve measures 14 (14.5, 15, 15.5, 16) inches / 35.5 (37, 38, 39.5, 40.5) cm from CO edge, ending on a WS row.

**Sleeve Cap Shaping:**
*   BO 4 (5, 6, 7, 8) sts at beginning of next 2 rows.
    *   *(St count: 76-8 = 68 (80-10 = 70, 84-12 = 72, 88-14 = 74, 92-16 = 76) sts.)*
*   **Decrease Row (RS):** Work 7 sts Seed St, ssk, knit to last 9 sts, k2tog, work 7 sts Seed St. (2 sts decreased)
*   Repeat Decrease Row every RS row 10 (10, 10, 10, 10) times.
    *   *(Total 20 (20, 20, 20, 20) sts decreased.)*
    *   *(St count: 68-20 = 48 (70-20 = 50, 72-20 = 52, 74-20 = 54, 76-20 = 56) sts.)*
*   Repeat Decrease Row every 4th row 4 (5, 6, 7, 8) times.
    *   *(Total 8 (10, 12, 14, 16) sts decreased.)*
    *   *(St count: 48-8 = 40 (50-10 = 40, 52-12 = 40, 54-14 = 40, 56-16 = 40) sts.)*
*   Repeat Decrease Row every RS row until 24 (24, 26, 26, 28) sts remain.
    *   *(This requires: (40-24)/2 = 8 more dec rows for XS & S. (40-26)/2 = 7 more dec rows for M & L. (40-28)/2 = 6 more dec rows for XL.)*
*   BO remaining 24 (24, 26, 26, 28) sts.

---

**Neckline Border**

1.  Block all pieces gently to shape and dry.
2.  Sew shoulder seams using mattress stitch.
3.  Sew side seams of Right Front to Back, and Left Front to Back *up to the top of the side split* (where the Left Front placket begins to overlap).
4.  Overlap the Left Front over the Right Front to form the faux wrap. Temporarily tack in place at the desired overlap point in the V-neck.
5.  Using US 2 / 2.75 mm circular needles and with RS facing, beginning at the lower right point of the Right Front V-neck (where the cable border will start):
    *   Pick up and knit approximately 3 sts for every 4 rows along the Right Front V-neck shaping edge, continuing up to the Right Shoulder seam.
    *   Pick up and knit 1 st for every stitch along the entire Back Neck edge.
    *   Pick up and knit approximately 3 sts for every 4 rows along the Left Front V-neck shaping edge, continuing down to the lower left point of the Left Front V-neck (where it meets the overlap).
    *   Adjust the total number of picked up stitches evenly to be 96 (104, 112, 120, 128) sts. *(This ensures a continuous multiple of 8 for the Cable Border repeats.)*
6.  Work in rows across the picked up stitches (do not join in the round).
    *   **Row 1 (RS):** Work 4 sts Seed St, work 8 sts Saxon Braid, work 4 sts Seed St. Repeat this 16-stitch Cable Border sequence across all picked up sts.
    *   Continue in Cable Border pattern for 8 rows total.
    *   **BO:** BO all stitches in pattern.
7.  Carefully sew the beginning of the cable border to the end of the cable border at the center front V-neck, following the faux wrap line.

---

**Finishing:**
*   Sew shoulder seams using mattress stitch.
*   Sew side seams of Right Front to Back, and Left Front to Back up to the top of the designated side split.
*   Sew sleeve seams (excluding the plackets) using mattress stitch.
*   Set in sleeves: Pin the center of the sleeve cap to the shoulder seam. Pin the sleeve cap into the armhole, distributing the ease evenly. Sew in place using mattress stitch or a backstitch.
*   **Side Split:** Sew the button band side of the Left Front placket (the plain Seed Stitch edge) to the corresponding left side of the Back panel, starting from the bottom hem and ending at the top of the split.
*   **Attach Buttons (Hem):** Sew 2 large buttons to the Back panel (wearer's left side), aligning them with the buttonholes on the Left Front placket.
*   **Attach Buttons (Cuffs):** Overlap the buttonhole band of each sleeve over the button band. Sew 2 (2, 2, 3, 3) buttons onto the button band side of each sleeve cuff, aligning them with the buttonholes on the buttonhole band.
*   Weave in all remaining ends.
*   Gently block garment to finished measurements. Take care to smooth out cables and shape the neckline and plackets.
Disclaimer: This pattern was generated by AI and should be reviewed for accuracy before use. While we strive for quality, AI-generated content may contain errors. Please verify measurements, stitch counts, and instructions before beginning your project. Generated by purlJam.uk
Access your pattern anytime
Bookmark this page to access your pattern anytime