Type
Knitting
Difficulty
intermediate
Category
pullover
Pattern
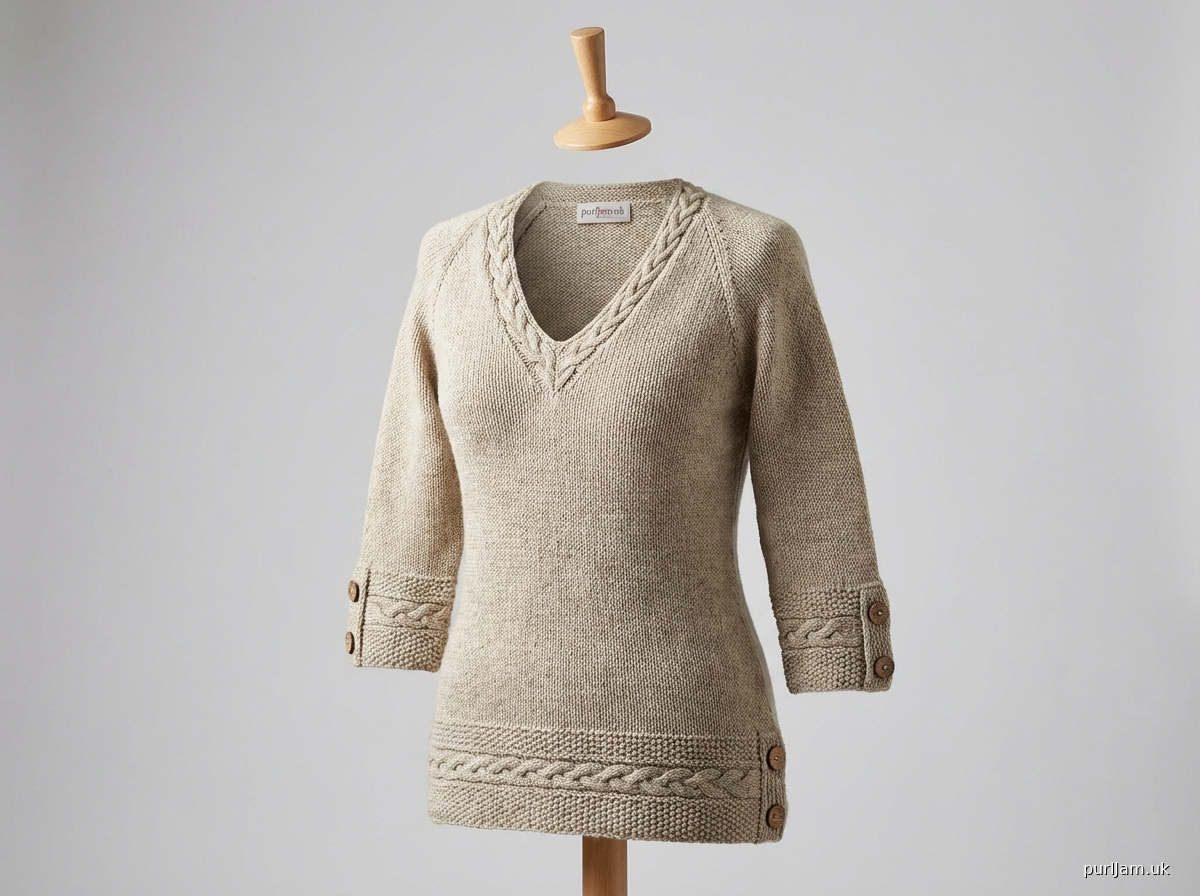
# The Celtic Heart Pullover

This fitted, top-down raglan pullover begins with a provisional cast-on, shaping a deep V-neck opening as the yoke grows. The seamless body features flattering waist shaping, leading to a high-hip length. Both the 3/4 length sleeves and bottom hem are adorned with striking horizontal bands of Seed Stitch and a classic Cable Braid, each finished with a buttoned placket for a unique touch. While incorporating several techniques, this pattern is designed with exceptionally clear, step-by-step instructions, making it a rewarding challenge for the determined advanced beginner.

**Difficulty Level:** Advanced Beginner (requires careful attention to detail and ability to follow step-by-step instructions for multiple techniques.)

**Sizes:** S (M, L, XL, 2XL)
**To Fit Bust Circumference:** 34 (38, 42, 46, 50) inches / 86.5 (96.5, 106.5, 117, 127) cm
**Finished Bust Circumference:** 35 (39, 43, 47, 51) inches / 89 (99, 109, 119.5, 129.5) cm
*(Designed with approximately 1 inch / 2.5 cm of positive ease)*

**Yarn:**
Fingering weight yarn, approximately 1300 (1500, 1700, 1900, 2100) yards / 1189 (1372, 1555, 1737, 1920) meters.
*Sample knit in a high-quality wool or wool blend for excellent stitch definition.*

**Needles:**
*   US 3 / 3.25 mm circular needle, 24-32 inches / 60-80 cm long (or size needed to obtain gauge)
*   US 3 / 3.25 mm circular needle, 16 inches / 40 cm long (for smaller circumferences, if preferred for neckband)
*   US 3 / 3.25 mm DPNs or longer circular for magic loop (for sleeves)
*   One additional US 3 / 3.25 mm needle for Provisional Cast-On (or a smaller needle for waste yarn)
*   Cable needle (CN)

**Notions:**
*   Stitch markers (4 for raglan lines, 2 for side seams, 2 unique markers for V-neck shaping)
*   Waste yarn or stitch holders
*   Tapestry needle for weaving in ends
*   2 (2, 2, 2, 2) buttons, 1 inch / 2.5 cm diameter, for cuffs
*   2 (2, 2, 2, 2) buttons, 1 inch / 2.5 cm diameter, for hem
*   Measuring tape

**Gauge:**
30 stitches and 40 rows = 4 inches (10 cm) in Stockinette Stitch, knit in the round on US 3 / 3.25 mm needles, after blocking.
*Take time to check your gauge. Adjust needle size if necessary to obtain correct gauge.*

---

### **Stitch Glossary & Special Techniques**

*   **k:** knit
*   **p:** purl
*   **sts:** stitches
*   **rnd(s):** round(s)
*   **row(s):** row(s)
*   **RS:** Right Side
*   **WS:** Wrong Side
*   **M:** Marker
*   **sm:** slip marker
*   **pm:** place marker
*   **rem:** remain/remaining
*   **BO:** bind off
*   **CO:** cast on
*   **St st:** Stockinette Stitch (knit all stitches when working in the round; knit on RS, purl on WS when working flat)
*   **Seed Stitch (worked flat):**
    *   **Row 1 (RS):** *K1, P1; rep from * to end of row.
    *   **Row 2 (WS):** *P1, K1; rep from * to end of row.
    *   Repeat Rows 1-2.
*   **Seed Stitch (worked in the round):**
    *   **Round 1:** *K1, P1; rep from * to end of round.
    *   **Round 2:** *P1, K1; rep from * to end of round.
    *   Repeat Rounds 1-2.
*   **Cable Braid (CB) – 8 stitches:**
    *   **Row 1 (RS - Twist):** P1, slip 3 sts to CN, hold in front, K3 from left needle, K3 from CN, P1.
    *   **Row 2 (WS):** K1, P6, K1.
    *   **Row 3 (RS - Plain):** P1, K6, P1.
    *   **Row 4 (WS):** K1, P6, K1.
    *   Repeat Rows 1-4 for Cable Braid pattern.
*   **M1L (Make One Left):** Lift the bar between the last stitch worked and the next stitch with the left needle from the front to the back, knit into the back loop. (Increases 1 stitch)
*   **M1R (Make One Right):** Lift the bar between the last stitch worked and the next stitch with the left needle from the back to the front, knit into the front loop. (Increases 1 stitch)
*   **k2tog (knit 2 together):** Knit 2 stitches together as one. (Decreases 1 stitch)
*   **ssk (slip, slip, knit):** Slip 1 stitch knitwise, slip 1 stitch knitwise, insert left needle into the front of both slipped stitches and knit them together. (Decreases 1 stitch)
*   **Provisional Cast-On:** Using waste yarn and a crochet hook, create a chain. Pick up stitches into the back bumps of the chain with your knitting needle.
*   **Backward Loop Cast-On:** A simple method for casting on new stitches, useful for underarms and buttonholes.
*   **Buttonhole (2-Stitch):**
    *   **RS Row:** K to buttonhole placement, BO 2 sts, work in pattern to end.
    *   **Next Row (WS):** Work in pattern to buttonhole, CO 2 sts (using backward loop or cable cast-on) over the bound-off stitches, work in pattern to end.
*   **Pick Up and Knit:** Insert needle from front to back through desired stitch or edge, wrap yarn, pull loop through.

---

### **Pattern Notes:**

*   This sweater is worked seamlessly from the top down.
*   Raglan increases occur on every RS row when working flat, and every other round when working in the round. Each increase row/round adds 8 stitches to the total.
*   The V-neck is shaped by increases along the front edges when working flat.
*   The Cable Braid pattern is an 8-stitch repeat (P1, K6, P1). The hem and cuff bands incorporate 4 rows of Seed Stitch *above* and *below* this cable panel.
*   Read through all instructions for your size before beginning. Stitch counts are provided as S (M, L, XL, 2XL).

---

### **Pattern Instructions**

#### **Yoke - Worked Flat (Back Neck, Shoulders, V-Neck Opening)**

Using a provisional cast-on, CO 30 (30, 34, 34, 38) sts onto your US 3 / 3.25 mm circular needle. These are the Back Neck stitches.

**Set-up Row (WS):** Purl all sts.

**Next Row (RS - Establish Raglan Lines & V-Neck):**
K1 (Right Front Edge)
pm (V-M1)
K1 (Center Front St)
pm (V-M2)
K0 (0, 2, 2, 2) sts (Right Front section)
pm (R-M1)
K2 (Right Sleeve)
pm (R-M2)
K28 (28, 32, 32, 36) sts (Back)
pm (R-M3)
K2 (Left Sleeve)
pm (R-M4)
K0 (0, 2, 2, 2) sts (Left Front section)
K1 (Left Front Edge).
**Stitches after Set-up Row:** 64 (64, 72, 72, 76) sts.
*(Stitch breakdown: Right Front: 2 (2, 4, 4, 4) sts | Right Sleeve: 2 sts | Back: 28 (28, 32, 32, 36) sts | Left Sleeve: 2 sts | Left Front: 1 (1, 3, 3, 3) sts, plus 6 raglan markers and 2 V-neck markers.)*

**Yoke Shaping (Flat - V-Neck and Raglan Increases):**
This section is worked flat. Raglan increases (M1L/M1R) occur before/after each of the 4 Raglan Markers (R-M1 to R-M4) on **every RS row**. V-neck shaping occurs by increasing (M1R before V-M1, M1L after V-M2) on **every RS row**.
*Each RS row increases 6 stitches total (2 at V-neck, 4 at raglan lines).*

**Row 1 (RS - Inc Row):** K1, sm V-M1, M1R, k to 1 st before V-M2, M1L, sm V-M2, k to R-M1, M1R, sm R-M1, k to R-M2, sm R-M2, M1L, k to R-M3, M1R, sm R-M3, k to R-M4, sm R-M4, M1L, k to end (last st = Left Front Edge K1). (6 sts increased total)
**Row 2 (WS - Even Row):** Purl all stitches.
Repeat Rows 1-2 for 10 (12, 14, 16, 18) times in total. (This means 10 (12, 14, 16, 18) RS increase rows).
*Total stitches after flat section:* 64 (64, 72, 72, 76) + (10 (12, 14, 16, 18) * 6) = 124 (136, 156, 168, 184) sts.

**Join in the Round:**
With RS facing, CO 2 (2, 2, 2, 2) stitches using the backward loop method (this forms the bottom of your V-neck opening). Place a unique marker for Beginning of Round (BOR) in the center of these new stitches. Join to work in the round, being careful not to twist.
*Total stitches after joining:* 124 (136, 156, 168, 184) + 2 = 126 (138, 158, 170, 186) sts.

**Yoke - Worked in the Round (Raglan Increases):**
You will now work in the round, increasing at the 4 raglan markers only (V-neck increases are complete).
*Each increase round increases 8 stitches total (2 at each raglan line).*

**Round 1 (Inc Round):** *K to 1 st before Raglan M, M1L, sm, k to Raglan M, sm, M1R; rep from * 4 times. Knit to end of round. (8 sts increased)
**Round 2 (Even Round):** Knit all stitches.
Repeat Rounds 1-2 for a total of 12 (15, 17, 20, 22) more increase rounds.
*Total Yoke Stitches after all increases (before separation):*
S: 126 + (12 * 8) = 222 sts.
M: 138 + (15 * 8) = 258 sts.
L: 158 + (17 * 8) = 294 sts.
XL: 170 + (20 * 8) = 330 sts.
2XL: 186 + (22 * 8) = 362 sts.
*(Your yoke should measure approximately 8 (8.5, 9, 9.5, 10) inches / 20.5 (21.5, 23, 24, 25.5) cm from the provisional cast-on, or until armhole depth is comfortable.)*

#### **Separate Body and Sleeves**

At this point, you should have 222 (258, 294, 330, 362) stitches on your needle. You are at the BOR (bottom center of the V-neck).

**Stitch Distribution for Separation:**
*   **Front Body Stitches:** 70 (82, 94, 106, 118) sts
*   **Right Sleeve Stitches:** 40 (46, 52, 58, 64) sts
*   **Back Body Stitches:** 70 (82, 94, 106, 118) sts
*   **Left Sleeve Stitches:** 40 (46, 52, 58, 64) sts
*(The Front and Back Body sections include the raglan stitches that are incorporated into the body. The total stitches of 222 (258, 294, 330, 362) equals Front + Right Sleeve + Back + Left Sleeve.)*

**Next Round (Separation):**
Knit across the 70 (82, 94, 106, 118) Front Body stitches to 1 st before R-M1.
Place the next 40 (46, 52, 58, 64) Right Sleeve stitches onto waste yarn or a holder. Remove R-M1 and R-M2.
CO 4 (4, 6, 6, 8) stitches using the backward loop method for the Right Underarm. Place a unique marker (Side M1) in the center of these new stitches (this is your new BOR).
Knit across the 70 (82, 94, 106, 118) Back Body stitches to 1 st before R-M3.
Place the next 40 (46, 52, 58, 64) Left Sleeve stitches onto waste yarn or a holder. Remove R-M3 and R-M4.
CO 4 (4, 6, 6, 8) stitches using the backward loop method for the Left Underarm. Place a unique marker (Side M2) in the center of these new stitches.
Knit to new BOR.
*Total Body Stitches:* 140 (164, 188, 212, 236) (Front + Back) + 8 (8, 12, 12, 16) (Underarm CO) = 148 (172, 200, 224, 252) sts.

#### **Body**

Work in St st in the round for 2 inches (5 cm).

**Waist Shaping:**
Your BOR is Side M1 (Right Side), and Side M2 is at the Left Side.
**Decrease Round:** K1, ssk, k to 2 sts before Side M2, k2tog, sm Side M2, k1, ssk, k to 2 sts before BOR, k2tog. (4 sts decreased)
**Even Round:** Knit all stitches.
Repeat Decrease Round and Even Round 3 (3, 4, 4, 5) more times.
*Total decreases:* 4 (4, 5, 5, 6) times = 16 (16, 20, 20, 24) sts decreased.
*Stitches remaining:* 132 (156, 180, 204, 228) sts.

Work straight in St st for 2 inches (5 cm).

**Increase for Hips:**
**Increase Round:** K1, M1R, k to 1 st before Side M2, M1L, sm Side M2, k1, M1R, k to 1 st before BOR, M1L. (4 sts increased)
**Even Round:** Knit all stitches.
Repeat Increase Round and Even Round 3 (3, 4, 4, 5) more times.
*Total increases:* 4 (4, 5, 5, 6) times = 16 (16, 20, 20, 24) sts increased.
*Stitches returning to:* 148 (172, 200, 224, 252) sts.

Work straight in St st until body measures approximately 10 (10.5, 11, 11.5, 12) inches / 25.5 (26.5, 28, 29, 30.5) cm from underarm CO, or desired length before hem split.

#### **Hem - Side Split with Button Placket**

**Start Split (Left Hip):**
The BOR is at the Right Side (Side M1).
Knit in St st in the round to Side M2 (Left Side). Remove Side M2.
You will now work the Front and Back hem sections flat, separately.

**Back Hem Section:**
Place 74 (86, 100, 112, 126) stitches (half of total stitches, plus any odd stitch if applicable) onto a holder to work later. You are currently working on the other 74 (86, 100, 112, 126) stitches for the Back.
Work the Back section flat for 1.5 inches (4 cm) in St st, creating the split opening.
**Hem Band (Back Section - Worked Flat):**
**Rows 1-4 (Seed Stitch):** Work Seed Stitch (K1, P1) over all stitches.
**Rows 5-8 (Cable Braid):**
    **Row 5 (RS - Cable Twist):** Work [P1, C6F, P1] for Cable Braid pattern repeatedly across the row. Work any remaining stitches at ends in St st. (For S: 74 sts / 8 sts per CB = 9 CB panels with 2 sts rem. Work 9 CB panels, K1, P1 at beginning and end if preferred to center the cables).
    **Row 6 (WS):** Work [K1, P6, K1] over Cable Braid sections. Work remaining stitches in St st.
    **Row 7 (RS - Cable Plain):** Work [P1, K6, P1] over Cable Braid sections. Work remaining stitches in St st.
    **Row 8 (WS):** Work [K1, P6, K1] over Cable Braid sections. Work remaining stitches in St st.
**Rows 9-12 (Seed Stitch):** Work Seed Stitch (K1, P1) over all stitches.
BO loosely in pattern.

**Front Hem Section (with Placket):**
Return the remaining 74 (86, 100, 112, 126) stitches to your needle. These are your Front stitches.
Work the Front section flat for 1.5 inches (4 cm) in St st, creating the split opening.
**Hem Band (Front Section - Worked Flat with Placket):**
Work 8 stitches on the Left side of the Front section as the Placket Overlap.
**Rows 1-4 (Seed Stitch):** Work Seed Stitch (K1, P1) over all stitches.
**Row 5 (RS - Cable Twist with Buttonhole):** Work 8 sts of overlap in Seed Stitch, then work [P1, C6F, P1] for Cable Braid pattern repeatedly across the row. Work any remaining stitches in St st. (Work 1st buttonhole in overlap on Row 5, approx. 1 inch / 2.5 cm from edge).
**Row 6 (WS):** Work as established, continuing Seed Stitch for overlap.
**Row 7 (RS - Cable Plain with Buttonhole):** Work as established. (Work 2nd buttonhole in overlap on Row 7, approx. 2.5 inches / 6 cm above 1st buttonhole).
**Row 8 (WS):** Work as established.
**Rows 9-12 (Seed Stitch):** Work Seed Stitch (K1, P1) over all stitches.
BO loosely in pattern.
**Finishing Hem Split:** Overlap the Front hem piece (with buttonholes) over the Back hem piece on the left hip. Sew buttons to the Back hem to align with the buttonholes.

#### **Sleeves (Make 2)**

Return 40 (46, 52, 58, 64) Sleeve stitches from holder to DPNs or magic loop.
Pick up 4 (4, 6, 6, 8) stitches from the underarm CO using the backwards loop method.
PM for BOR at the center of the picked up underarm stitches.
*Total Sleeve Stitches:* 44 (50, 58, 64, 72) sts.

Work in St st in the round for 3/4 length, approximately 9 (9.5, 10, 10.5, 11) inches / 23 (24, 25.5, 26.5, 28) cm from underarm.
**Decrease for Cuff:**
To shape the sleeve towards the cuff, work Decrease Rounds: K1, k2tog, k to 3 sts before BOR, ssk, k1. (2 sts decreased).
Repeat Decrease Round every 6th (6th, 5th, 5th, 4th) round 3 (4, 5, 6, 7) times.
*Total stitches after decreases:* 38 (42, 48, 52, 58) sts.

Work straight for 1 inch (2.5 cm).
You will now work flat for the cuff placket.
**Next Round (Start Placket):** K to 4 sts before BOR. Turn.
You will now work back and forth in rows over all stitches for the cuff band and placket.

**Cuff Band (Worked Flat with Placket):**
Current stitches: 38 (42, 48, 52, 58) sts.
Work 8 stitches on the Right side (when looking at the RS of the sleeve) of the cuff as the Placket Overlap.
**Rows 1-4 (Seed Stitch):** Work Seed Stitch (K1, P1) over all stitches.
**Row 5 (RS - Cable Twist with Buttonhole):** Work 8 sts of overlap in Seed Stitch, then work [P1, C6F, P1] for Cable Braid pattern repeatedly across the row. Work any remaining stitches in St st. (Work 1st buttonhole in overlap on Row 5, approx. 1 inch / 2.5 cm from edge).
**Row 6 (WS):** Work as established, continuing Seed Stitch for overlap.
**Row 7 (RS - Cable Plain with Buttonhole):** Work as established. (Work 2nd buttonhole in overlap on Row 7, approx. 2.5 inches / 6 cm above 1st buttonhole).
**Row 8 (WS):** Work as established.
**Rows 9-12 (Seed Stitch):** Work Seed Stitch (K1, P1) over all stitches.
BO loosely in pattern.
**Finishing Cuff Placket:** Overlap the buttonhole side over the plain side of the cuff. Sew buttons to the plain side of the cuff to align with the buttonholes.

#### **Neckband**

Unzip provisional cast-on stitches from the back neck and place them onto your needle. Pick up stitches along the V-neck opening (approximately 3 stitches for every 4 rows along the diagonal edges, 1 stitch for every stitch along the straight cast-on/bound-off edges). Aim for an even number of stitches that sits smoothly.
Pm BOR at center back.
Work Seed Stitch (in the round) for 1 inch (2.5 cm).
BO loosely in pattern.

#### **Finishing**

Weave in all loose ends. Gently block your sweater to measurements. Sew buttons to the plackets on the left hip hem and both sleeve cuffs.

---
**END OF PATTERN**
Disclaimer: This pattern was generated by AI and should be reviewed for accuracy before use. While we strive for quality, AI-generated content may contain errors. Please verify measurements, stitch counts, and instructions before beginning your project. Generated by purlJam.uk
Access your pattern anytime
Bookmark this page to access your pattern anytime