Type
Crochet
Difficulty
intermediate
Category
basket
AI Thinking Process
Planning
Verification
Pattern
Christmas Door Pocket
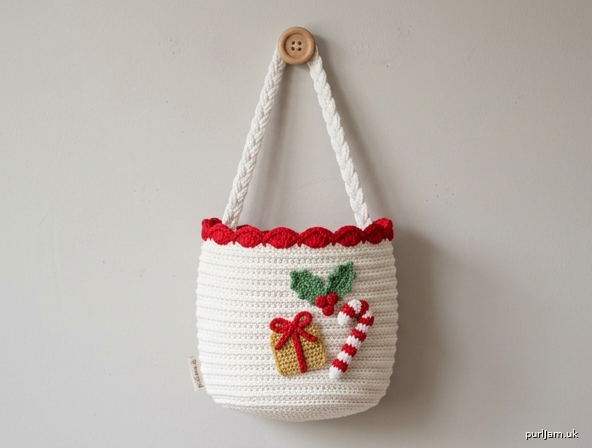
A rounded hanging basket-pocket in US crochet terms. The ivory body is a dense, ridged fabric with a bright red scalloped rim, two long white braided handles joined by a natural wooden button, and a small gold gift box, striped candy cane, and holly cluster on the front.
Skill level: Intermediate
Finished size
- Base diameter: 7¾" (19.5 cm)
- Pocket height, including scallops: 6½" (16.5 cm)
- Each braided handle: 14" (35.5 cm) from rim to button
- Overall hanging length: about 21" (53.5 cm) from button to base
- Gift box: 1½" (4 cm) cube
- Candy cane: 3½" (9 cm) along the curve
Materials
Yarn: Worsted weight (category 4), cotton strongly recommended for shape (acrylic is acceptable if stiffened).
- Color A — Ivory/White: 360 yd (329 m)
- Color B — Bright Red: 70 yd (64 m)
- Color C — Gold (or yellow-gold): 35 yd (32 m)
- Color D — Christmas Green: 20 yd (18 m)
Hooks
- US 7 / 4.5 mm for the basket and handles (one to two sizes smaller than the yarn label, for a firm fabric)
- US E-4 / 3.5 mm for the gift, candy cane, and holly
Notions
- Stitch marker
- Tapestry needle
- Small amount of fiberfill
- One 1¼" (32 mm) natural wooden button
- Pins
- Scissors
- Optional: fabric stiffener spray; ¼" (6 mm) cotton piping/clothesline cord if you want a wired rim
Gauge (4.5 mm hook, unblocked, in the round)
- 16 sc and 18 rnds = 4" × 4" (10 × 10 cm)
- 14 hdc BLO and 14 rnds = 4" × 4" (10 × 10 cm)
Work a 4" (10 cm) sc swatch in the round and adjust hook until gauge matches. A looser fabric will not hold a pocket shape.
Abbreviations (US)
- BLO — back loop only
- ch — chain
- dc — double crochet
- FO — fasten off
- hdc — half double crochet
- inc — increase (2 sc in the same stitch)
- MR — magic ring
- pm — place marker
- rnd(s) — round(s)
- RS — right side
- sc — single crochet
- sk — skip
- sl st — slip stitch
- st(s) — stitch(es)
- tr — treble crochet
- yo — yarn over
Special stitches
- Scallop: 5 dc in the same stitch.
- Berry: 6 sc in MR, sl st to first sc, FO leaving a tail, and cinch the ring closed into a tight ball.
Pattern notes
- US terms throughout (sc, hdc, dc, tr). Never substitute UK treble for US dc.
- The base is worked in continuous spirals. Place a marker in the first stitch of every round and move it up.
- From Rnd 17 onward the sides are worked in joined rounds so the texture ridges sit in even horizontal rings. The join is the center back (the side that will rest against the door).
- Do not turn at the end of rounds unless told to.
- After the base, stitch count is 96 on every round until the scallops.
- Color changes for the candy cane are made in the last yarn-over of the last stitch of the old color.
- Weave tails as you go on the small appliqués; they are stuffed or sewn closed.
- Cotton plus a smaller hook is what keeps this pocket standing when empty. Optional stiffener is listed at the end, not required if gauge is firm.
Basket
Base (Color A, 4.5 mm, continuous rounds)
Work all stitches in both loops.
Rnd 1: 6 sc in MR. Pm in first sc. (6 sc)
Rnd 2: Inc in each st around. (6 increases → 6 + 6 = 12 ✓)
Rnd 3: *Sc in next st, inc in next st; rep from * around. (6 increases → 12 + 6 = 18 ✓)
Rnd 4: *Sc in next 2 sts, inc in next st; rep from * around. (6 increases → 18 + 6 = 24 ✓)
Rnd 5: *Sc in next 3 sts, inc in next st; rep from * around. (6 increases → 24 + 6 = 30 ✓)
Rnd 6: *Sc in next 4 sts, inc in next st; rep from * around. (6 increases → 30 + 6 = 36 ✓)
Rnd 7: *Sc in next 5 sts, inc in next st; rep from * around. (6 increases → 36 + 6 = 42 ✓)
Rnd 8: *Sc in next 6 sts, inc in next st; rep from * around. (6 increases → 42 + 6 = 48 ✓)
Rnd 9: *Sc in next 7 sts, inc in next st; rep from * around. (6 increases → 48 + 6 = 54 ✓)
Rnd 10: *Sc in next 8 sts, inc in next st; rep from * around. (6 increases → 54 + 6 = 60 ✓)
Rnd 11: *Sc in next 9 sts, inc in next st; rep from * around. (6 increases → 60 + 6 = 66 ✓)
Rnd 12: *Sc in next 10 sts, inc in next st; rep from * around. (6 increases → 66 + 6 = 72 ✓)
Rnd 13: *Sc in next 11 sts, inc in next st; rep from * around. (6 increases → 72 + 6 = 78 ✓)
Rnd 14: *Sc in next 12 sts, inc in next st; rep from * around. (6 increases → 78 + 6 = 84 ✓)
Rnd 15: *Sc in next 13 sts, inc in next st; rep from * around. (6 increases → 84 + 6 = 90 ✓)
Rnd 16: *Sc in next 14 sts, inc in next st; rep from * around. (6 increases → 90 + 6 = 96 ✓)
The circle should lie flat at about 7¾" (19.5 cm) across. If the edge cups, the fabric is too tight or a round was shorted; if it ruffles, there are extra increases. Count 96 before going on.
Base-to-sides transition
This BLO round is the corner between floor and wall. Do not skip it.
Rnd 17: Sc BLO in each st around, sl st in first sc to join. (96 sc BLO)
The unused front loops form a ridge on the outside of the base. That is correct.
Sides — thick ridged body (Color A, joined rounds)
Work hdc in BLO of every stitch. Ch 1 at the start of a round does not count as a stitch. Join to the first hdc, not the ch-1.
Rnd 18: Ch 1, hdc BLO in same st and in each st around, sl st in first hdc to join. (96 hdc)
Rnds 19–37: Rep Rnd 18. (20 hdc BLO rounds total, counting Rnd 18; 96 sts every round ✓)
Side height before the border is about 5¾" (14.5 cm). The outside shows stacked horizontal ridges.
FO Color A. Weave the starting tail on the base. Leave the ending tail long enough to bury along the join at center back.
Red scalloped border (Color B, 4.5 mm)
Join Color B with a sl st in the first st of Rnd 37, at center back.
Rnd 38 (scallops): *Sc in next st, sk 2 sts, 5 dc in next st, sk 2 sts; rep from * around, sl st in first sc to join. (16 scallops; 16 × 6 sts = 96 ✓)
FO Color B. Weave ends into the back of the shells so the ivory body stays clean.
Optional extra-firm rim: before Rnd 38, lay cotton piping along Rnd 37 and work the sc of each scallop over the cord. Do not work the 5-dc shells over the cord.
Braided handles (Color A, 4.5 mm)
Make 6 slip-stitch cords (3 per handle).
Cord (make 6): Ch 72. Sl st in 2nd ch from hook and in each ch across. (71 sl sts)
FO, leaving a 12" (30.5 cm) tail at each end of every cord. Each cord measures about 18" (45.5 cm).
Braid (make 2):
- Hold 3 cords together. Knot or oversew the three tails at one end so the start cannot slip.
- Braid firmly and evenly until 1" (2.5 cm) of unbraided cord remains.
- Oversew the second end the same way. Trim only after sewing to the pocket.
- Finished braid is about 15–16" (38–40.5 cm) before attachment.
Mark the pocket Lay the basket upright. The join is center back (against the door). Center front is opposite the join — that is where the decorations will sit.
Place two pins on the top edge, just under the scallops:
- Left handle: 2½" (6.5 cm) left of center back
- Right handle: 2½" (6.5 cm) right of center back
The pins sit slightly toward the back so the pocket hangs flat on a door and the front stays clear for appliqués.
Sew each handle Using the cord tails, sew 1" (2.5 cm) of one braid end to the rim at a pin, taking the needle through the braid, through Rnds 36–37, and through the base of the nearest scallop, at least 8 times. Wrap the remaining tail around the sewn section and bury it. Repeat for the second braid on the other pin.
Bring the two free braid ends together 14" (35.5 cm) above the rim. Stack them, sew through both for 1" (2.5 cm), and leave the stacked ends ready for the button.
Wooden button
With Color A, sew the 1¼" (32 mm) wooden button through the stacked handle ends, button facing the front of the pocket. Go through the button, both braids, and back several times so the hanging point cannot pull out. The button is decorative and structural — it is the single loop that goes over a door hook or knob.
Gold gift box (Color C, 3.5 mm)
Worked in turned rows of sc. Ch 1 at the start of a row does not count as a stitch.
Four side faces (one strip)
Ch 7.
Row 1: Sc in 2nd ch from hook and in each ch across. (6 sc)
Rows 2–6: Ch 1, turn, sc in each st across. (6 sc) — face 1
Rows 7–12: Ch 1, turn, sc in each st across. (6 sc) — face 2
Rows 13–18: Ch 1, turn, sc in each st across. (6 sc) — face 3
Rows 19–24: Ch 1, turn, sc in each st across. (6 sc) — face 4
FO, leaving a 12" (30.5 cm) tail. Fold the strip into a ring so Row 1 meets Row 24. Whipstitch the short edges together. (4 faces × 6 rows = 24 rows ✓)
Top and bottom (make 2)
Ch 7.
Row 1: Sc in 2nd ch from hook and in each ch across. (6 sc)
Rows 2–6: Ch 1, turn, sc in each st across. (6 sc)
FO, leaving a long tail.
Whipstitch the bottom square to one open end of the ring. Stuff firmly with fiberfill so the cube holds its shape. Whipstitch the top square closed.
Cube is 6 sc × 6 rows on every face ≈ 1½" (4 cm).
Red ribbon and bow (Color B, 3.5 mm)
Wraps: Ch 22. FO. Wrap this chain around the cube like gift ribbon (down one face, under the bottom, up the opposite face). Tack at the top center. Ch 22 again and wrap the other direction so the ribbons cross on top and bottom. Tack at the crossing.
Bow loops: Ch 16. Hdc in 3rd ch from hook and in each ch across. (14 hdc). FO. Pinch the strip at its center and wrap Color B tightly around the pinch 8 times. Tie off at the back.
Tails: Ch 12. Sl st in 2nd ch from hook and in each remaining ch. (11 sl sts). FO. Fold in half and sew the fold behind the bow.
Sew the bow on the top of the cube, covering the ribbon crossing.
Candy cane (Colors A and B, 3.5 mm)
Worked as a stuffed tube in a continuous spiral. Pm in the first st of every rnd. Stuff lightly as you go, keeping the tube even.
Rnd 1: With Color A, 6 sc in MR. (6 sc)
Rnds 2–3: Sc in each st around. (6 sc) — white
Change to Color B in the last yo of Rnd 3.
Rnds 4–5: Sc in each st around. (6 sc) — red
Change to Color A.
Rnds 6–7: Sc in each st around. (6 sc) — white
Change to Color B.
Rnds 8–9: Sc in each st around. (6 sc) — red
Change to Color A.
Rnds 10–11: Sc in each st around. (6 sc) — white
Change to Color B.
Rnds 12–13: Sc in each st around. (6 sc) — red
Change to Color A.
Rnds 14–15: Sc in each st around. (6 sc) — white
Change to Color B.
Rnds 16–17: Sc in each st around. (6 sc) — red
Change to Color A.
Rnds 18–19: Sc in each st around. (6 sc) — white
Rnd 20: Sc in each st around. (6 sc)
FO Color A, leaving an 8" (20.5 cm) tail. Add a last pinch of stuffing. Thread the tail through the 6 sts and cinch the tip closed.
Bend the top third over into a crook. With Color A, take 3–4 tiny tacking stitches on the inside of the curve so the cane keeps its shape. Finished length along the curve is about 3½" (9 cm).
Holly (Color D leaves, Color B berries, 3.5 mm)
Leaf (make 2)
With Color D, ch 8.
Work in the back bump of the chain if you like a smoother edge.
Pass 1 (first side): Sc in 2nd ch from hook, hdc in next ch, dc in next ch, tr in next ch, dc in next ch, hdc in next ch, 3 sc in last ch.
Pass 2 (other side): Working along the opposite side of the foundation, hdc in next ch, dc in next ch, tr in next ch, dc in next ch, hdc in next ch, sc in last ch, sl st in first sc.
FO, leaving a 6" (15 cm) tail. Gently tug the leaf so the points sit flat.
Berries (make 3)
With Color B, 6 sc in MR, sl st in first sc. FO, leaving a tail. Cinch the ring into a tight ball and stitch through the berry once or twice to lock it.
Assembly
- Hang the pocket from the button (or pin it upright on a blocking board) so you can see the true front. Center front is opposite the round join.
- Pin the gold gift box on the front, slightly left of center and about 1½" (4 cm) up from the base ridge, sitting on the ridged body — not on the scallops.
- Pin the candy cane to the right of the gift, crook at the top, leaning gently against the box.
- Pin the two holly leaves behind and just above the gift, points angled out. Cluster the three berries over the leaf bases.
- When the grouping looks balanced, sew each piece down with matching yarn:
- Gift: sew the back face and the bottom edges only, so it stays three-dimensional.
- Candy cane: sew along the inner edge of the tube in several spots; do not flatten the stripes.
- Leaves: sew along the center vein.
- Berries: one or two stitches each, into the leaf bases.
- Check the hanging: the pocket should sit level, scallops even, button at the top, decorations facing into the room.
Finishing
- Weave in every remaining tail on the WS of the body and the back of the appliqués.
- Block the base: dampen the floor of the basket only, press it flat, and weight it under a book until dry. Do not crush the ridged sides or the scallops.
- Optional: light fabric-stiffener spray on the inside of the sides. Let dry fully before hanging.
- Reinforce handles once more if the pocket will hold weight: a few extra whipstitches at each rim attachment, on the inside.
- Hang from a door hook or knob by the wooden button. The pocket is meant for lightweight holiday items (greenery picks, cards, wrapped sweets). It is not a load-bearing bag.
Care: Spot clean. If the yarn is cotton, a cool hand wash and reshape is possible; air dry stuffed with towels so the walls stay vertical. Do not machine-dry.
Disclaimer: This pattern was generated by AI and should be reviewed for accuracy before use. While we strive for quality, AI-generated content may contain errors. Please verify measurements, stitch counts, charts, and instructions before beginning your project. Generated by purlJam.uk
Love this pattern?
Save this pattern to your free PurlJam libraryAccess your pattern anytime
Bookmark this page to access your pattern anytime