Type
Machine Knitting
Difficulty
advanced
Category
pullover
AI Thinking Process
Planning
Verification
Pattern
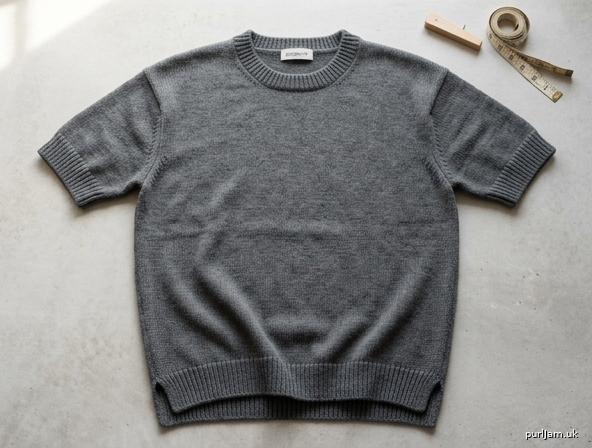
Classic Crew-Neck Men's T-Shirt — Drop-Shoulder Machine Pullover (Fingering Weight)
A short-sleeve, crew-neck men's tee knit flat in four panels (back, front, two sleeves) on a standard-gauge knitting machine with ribber, then seamed. Straight drop-shoulder construction with minimal shaping — only the front neckline and sleeve increases are shaped.
MACHINE_SETUP
- Machine: Standard gauge (4.5mm pitch) single-bed machine with ribber attachment for all welts, cuffs, and neckband.
- Swatch first: Cast on 40 sts, knit 60 rows in stockinette at Main Bed tension dial 6 (adjust ±1 for your fingering yarn), Ribber tension dial 3 for 1x1 rib sections. Remove on waste yarn, steam gently, measure after 30 minutes rest.
- Cast-on method: Waste yarn + ravel cord cast-on on the ribber (needles set 1x1), or comb-and-weight cast-on if working hem-first with a temporary waste-yarn row. Hang claw weights evenly across the cast-on comb; add a second row of weights once 4–5 cm of fabric has formed.
- Carriage levers: Main bed carriage on stockinette (N/normal), ribber carriage set to rib (both beds knitting every row for welts). Set racking to half-pitch for 1x1 rib alignment.
- Tension dial suggestions (fingering weight):
- Main bed stockinette (body/sleeves): T6
- Ribber 1x1 rib (hems, cuffs, neckband): MB T3 / RB T3
- Neckband bind-off row: loosen to T7–8 for stretch.
- Weights: Standard claw weights (4–6), moving up the fabric every 10–15cm; use a full-width weight bar for wide panels like the body.
MATERIALS
- Fingering weight yarn (approx. 800–1050m / 875–1150yds depending on size — see table below)
- Waste yarn and ravel cord for cast-on/holds
- 4 x stitch holders or garter bar (for neckline holds)
- Transfer tools (single and multi-prong), latch tool, tapestry needle
- Sweater board or blocking mats, steam iron/steamer
| Size | S | M | L | XL |
|---|---|---|---|---|
| Approx. yarn required | 850m | 950m | 1050m | 1150m |
GAUGE_AND_TENSION
Gauge (after steaming, resting flat 30 min):
- Stitch gauge: 30 sts = 10cm (3.9") — stockinette, MB T6
- Row gauge: 40 rows = 10cm (3.9")
- Rib gauge (relaxed): 34 sts = 10cm unstretched at MB/RB T3
To measure: Steam swatch lightly (do not press), let rest flat 30 minutes, pin out without stretching, count stitches and rows over a 10cm square using a gauge ruler.
SCHEMATIC_AND_SIZES
| Measurement | S | M | L | XL |
|---|---|---|---|---|
| Finished chest circumference | 100cm (39.4") | 108cm (42.5") | 116cm (45.7") | 124cm (48.8") |
| Body length (hem to shoulder) | 60cm | 62cm | 64cm | 66cm |
| Armhole depth (drop-shoulder opening) | 22cm | 23cm | 24cm | 25cm |
| Sleeve length (cuff to underarm) | 19cm | 20cm | 21cm | 22cm |
| Neck width (finished) | 20cm | 21cm | 22cm | 23cm |
Panel cast-on stitch counts (front = back):
| S | M | L | XL | |
|---|---|---|---|---|
| Panel width (sts) | 150 | 162 | 174 | 186 |
| Total rows, hem to shoulder | 240 | 248 | 256 | 264 |
| Shoulder width after shaping (sts) | 49 | 53 | 56 | 60 |
Sizes are referenced throughout as [S / M / L / XL]. Worked example uses M in full sentences; all four values are always given.
BACK_PANEL
Cast-on stitches: 150 / 162 / 174 / 186
- RC000: Cast on using waste yarn + ravel cord on the ribber, 1x1 needle arrangement, MB/RB T3. Hang comb and weights.
- RC000–024: Work 1x1 rib, 24 rows (6cm) at T3/T3. COR at end of ribbing.
- Transfer all sts to main bed. Set MB tension to T6. Push ribber out of work (or drop to holding position) for stockinette body.
- RC024–[240/248/256/264]: Work straight stockinette, body rows 216 / 224 / 232 / 240, ending with carriage COL (needed for shoulder bind-off symmetry). Move weights up every 10–15cm; check RC counter every 20 rows against the row gauge.
- At final RC, mark the center of the row with a scrap of contrasting yarn on the needle bed for reference — this is your shoulder/neck alignment mark used later during seaming.
- Shoulder division: With COL, transfer/hold the center [52 / 56 / 62 / 66] sts to holders or a garter bar (these become the back neck sts, rehung later for the neckband). The remaining sts split evenly: [49 / 53 / 56 / 60] sts each side.
- Bind off each shoulder group (49/53/56/60 sts) using the latch tool 3-needle-style bind-off, or leave on waste yarn if you plan to join shoulders by machine 3-needle bind-off with the front later (recommended — see FINISHING).
Math check: 49 + 52 + 49 = 150 ✓ | 53 + 56 + 53 = 162 ✓ | 56 + 62 + 56 = 174 ✓ | 60 + 66 + 60 = 186 ✓
FRONT_PANEL
Cast-on stitches: 150 / 162 / 174 / 186 — worked identically to the back through the straight body section, then shaped at the neck.
- RC000–024: Rib hem exactly as for BACK_PANEL.
- RC024–[220/228/236/244]: Work straight stockinette (this is body rows minus 20-row neck shaping allowance: 196 / 204 / 212 / 220 rows), ending COR.
- Neck shaping begins at RC [220 / 228 / 236 / 244]:
- Center hold: transfer [30 / 32 / 36 / 38] center sts to a holder/garter bar and remove from work (these will be rehung for the neckband).
- You now have two independent shoulder sides of [60 / 65 / 69 / 74] sts each. Work each side separately — disconnect the carriage from the opposite side by pushing its needles to holding position (upper working position, out of the carriage's path).
- Shape the inner neck edge in 4 steps, working 2 rows between each step (COL/COR alternating), transferring stitches from the neck edge onto the adjacent needle and moving that needle to holding position (non-knitting) so it is carried along and picked up later:
- Step 1: hold [4 / 4 / 5 / 5] sts
- Step 2 (2 rows later): hold [3 / 3 / 3 / 4] sts
- Step 3 (2 rows later): hold [2 / 3 / 3 / 3] sts
- Step 4 (2 rows later): hold [2 / 2 / 2 / 2] sts
- Total held per side: 11 / 12 / 13 / 14 sts → remaining shoulder sts: 49 / 53 / 56 / 60 ✓ (matches BACK_PANEL shoulder count).
- After the last shaping step, work remaining shoulder sts straight to RC [240 / 248 / 256 / 264] (approx. 8 rows further), ending with COL on the right shoulder / COR on the left shoulder so both sides are ready for bind-off in matching carriage position.
- Bind off (or leave live on waste yarn for machine 3-needle join) each shoulder: 49 / 53 / 56 / 60 sts.
- Keep the held neck-edge groups (the small step-holds) and the center hold on waste yarn — all will be rehung together for the neckband.
Math check (M example): 32 (center) + 2×(65) = 162 ✓; 65 − 12 (steps) = 53 ✓ shoulder.
SLEEVES
Make two identical sleeves.
Cast-on (cuff) stitches: 50 / 54 / 56 / 60 — Top (underarm) width at bind-off: 66 / 70 / 72 / 76
- RC000: Cast on with waste yarn + ravel cord on ribber, 1x1 arrangement, MB/RB T3. Hang comb and weights.
- RC000–012: Work 1x1 rib, 12 rows (3cm), T3/T3. COR at end.
- Transfer to main bed, set MB T6, drop ribber out of work.
- RC012–[076/080/084/088]: Work stockinette body, increasing 1 st at each edge (bring one additional needle into working position at each side, e-wrap the new stitch onto the needle to avoid a hole) as follows:
- S: every 8 rows, 8 times per side (RC020, 028, 036, 044, 052, 060, 068, 076) — 16 sts gained total.
- M: every 8 rows, 8 times per side (RC020…076), then work 4 rows straight to RC080.
- L: every 9 rows, 8 times per side (RC021, 030, 039, 048, 057, 066, 075, 084 — final increase lands on last row).
- XL: every 9 rows, 8 times per side (RC021…084), then work 4 rows straight to RC088.
- Final stitch count at bind-off row: 66 / 70 / 72 / 76 sts (50+16=66 ✓, 54+16=70 ✓, 56+16=72 ✓, 60+16=76 ✓).
- Bind off all stitches loosely (latch tool bind-off or transfer to waste yarn) with COR or COL noted for seaming reference — this straight top edge is the sleeve cap that will be set into the drop-shoulder armhole opening.
NECKBAND
- With shoulders joined (see FINISHING), rehang all held neckline stitches onto the ribber and main bed in 1x1 arrangement, in this order around the neck: back center hold, up the back-left step (if any), across the left shoulder seam point, down the front-left steps and front center hold, up the front-right steps, across the right shoulder seam point, and down the back-right step — forming a full circle.
- Total stitches to rehang (both panels combined): 112 / 122 / 138 / 148 (calculated as each panel's non-shoulder sts: front = center + 2×held-steps, back = center hold; summed and verified against panel widths minus shoulder totals).
- Set machine for circular-style flat rib: MB/RB T3, work 1x1 rib for 20 rows (5cm), RC000(reset)–020, COR/COL alternating normally.
- Bind off: Use the latch tool bind-off for a firm edge, or for extra stretch, do a sewn (picot/tubular) bind-off by threading yarn through a tapestry needle and working a running latch-tool bind-off at a loosened tension equivalent to T7–8.
- Steam the neckband lightly flat before seaming its short edge closed (if worked flat rather than in the round).
FINISHING
- Shoulder joins: With right sides together (or using a flat machine 3-needle bind-off if shoulders were left live), join front and back shoulder stitches: 49 / 53 / 56 / 60 sts per shoulder. Use latch tool 3-needle bind-off for an invisible, flat seam appropriate for drop-shoulder styling.
- Side seams: Mattress-stitch the side seams from the hem upward, stopping [22 / 23 / 24 / 25]cm (rows 88 / 92 / 96 / 100 from the top) below the shoulder seam — this leaves the armhole opening for the sleeve.
- Sleeve attachment: With the sleeve's straight bound-off top edge, mattress-stitch it into the armhole opening, matching the sleeve's side edges to the point where the body side seam stopped. Center the sleeve top on the shoulder seam.
- Sleeve seams: Sew the sleeve's own side seam from cuff to underarm, continuing directly into the body's side seam for a clean, continuous seam line.
- Steaming and blocking: Steam all seams flat from the wrong side. Block the finished garment on a sweater board sized to the schematic measurements (chest, length, sleeve length) — pin lightly, steam again without pressing the iron directly onto the fabric, and allow to dry fully before removing from the board.
- Weave in all yarn tails along seam lines; remove all waste yarn/ravel cord from cast-on edges.
ABBREVIATIONS
- MB — Main Bed
- RB — Ribber Bed
- RC — Row Counter (reading at start of each referenced row)
- COL / COR — Carriage on Left / Carriage on Right
- T — Tension dial setting
- sts — stitches
- 1x1 rib — alternating knit/purl needle arrangement, both beds working
- Hold / holding position — needle pushed to non-working upper position so carriage passes without knitting it
- Transfer — moving a stitch from one needle to an adjacent needle using a transfer tool
- Latch tool bind-off — hand bind-off technique using a latch tool to chain stitches off the needles
- e-wrap — hand-wrapping yarn around a needle to create a new stitch (used for edge increases)
- Rehang — placing held/waste-yarn stitches back onto working needles
Disclaimer: This pattern was generated by AI and should be reviewed for accuracy before use. While we strive for quality, AI-generated content may contain errors. Please verify measurements, stitch counts, and instructions before beginning your project. Generated by purlJam.uk
Love this pattern?
Save this pattern to your free PurlJam libraryAccess your pattern anytime
Bookmark this page to access your pattern anytime