Type
Crochet
Difficulty
intermediate
Category
amigurumi
AI Thinking Process
Planning
Verification
Pattern
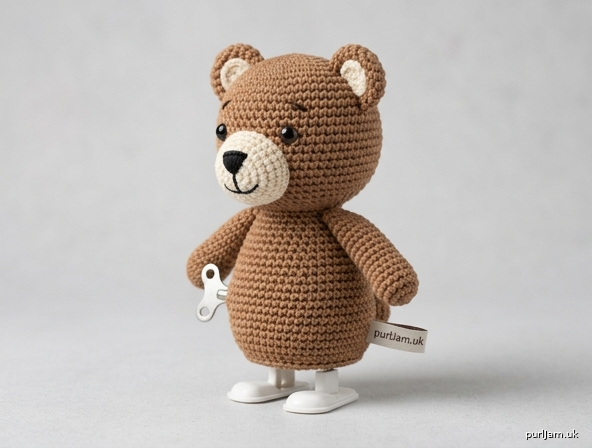
Clockwork Walking Bear
A small wind-up amigurumi bear with an internal walking mechanism
Skill level: Intermediate
Finished size: Approx. 11.5 cm (4½ in) tall; body about 6.7 cm (2⅝ in) across
Yarn weight: Sport / Fine #2
Terminology: UK crochet terms throughout
This little bear is built as a structural housing for a wind-up walking mechanism. The base is an open, calculated ring so the mechanism’s feet can reach the floor; a reinforced slot on the side lets the winder key turn freely. The head, ears, snout, arms and tail are classic separate amigurumi pieces.
Terminology conversion
| UK (this pattern) | US equivalent |
|---|---|
| dc (double crochet) | sc (single crochet) |
| htr (half treble) | hdc |
| tr (treble) | dc |
| sl st | sl st |
| ch | ch |
| yrh | yo |
| tension | gauge |
| miss | skip |
UK dc = US sc throughout. There are no US-dc / UK-tr stitches in this pattern.
Materials
Yarn — Fiocco Cotton (100% cotton, Fine / Sport weight #2)
- MC (main colour — bear): 45 g (approx. 110 m)
- CC (snout, inner ear, optional foot covers): 8 g (approx. 20 m)
- Black or dark brown: small amount for nose, mouth and brows
Hook: 1.8 mm (very tight amigurumi tension; US steel 6)
Notions
- Internal wind-up walking mechanism: height 4.5 cm; base 4.5 cm × 3.5 cm (1¾ × 1¾ × 1⅜ in); winder shaft 2.2 cm (⅞ in) from the bottom base
- 1 pair 6 mm safety eyes
- Polyester toy stuffing (small amount)
- Stitch marker, tapestry needle, pins, sharp scissors
- Optional: 2 mm plastic canvas or stiff felt for a hidden base washer; fabric glue for foot covers
Important safety note: Safety eyes and a wind-up mechanism are not suitable for children under 3 years. The mechanism contains small parts and metal gears.
Tension (gauge)
Worked in a spiral of dc with a 1.8 mm hook, unblocked:
10 dc and 10 rounds = 2.5 cm × 2.5 cm (1 in × 1 in)
That is 4 dc = 1 cm and 4 rounds = 1 cm.
This tension is structural. If your swatch is larger, go down a hook; if smaller, go up 0.15–0.25 mm. A loose body will wobble; a tight body will jam the gears.
Fit check (do this before stuffing or sewing the head): the body tube must slip over the mechanism with about 2 mm of air on every side, and the feet must pass through the base opening without rubbing.
Abbreviations
| Abbreviation | Meaning |
|---|---|
| MC / CC | main colour / contrast colour |
| ch | chain |
| sl st | slip stitch |
| dc | double crochet (UK) = US sc |
| inc | 2 dc in next stitch (increase) |
| dc2tog | double crochet 2 together (use the invisible decrease) |
| BLO | back loop only |
| st(s) | stitch(es) |
| rnd(s) | round(s) |
| MR | magic ring |
| FO | fasten off |
| RS | right side |
Pattern notes
- Pieces are worked in a continuous spiral unless stated. Mark the first stitch of every round.
- Do not join rounds and do not turn.
- Always use the invisible decrease (dc2tog through the front loops only) so the fabric stays dense.
- Work very tightly. The cotton fabric is the chassis: stuffing must never be packed against gears, and stitches must not collapse onto moving parts.
- Internal clearance: the pattern’s 84-st body is calculated for a 4.5 × 3.5 × 4.5 cm mechanism plus a mandatory +2 mm air gap on all sides. Do not add extra decreases “to make it snug”.
- No stuffing in the mechanism chamber. Stuff the head and arms firmly; stuff only a light shoulder cap above the mechanism after it is seated.
- Read the Mechanism insertion section before you sew the head on. Once the head is attached, the mechanism can no longer be removed.
- Left and right are given as the bear wears them.
Engineering overview
| Feature | Calculation | Pattern result |
|---|---|---|
| Mechanism box | 4.5 × 3.5 × 4.5 cm | — |
| +2 mm all sides | 4.9 × 3.9 × 4.7 cm cavity | — |
| Body circumference | 84 dc × 0.25 cm | 21 cm (dia. ~6.7 cm) |
| Base opening | 36 dc | ~2.9 cm diameter |
| Wall height | 21 rounds | ~5.25 cm |
| Keyhole centre | 9 wall rounds up | ~2.25 cm (matches 2.2 cm shaft) |
| Neck opening | 48 dc | sews to head |
The 36-st opening is smaller than 3.5 cm in every direction, so the chassis cannot fall through, while the walking feet can reach the floor. The circular body is slightly roomy on the flat sides and just clears the box on the diagonal — that is the +2 mm tolerance at work.
Pattern
Head (make 1 in MC)
Worked from the top down. Stuff firmly as you go.
Rnd 1: 6 dc in MR. (6)
Rnd 2: inc in each st. (6 increases → 6 + 6 = 12 ✓)
Rnd 3: [1 dc, inc] 6 times. (6 increases → 12 + 6 = 18 ✓)
Rnd 4: [2 dc, inc] 6 times. (6 increases → 18 + 6 = 24 ✓)
Rnd 5: [3 dc, inc] 6 times. (6 increases → 24 + 6 = 30 ✓)
Rnd 6: [4 dc, inc] 6 times. (6 increases → 30 + 6 = 36 ✓)
Rnd 7: [5 dc, inc] 6 times. (6 increases → 36 + 6 = 42 ✓)
Rnd 8: [6 dc, inc] 6 times. (6 increases → 42 + 6 = 48 ✓)
Rnd 9: [7 dc, inc] 6 times. (6 increases → 48 + 6 = 54 ✓)
Rnds 10–13: 1 dc in each st. (54) — 4 even rounds
Safety eyes: insert between rnds 10 and 11, 9 stitches apart, centred on the face. Lock the washers on the inside before decreasing.
Rnd 14: [7 dc, dc2tog] 6 times. (6 decreases → 54 − 6 = 48 ✓)
Rnd 15: [6 dc, dc2tog] 6 times. (48 − 6 = 42 ✓)
Rnd 16: [5 dc, dc2tog] 6 times. (42 − 6 = 36 ✓)
Rnd 17: [4 dc, dc2tog] 6 times. (36 − 6 = 30 ✓)
Rnd 18: [3 dc, dc2tog] 6 times. (30 − 6 = 24 ✓)
Stuff the head firmly, shaping a slightly egg-like bear head.
Rnd 19: [2 dc, dc2tog] 6 times. (24 − 6 = 18 ✓)
Rnd 20: [1 dc, dc2tog] 6 times. (18 − 6 = 12 ✓)
Rnd 21: dc2tog 6 times. (12 − 6 = 6 ✓)
FO, thread the tail through the front loops of the remaining 6 sts, pull closed and weave in. Head measures about 4.3 cm (1¾ in) across and 5.25 cm (2 in) tall.
Muzzle / snout (make 1 in CC)
Rnd 1: 6 dc in MR. (6)
Rnd 2: inc in each st. (12)
Rnd 3: [1 dc, inc] 6 times. (18)
Rnd 4: [2 dc, inc] 6 times. (24)
Rnd 5: 1 dc in each st. (24)
Rnd 6: [2 dc, dc2tog] 6 times. (18)
FO, leaving a 25 cm (10 in) tail. Do not stuff yet.
With black yarn, embroider a small inverted triangle nose over rnds 1–2, then a short vertical stitch and a shallow ‘W’ or ‘‿’ smile. Lightly stuff the snout just before sewing it on.
Placement: pin the snout to the head covering rnds 12–16, centred between the eyes, with the top edge sitting 2 sts below the eye line. Sew with the yarn tail.
Ears (make 2 in MC; optional inner 2 in CC)
Outer ear (MC)
Rnd 1: 6 dc in MR. (6)
Rnd 2: inc in each st. (12)
Rnd 3: [1 dc, inc] 6 times. (18)
Rnds 4–5: 1 dc in each st. (18)
Rnd 6: [1 dc, dc2tog] 6 times. (12)
FO, leaving a 20 cm (8 in) tail. Do not stuff. Flatten the ear so the fasten-off sits at one side.
Inner ear (optional, CC)
Rnd 1: 6 dc in MR. (6)
Rnd 2: inc in each st. (12)
Rnd 3: [1 dc, inc] 6 times. (18)
FO, leaving a tail. Flatten and sew to the inside of the outer ear, then sew the paired ear to the head.
Placement: sew ears over rnds 4–8 of the head, about 8 sts apart at the inner edges, slightly towards the back so they read as a bear, not a mouse.
Body (make 1 in MC)
The body is worked bottom-up: open walking ring → cupped cradle flange → standing walls with winder slot → neck.
A. Open walking ring and cradle flange
Leave a 15 cm (6 in) beginning tail.
Foundation: ch 36, join with sl st to the first ch, taking care not to twist. This ring is the walking aperture.
Rnd 1: 1 dc in each ch around. (36)
Shape the ring into a rounded oval no larger than 3.2 cm × 2.8 cm (1¼ × 1⅛ in) as you work — it must stay smaller than 3.5 cm in every direction so the mechanism cannot drop through.
Rnd 2: [2 dc, inc] 12 times. (36 + 12 = 48 ✓)
Rnd 3: [3 dc, inc] 12 times. (48 + 12 = 60 ✓)
Rnd 4: [4 dc, inc] 12 times. (60 + 12 = 72 ✓)
Rnd 5: [5 dc, inc] 12 times. (72 + 12 = 84 ✓)
The flange will cup gently upwards. That bowl is intentional: it cradles the mechanism base. If it ruffles, ease it with your fingers; do not add extra decreases.
Rnd 6 (turning ridge): 1 dc BLO in each st. (84)
This ridge is the lower edge of the standing wall and the zero-point for the 2.2 cm keyhole measurement.
B. Standing walls
Rnds 7–12: 1 dc in each st. (84) — 6 even rounds
You have now worked 7 wall rounds from the BLO ridge (rnds 6–12) = about 1.75 cm (⅝ in).
C. Winder key slot
The shaft sits 2.2 cm (⅞ in) above the mechanism base. At this tension that is 9 wall rounds above the BLO ridge, i.e. centred on rnds 14–15.
Mark the slot before you work it. Lay the body flat. The slot sits on the bear’s left-hand side (as worn), halfway between centre front and centre back, so the key does not poke out of the tummy. Mark 4 consecutive stitches at that point.
Rnd 13: 1 dc in each st to the 4 marked sts, ch 4, miss 4 sts, 1 dc in each st to end. (80 dc + 4 ch = 84 ✓)
Rnd 14: 1 dc in each dc to the ch-sp, ch 4, miss the 4 ch, 1 dc in each st to end. (84)
Rnd 15: as rnd 14. (84)
Rnd 16: 1 dc in each dc to the ch-sp, 4 dc into the ch-4 space, 1 dc in each st to end. (84)
You now have a reinforced window about 1 cm wide × 0.75 cm tall (⅜ × ⅜ in), centred ~2.25 cm (⅞ in) above the wall ridge.
Check now: slide the mechanism in from the neck (not yet made — just test the tube). The winder shaft must sit in the window with room to turn. If your shaft is higher or lower by a round, work one extra even round before or after the slot on a future bear; do not stretch the hole.
If the window edges look loose, work 1 sl st into each ch-sp column on the next round as you pass — the count stays 84.
Rnds 17–26: 1 dc in each st. (84) — 10 even rounds
Walls from BLO rnd 6 through rnd 26 = 21 rounds = 5.25 cm (2 in). Internal height above a 4.7 cm mechanism = 5 mm of shoulder buffer. ✓
D. Neck shaping (open at the top)
Rnd 27: [12 dc, dc2tog] 6 times. (84 − 6 = 78 ✓)
Rnd 28: [11 dc, dc2tog] 6 times. (78 − 6 = 72 ✓)
Rnd 29: [10 dc, dc2tog] 6 times. (72 − 6 = 66 ✓)
Rnd 30: [9 dc, dc2tog] 6 times. (66 − 6 = 60 ✓)
Rnd 31: [8 dc, dc2tog] 6 times. (60 − 6 = 54 ✓)
Rnd 32: [7 dc, dc2tog] 6 times. (54 − 6 = 48 ✓)
FO, leaving a 40 cm (16 in) tail for sewing the head. Do not close the neck. Do not stuff the body.
Body measurements to hit:
– across the walls: 6.5–6.8 cm (2½–2⅝ in)
– standing wall height, ridge to last even round: 5.1–5.4 cm (2–2⅛ in)
– neck opening: 48 sts, about 3.8 cm (1½ in) across
Arms (make 2 in MC)
Rnd 1: 6 dc in MR. (6)
Rnd 2: inc in each st. (12)
Rnd 3: [1 dc, inc] 6 times. (18)
Rnds 4–11: 1 dc in each st. (18) — 8 even rounds
Rnd 12: [1 dc, dc2tog] 6 times. (12)
Stuff the lower two-thirds lightly; leave the top 1 cm empty so the arm sews flat. Flatten the opening. FO, leaving a 25 cm (10 in) tail.
Each arm is about 3 cm (1¼ in) long and 1.4 cm (½ in) across — short enough that they swing clear of the walking feet.
Tail (make 1 in MC)
Rnd 1: 6 dc in MR. (6)
Rnd 2: inc in each st. (12)
Rnd 3: [1 dc, inc] 6 times. (18)
Rnd 4: 1 dc in each st. (18)
Rnd 5: [1 dc, dc2tog] 6 times. (12)
Lightly stuff. FO, leaving a 20 cm (8 in) tail. Sew to centre back of the body over wall rnds 8–11, well clear of the keyhole (which is on the left side) and above the walking feet.
Optional foot covers (make 2 in CC)
Only if you want the plastic feet disguised. Measure your mechanism’s feet first and add or subtract 1–2 sts / 1 round as needed.
Rnd 1: 6 dc in MR. (6)
Rnd 2: inc in each st. (12)
Rnd 3: [1 dc, inc] 6 times. (18)
Rnds 4–6: 1 dc in each st. (18)
Rnd 7: [1 dc, dc2tog] 6 times. (12)
FO, leaving a tail. Slip over the plastic foot; the walking sole must remain uncovered so it can grip the floor. Tack with two or three stitches or a tiny dot of fabric glue on the upper surface only. Do not glue the sole.
Assembly
Work in this order. Do not sew the head on until the mechanism has been inserted, aligned, wound and walked across a table.
1. Finish the face
Sew snout and ears to the head. Embroider two tiny brows above the eyes if desired. Weave in all head ends.
2. Prepare the body
Weave in the beginning tail of the base ring on the inside of the flange, keeping the 36-st opening clear. Do not leave loose ends in the gear well.
Optional stiffener: cut a washer of plastic canvas or stiff felt with an outer size of 4.7 × 3.7 cm (1⅞ × 1½ in) and an inner oval of about 3.0 × 2.2 cm (1¼ × ⅞ in). Seat it in the cupped flange under the mechanism to stop the cotton creeping into the feet.
3. Insert the mechanism
- Drop the mechanism feet-first through the neck opening.
- Guide the two walking feet down through the 36-st base ring until they protrude below the flange and can touch the floor.
- Rotate the chassis until the winder shaft looks out through the keyhole. The shaft should sit in the centre of the window, not pressed against the cotton.
- Confirm the +2 mm air gap: you should be able to rock the mechanism a millimetre or two in every direction. If it is tight, do not force it — the gears will bind. In that case, the tension was too tight; this body cannot be stretched, so you would need to remake the walls on a 2.0 mm hook.
- Wind the key and test the walk on a smooth table. The feet must swing without catching the base ring. If a foot ticks the cotton, ease the opening with your fingers (do not cut stitches).
- When the walk is clean, take the key out again for the next steps.
4. Anchor the chassis (no glue required)
With MC, make two internal retaining straps:
- Strap A: ch 16, FO.
- Strap B: ch 16, FO.
On the inside of the body, just above the top of the mechanism, sew Strap A from centre front wall to centre back wall. Sew Strap B from left wall to right wall, behind the winder shaft so the key can still enter. The straps form a cross that stops the mechanism climbing when wound. Do not let the straps touch any gear.
Alternatively, take 4 tiny tacking stitches from the inner fabric into existing moulded holes or unused plastic corners of the chassis — never into moving parts.
5. Shoulder stuffing only
Push a thin pancake of stuffing into the neck decrease (rnds 27–32) above the retaining straps. This pads the head join and stops a hollow sound. Stop as soon as the mechanism is hidden from above. Stuffing that migrates down will jam the gears.
6. Sew the head to the body
Pin the head onto the 48-st neck so the snout faces centre front and the keyhole sits on the bear’s left. The head’s rnds 16–18 (36–24 sts) sit over the neck like a lid; sew through the neck stitches and into the head, going round twice. Pull snug but do not gather the neck smaller than 48 sts.
7. Arms
Sew the flattened tops of the arms to the sides of the body over rnds 29–31 (the neck decreases), 4–5 sts behind the side-seam line, angled 10° forward. They must hang well above the walking feet and must not cover the keyhole.
8. Tail
Sew as given above.
9. Final wind-up test
Insert the key, wind, and set the bear on a smooth, level surface. The open base ring should hover just above the floor; only the mechanism feet (or their covers) should make contact. If the cotton ring drags, the feet are not fully through the opening — reseat the chassis.
Finishing
- Weave in every remaining end on the outside or in the stuffed head/arms — never in the gear chamber.
- Steam is not recommended on cotton at this tension; shape with your fingers only.
- Store with the key removed so the spring is at rest.
Designer checklist (technical edit)
| Check | Target | Pass? |
|---|---|---|
| Tension swatch | 10 dc × 10 rnds = 2.5 cm | measure before starting |
| Body stitch count | 84 at the walls | rnds 5–26 |
| Base opening | 36 sts, < 3.5 cm any direction | rnd 1 |
| Wall height | 21 rnds ≈ 5.25 cm | rnds 6–26 |
| Keyhole centre | 2.2–2.3 cm above BLO ridge | rnds 13–16 |
| Neck | 48 sts, open | rnd 32 |
| Head max | 54 sts | rnds 9–13 |
| Eyes | between rnds 10–11, 9 sts apart | before decreasing |
| Clearance | +2 mm air, no stuffing in well | at insertion |
| Walk test | feet free, ring not dragging | before sewing head |
Care
Spot-clean only. Do not immerse; water will rust the mechanism and shrink the cotton housing. If a stitch ever catches a foot, stop winding and ease the fabric away — do not pull the key against resistance.
Pattern written for Fiocco Cotton (sport / 5-ply) at 1.8 mm, UK terminology. Clockwork Walking Bear © — for personal use.
Disclaimer: This pattern was generated by AI and should be reviewed for accuracy before use. While we strive for quality, AI-generated content may contain errors. Please verify measurements, stitch counts, charts, and instructions before beginning your project. Generated by purlJam.uk
Love this pattern?
Save this pattern to your free PurlJam libraryAccess your pattern anytime
Bookmark this page to access your pattern anytime