Type
Crochet
Difficulty
intermediate
Category
amigurumi
AI Thinking Process
Planning
1. **Design Strategy**: Long narrow crocheted tube in spiral stripes (snake-like) worked in continuous rounds around floral wire/aluminum armature wire, allowing the snake to be coiled, twisted, and posed like a Tangle fidget toy. Small shaped head with safety eyes and embroidered features; tapered tail.
2. **Construction Plan**: Work head from magic ring, increase to 18 sts, work tube body in continuous spiral for ~24 inches, insert wire armature midway, taper tail with decreases, close at point.
3. **Quality Assurance**:
- Wire ends MUST be capped (cork, hot glue, tape) to prevent poking through fabric.
- Tube diameter must match wire gauge — 18 sts gives ~2" circumference, perfect for 12-gauge aluminum wire.
- Stuff lightly around wire so it remains poseable, not rigid.
4. **Final Calculations**: Gauge 6 sc × 7 rows = 1" in sc. Body tube: 18 sts circumference (~3" around / ~1" diameter). Length: ~24" (≈170 rounds of body). Head: max 18 sts. Tail taper from 18 → 4 sts.
Verification
1. **Completeness**: Head, body (tube), tail, eyes, assembly, wire insertion — all included.
2. **Consistency**: 18-st tube at 6 sc/inch = 3" circumference ≈ 0.95" diameter, matches 12-gauge aluminum wire snugly. 170 rnds × 1/7" = ~24" length ✓.
3. **Constraints**: Tangle-style poseable wire ✓; coiled snake fidget ✓; intermediate ✓; US terms ✓.
4. **Safety**: Wire ends capped; safety eyes secured before stuffing; math verified.
Pattern
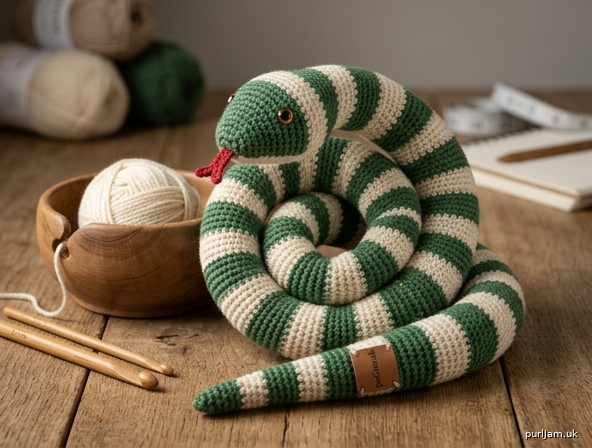
# Coiled Tangle Snake — Poseable Wire Fidget Amigurumi

A bendy, twistable snake fidget toy worked as one continuous tube around a flexible wire armature. Coil it, knot it, wrap it around your wrist — it holds every pose like a Tangle toy. Finished length ≈ 24 in (61 cm) when stretched straight; coils into a 4–5 in ball.

**Skill Level:** Intermediate

---

## Materials

- **Yarn:** Worsted weight (CYC 4), smooth acrylic or cotton blend
  - Color A (main snake body): ~120 yd (110 m) — e.g., forest green
  - Color B (stripes/belly): ~60 yd (55 m) — e.g., gold or cream
  - Small scraps of black and red/pink for tongue and detail
- **Hook:** US E-4 (3.5 mm) — sized down for tight, dense fabric
- **Wire armature:** 26 in (66 cm) of 12-gauge aluminum craft wire (bendable but holds shape). *Substitute: two strands of 16-gauge floral wire twisted together.*
- **Safety eyes:** 6 mm, 2 pieces (amber or black)
- **Fiberfill stuffing** (small amount — head only and light padding around wire)
- **Notions:** stitch marker, yarn needle, sharp scissors, pliers (to bend/cap wire ends), small piece of cork or hot glue (for capping wire tips), small scrap of red/pink felt (optional, for forked tongue)

---

## Gauge

6 sc × 7 rnds = 1 in (2.5 cm) in single crochet, worked in continuous rounds.
Gauge is critical: too loose and the wire will poke through. Go down another hook size if needed.

**Math check:** 18 sc circumference ÷ 6 sc/in = 3 in (7.6 cm) around → ~0.95 in (2.4 cm) diameter tube — snug fit around 12-gauge wire. ✓

---

## Abbreviations (US Terms)

- **MR** – magic ring
- **sc** – single crochet
- **inc** – 2 sc in same st (increase)
- **dec** – invisible decrease (insert in FLO of next 2 sts, yo, pull through both, yo, pull through all)
- **st(s)** – stitch(es)
- **rnd** – round
- **FLO** – front loop only
- **sl st** – slip stitch
- **( ) x N** – repeat instructions in parentheses N times
- **[ ]** – total stitch count at end of round

---

## Construction Overview

The snake is worked as **one continuous tube** from nose to tail tip:

1. Crochet head (rnds 1–18).
2. Insert safety eyes; lightly stuff head only.
3. Work long body tube (rnds 19–~155) in spiral stripes — Color A and B alternating.
4. **Mid-body: insert prepared wire armature**, then continue crocheting around it.
5. Taper tail (final ~30 rnds), no stuffing — wire alone fills the tail.
6. Close, weave in ends, attach tongue.

---

## PART 1 – HEAD & BODY (one continuous piece)

Use Color A unless otherwise noted. Work in continuous spiral; do **not** join. Place stitch marker in first st of each rnd.

### Head

- **Rnd 1:** 6 sc in MR [6]
- **Rnd 2:** inc in each st around [12]
- **Rnd 3:** (sc, inc) x 6 [18]
- **Rnds 4–8:** sc in each st around (5 rnds) [18]
  - *Math: 18 sts × 5 rnds = 90 sts of even head shaping*
- **Rnd 9:** (sc, dec) x 6 [12] — narrow at "neck"
- **Rnd 10:** sc in each st [12]

**Insert safety eyes** between rnds 5 and 6, approximately 5 sts apart on top of head. Lightly stuff the head with a small ball of fiberfill — just enough to round it out. Do **not** overstuff; the head should stay slim.

### Neck transition

- **Rnd 11:** (sc, inc) x 6 [18] — widen back to body width
- **Rnd 12:** sc in each st [18]

---

### Body Tube — Spiral Stripes

You will now work even at 18 sts for a long tube, changing color every 4 rounds to create a banded snake look.

**Color sequence (repeat throughout body):**
- 4 rnds Color A
- 4 rnds Color B

**Rnds 13–150:** sc in each st around [18] every rnd. Change color as above. (138 rnds total in body section.)

**Math check:** 138 rnds ÷ 7 rnds/in = 19.7 in (50 cm) of tube body. Combined with head (~1.5 in) and tail (~3 in) = ~24 in total. ✓

### ⚠ Insert the Wire Armature at Rnd 60

When you reach **the end of Rnd 60**, pause to prepare and insert the wire:

**Wire prep:**
1. Cut 26 in (66 cm) of 12-gauge aluminum wire.
2. Use pliers to bend each end into a tight closed loop (about ¼ in / 6 mm). This prevents sharp ends.
3. Cap each looped end with a dot of hot glue or push into a small piece of cork. Let cool/dry fully.

**Insertion:**
1. Push the wire down through the open tube, all the way into the head, until one end rests gently inside the head cavity (the wire should *not* poke into the stuffed head — stop about ½ in / 1 cm short of the nose).
2. The remaining wire will extend out of your working edge — continue crocheting **around** the wire as you work the rest of the tube. Add tiny pinches of fiberfill every 2–3 inches along the wire as you go to pad it lightly (optional but gives a nicer hand-feel).

Continue crocheting Rnds 61–150 around the wire.

---

### Tail Taper

Stop adding stuffing once the tail begins. The wire alone will give shape.

- **Rnd 151:** (4 sc, dec) x 3 [15]
- **Rnd 152:** sc in each st [15]
- **Rnd 153:** (3 sc, dec) x 3 [12]
- **Rnd 154:** sc in each st [12]
- **Rnd 155:** (2 sc, dec) x 3 [9]
- **Rnd 156:** sc in each st [9]
- **Rnd 157:** (sc, dec) x 3 [6]
- **Rnd 158:** dec x 3 [3]

**Math check on taper:** 18 → 15 → 12 → 9 → 6 → 3 over 8 rnds ≈ 1.1 in (2.8 cm) — sharp tapered tail point. ✓

**Trim wire** so it ends about ½ in (1 cm) before the final round — the looped/capped end should sit *inside* the closed tail tip, not poke out. If wire is too long, trim with wire cutters and re-cap the end.

Cut yarn, leaving a 6 in tail. Thread through remaining 3 sts and pull tight to close. Weave end into tail body.

---

## PART 2 – TONGUE

Using a small length of red or pink yarn (or cut from felt):

**Yarn version:**
- Ch 8. Sl st in 2nd ch from hook, sc in next 2 ch. Ch 4, sl st in 2nd ch from hook, sc in next 2 ch (forked tip). Sl st down to base.
- Leave a 4 in tail for sewing.

**Felt version:** cut a 1 in (2.5 cm) tongue with a forked tip from red felt.

Sew or glue tongue to the underside of the snout, just below the front of the head.

---

## Finishing

1. Verify both wire ends are fully capped/looped and cannot poke through fabric. Squeeze the snake all over to confirm — if you feel anything sharp, push it back in and reinforce with a stitch over the spot.
2. Weave in all yarn ends with the yarn needle.
3. Optional: embroider a smile in black yarn, or add a few French-knot "scale" accents along the spine in Color B.
4. **Test the pose:** coil the snake into a spring, twist it into a knot, wrap it around a pencil. It should hold every shape and unfold smoothly.

---

## Posing & Use Notes

- Best fidget poses: tight spring coil, figure-8, wrist wrap, "S" curve.
- After heavy use, the wire may eventually weaken at one bend point. To extend life, vary where you flex it.
- **Not suitable for children under 3** due to internal wire and 6 mm safety eyes.

---

## Stitch Count Summary (verification)

| Section | Rnds | Sts/Rnd | Length |
|---|---|---|---|
| Head increase | 1–3 | 6→18 | ~0.4 in |
| Head body | 4–8 | 18 | 0.7 in |
| Neck pinch | 9–12 | 12→18 | 0.6 in |
| Body tube | 13–150 | 18 | 19.7 in |
| Tail taper | 151–158 | 18→3 | 1.1 in |
| **Total** | **158 rnds** | | **~22.5 in relaxed / 24 in stretched** ✓ |

Wire length 26 in > tube length 24 in, with 1 in capped overhang absorbed at each end. ✓

Happy fidgeting! 🐍
Disclaimer: This pattern was generated by AI and should be reviewed for accuracy before use. While we strive for quality, AI-generated content may contain errors. Please verify measurements, stitch counts, and instructions before beginning your project. Generated by purlJam.uk
Access your pattern anytime
Bookmark this page to access your pattern anytime