Type
Crochet
Difficulty
intermediate
Category
amigurumi
AI Thinking Process
Planning
Verification
Pattern
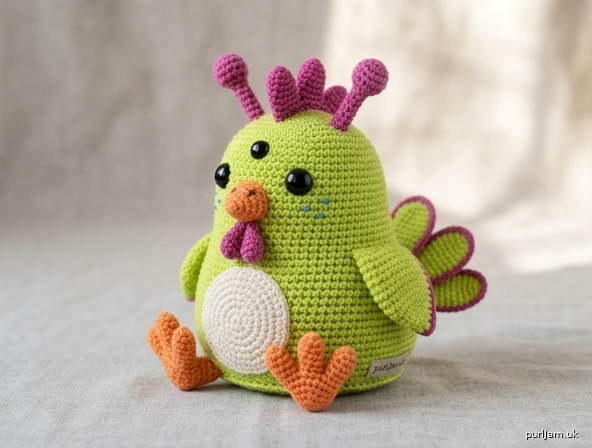
Cosmo the Chonky Alien Chicken
Intermediate crochet amigurumi · seated toy
A very round chicken with a flat, steady base, stubby wings and a small fan of tail feathers — plus the alien extras: a third eye and two bobble antennae. Worked in continuous spiral rounds of UK double crochet and sewn together. The finished toy sits. It does not stand on long legs; the feet are stabilisers.
UK crochet terms. In this pattern, dc is the short stitch (the same stitch as US single crochet). Do not work a US double crochet, or the fabric will be lacy, the counts will not match, and the toy will be far too big.
Finished size
At the tension below, about 19 cm (7.5 in) tall including antennae, and about 10 cm (4 in) wide across the body. The head is about 7 cm (2.75 in) wide. A looser tension makes a larger, holier toy; go down a hook size rather than changing the stitch counts.
Tension (gauge)
11 dc and 12 rounds = 5 cm (2 in), worked in a continuous spiral of dc with a 3.5 mm hook.
Quick check: a circle started with 6 dc should measure 5 cm (2 in) across at the end of Rnd 6 (36 sts). If it is larger than 5.5 cm (2.25 in), or if you can see stuffing through the fabric, change to a 3.0 mm hook and check again.
Materials
- MC — lime or chartreuse worsted (Aran / category 4): 100 g. Body, head, wings, tail.
- CC1 — tangerine worsted: 20 g. Beak, feet, toes.
- CC2 — magenta worsted: 20 g. Comb, wattle, antennae.
- CC3 — pale mint or cream worsted: 15 g. Belly patch.
- Hook: 3.5 mm (US E-4). Optional 3.0 mm if your tension is loose.
- 2 × 12 mm safety eyes and 1 × 9 mm safety eye, with washers.
- Polyester toy filling.
- Stitch marker, yarn needle, pins, scissors.
- A short length of brown yarn, or a darker shade of CC1, for nostrils and toe lines.
A classic chicken version uses yellow for MC and red for CC2, and simply leaves off the antennae and the third eye. Stitch counts do not change.
Abbreviations
| Abbreviation | Meaning |
|---|---|
| MR | magic ring (adjustable ring) |
| ch | chain |
| dc | double crochet (US single crochet) |
| inc | increase: 2 dc in the same stitch |
| dec | invisible decrease (see Notes) |
| sl st | slip stitch |
| st(s) | stitch(es) |
| rnd | round |
| rep | repeat |
| BLO | back loop only |
| yrh | yarn round hook |
| FO | fasten off |
| MC / CC | main colour / contrast colour |
The number in [square brackets] is the stitch count at the end of that round or row. Check it before you continue. If it does not match, unpick that round — do not “fix it” on the next one.
Notes
- Work in a continuous spiral. Do not join rounds with a slip stitch, and do not turn, unless the instruction says to. The comb is the only piece worked in rows.
- Place a stitch marker in the first stitch of every round and move it up as you go. The start of the round drifts; trust the marker, not the yarn tail.
- Magic ring: wrap the yarn around two fingers to form a ring, work the stated number of dc into the ring, then pull the tail until the hole closes. Alternative: ch 2, work the stitches into the 2nd ch from the hook. The ring method is neater.
- Invisible decrease: insert the hook under the front loop only of the next st, then under the front loop only of the following st, yrh, pull through both front loops, yrh, pull through both loops on the hook. One stitch decreased.
- Keep the tension firm enough that filling does not show between stitches. This matters more than hitting a flat-fabric tension swatch.
- Stuff as you go. The body and head should be firm; small parts are lightly stuffed or not stuffed, as stated.
- Leave both neck openings open. The body and the head each stop at 18 stitches and are sewn together. Do not decrease them to 6 and close them.
- Pin every piece before sewing. Use a whip stitch or ladder stitch and the leaving tail. Sew small parts twice, then bury the end inside the toy. A knot on the surface will come undone.
- Colour changes are not worked in the round. Contrast pieces are made separately and sewn on.
Parts list
Make all of these before assembly:
- 1 body (MC)
- 1 head (MC)
- 2 wings (MC)
- 2 feet (CC1)
- 6 toes (CC1)
- 1 beak (CC1)
- 1 comb (CC2)
- 1 wattle (CC2)
- 2 antennae (CC2)
- 3 tail feathers (MC)
- 1 belly patch (CC3)
Body (make 1) — MC
Start at the base. The increase section is the bottom, Rnd 12 is the sitting edge, and the last round is the neck.
Rnd 1: 6 dc in a MR. [6] Rnd 2: Inc in each st around. [12] (6 inc → 6 + 6 = 12) Rnd 3: (1 dc, inc) 6 times. [18] (6 inc → 12 + 6 = 18) Rnd 4: (2 dc, inc) 6 times. [24] (6 inc → 18 + 6 = 24) Rnd 5: (3 dc, inc) 6 times. [30] (6 inc → 24 + 6 = 30) Rnd 6: (4 dc, inc) 6 times. [36] (6 inc → 30 + 6 = 36) Rnd 7: (5 dc, inc) 6 times. [42] (6 inc → 36 + 6 = 42) Rnd 8: (6 dc, inc) 6 times. [48] (6 inc → 42 + 6 = 48) Rnd 9: (7 dc, inc) 6 times. [54] (6 inc → 48 + 6 = 54) Rnd 10: (8 dc, inc) 6 times. [60] (6 inc → 54 + 6 = 60) Rnd 11: (9 dc, inc) 6 times. [66] (6 inc → 60 + 6 = 66) Rnd 12: Dc in BLO around. [66] This ridge is the edge that sits on the table. Keep it. Rnds 13–18: Dc in each st around. [66] Rnd 19: (9 dc, dec) 6 times. [60] (6 dec → 66 − 6 = 60) Rnd 20: (8 dc, dec) 6 times. [54] (6 dec → 60 − 6 = 54) Rnd 21: (7 dc, dec) 6 times. [48] (6 dec → 54 − 6 = 48) Rnd 22: (6 dc, dec) 6 times. [42] (6 dec → 48 − 6 = 42) Rnd 23: (5 dc, dec) 6 times. [36] (6 dec → 42 − 6 = 36) Rnd 24: (4 dc, dec) 6 times. [30] (6 dec → 36 − 6 = 30)
Start stuffing. Pack the base firmly, especially around the BLO ridge, so the bottom stays flat. Keep adding filling as the opening narrows.
Rnd 25: (3 dc, dec) 6 times. [24] (6 dec → 30 − 6 = 24) Rnd 26: (2 dc, dec) 6 times. [18] (6 dec → 24 − 6 = 18)
FO, leaving a 45 cm (18 in) tail for sewing. Do not decrease further and do not close. Finish stuffing until the body is firm and the 18-st opening is a neat circle about 2.5 cm (1 in) across.
Set the body on a table before you sew anything to it. If it rocks, move filling toward the light side through the neck opening. The BLO edge should rest flat.
Head (make 1) — MC
Start at the crown. The last round is the neck and matches the body opening.
Rnd 1: 6 dc in a MR. [6] Rnd 2: Inc in each st around. [12] (6 inc → 6 + 6 = 12) Rnd 3: (1 dc, inc) 6 times. [18] (6 inc → 12 + 6 = 18) Rnd 4: (2 dc, inc) 6 times. [24] (6 inc → 18 + 6 = 24) Rnd 5: (3 dc, inc) 6 times. [30] (6 inc → 24 + 6 = 30) Rnd 6: (4 dc, inc) 6 times. [36] (6 inc → 30 + 6 = 36) Rnd 7: (5 dc, inc) 6 times. [42] (6 inc → 36 + 6 = 42) Rnd 8: (6 dc, inc) 6 times. [48] (6 inc → 42 + 6 = 48) Rnds 9–12: Dc in each st around. [48] Rnd 13: (6 dc, dec) 6 times. [42] (6 dec → 48 − 6 = 42) Rnd 14: (5 dc, dec) 6 times. [36] (6 dec → 42 − 6 = 36) Rnd 15: (4 dc, dec) 6 times. [30] (6 dec → 36 − 6 = 30)
Stop and insert the eyes before going on. The opening is still wide enough for the washers.
- Main pair (12 mm): between Rnds 10 and 11, centred on the front, 8 sts apart (about 3.5 cm / 1.5 in from centre to centre).
- Third eye (9 mm): between Rnds 7 and 8, on the centre line, about 1 cm (0.5 in) above the gap between the main eyes. Set it a stitch or two off centre if you want a quirkier face; centred is the classic alien look.
Secure every washer on the inside. If you are making this for a child under 3, do not use safety eyes — embroider them instead (see Safety).
Stuff the crown and cheeks firmly now, then continue.
Rnd 16: (3 dc, dec) 6 times. [24] (6 dec → 30 − 6 = 24) Rnd 17: (2 dc, dec) 6 times. [18] (6 dec → 24 − 6 = 18)
FO, leaving a 45 cm (18 in) tail. Do not close. Add filling until the head is firm and the opening matches the body neck. Do not stuff so hard that the eyes bulge.
Wings (make 2) — MC
The magic ring is the outer tip. The last round is sewn to the body. Do not stuff.
Rnd 1: 6 dc in a MR. [6] Rnd 2: (1 dc, inc) 3 times. [9] (3 inc → 6 + 3 = 9) Rnd 3: (2 dc, inc) 3 times. [12] (3 inc → 9 + 3 = 12) Rnd 4: (3 dc, inc) 3 times. [15] (3 inc → 12 + 3 = 15) Rnds 5–7: Dc in each st around. [15] Rnd 8: (3 dc, dec) 3 times. [12] (3 dec → 15 − 3 = 12)
FO, leaving a 25 cm (10 in) tail. Flatten the wing. Optional: with CC2, sl st loosely around the flattened edge for a thin alien outline, then FO and weave in that end. Do not let the edging pull the wing in.
Feet (make 2) — CC1
Flat discs. Do not stuff. They are sewn onto the base, not used as standing legs.
Rnd 1: 6 dc in a MR. [6] Rnd 2: Inc in each st around. [12] (6 inc → 6 + 6 = 12) Rnd 3: (1 dc, inc) 6 times. [18] (6 inc → 12 + 6 = 18) Rnd 4: (2 dc, inc) 6 times. [24] (6 inc → 18 + 6 = 24)
FO, leaving a 30 cm (12 in) tail.
Toes (make 6) — CC1
Three toes on the top of each foot, so the underside stays flat and the toy does not wobble. Do not stuff.
Rnd 1: 4 dc in a MR. [4] Rnd 2: (1 dc, inc) 2 times. [6] (2 inc → 4 + 2 = 6) Rnd 3: Dc in each st around. [6]
FO, leaving a 20 cm (8 in) tail. Flatten the open end.
Baby-safe alternative: skip the separate toes. With brown or darker CC1, embroider 3 straight stitches about 1.5 cm (0.5 in) long on the top of each foot, fanned from the centre front.
Beak (make 1) — CC1
The magic ring is the tip. The open end is sewn to the face. Stuff lightly, just enough to hold the cone shape.
Rnd 1: 6 dc in a MR. [6] Rnd 2: (1 dc, inc) 3 times. [9] (3 inc → 6 + 3 = 9) Rnd 3: (2 dc, inc) 3 times. [12] (3 inc → 9 + 3 = 12) Rnds 4–5: Dc in each st around. [12]
FO, leaving a 25 cm (10 in) tail.
With brown or darker CC1, embroider 2 short horizontal stitches on the upper half of the beak for nostrils, about 0.5 cm (0.25 in) long and 0.5 cm apart.
Comb (make 1) — CC2
Worked in rows. Three spikes on a short strip. The Row 1 edge is sewn to the head; the spikes point up.
Row 1: Ch 8. Dc in the 2nd ch from the hook and in each ch across. Turn. [7]
Row 2: Ch 1 (does not count as a st), dc in the first st. Then work this sequence 3 times: ch 6, dc in the 2nd ch from the hook and in each of the next 4 ch, miss the next st of Row 1, sl st in the next st. [3 spikes]
The first dc uses st 1 of Row 1. Each spike sequence uses 2 further sts (one missed, one slip-stitched), so 1 + 6 = 7 and the row is used up. Each spike is 5 dc tall.
FO, leaving a 25 cm (10 in) tail. If a spike twists, turn it upright before you sew and catch its base so it stays up.
Wattle (make 1) — CC2
Do not stuff. It should hang softly under the beak.
Rnd 1: 6 dc in a MR. [6] Rnd 2: Inc in each st around. [12] (6 inc → 6 + 6 = 12) Rnd 3: (1 dc, inc) 6 times. [18] (6 inc → 12 + 6 = 18)
FO, leaving a 20 cm (8 in) tail. Flatten.
Antennae (make 2) — CC2
The magic ring is the top of the ball. The open end of the stalk is sewn to the crown. Stuff the ball only, not the stalk, so the stalk stays slim. The back of a pencil, used gently, helps push the filling up before the stalk gets long.
Rnd 1: 6 dc in a MR. [6] Rnd 2: Inc in each st around. [12] (6 inc → 6 + 6 = 12) Rnd 3: Dc in each st around. [12] Rnd 4: Dec 6 times. [6] (6 dec → 12 − 6 = 6)
Stuff the ball lightly.
Rnds 5–11: Dc in each st around. [6]
FO, leaving a 25 cm (10 in) tail. The stalk is 7 rounds, about 3 cm (1.25 in), plus the ball.
Tail feathers (make 3) — MC
Do not stuff. Flatten each feather.
Rnd 1: 4 dc in a MR. [4] Rnd 2: (1 dc, inc) 2 times. [6] (2 inc → 4 + 2 = 6) Rnd 3: (2 dc, inc) 2 times. [8] (2 inc → 6 + 2 = 8) Rnd 4: (3 dc, inc) 2 times. [10] (2 inc → 8 + 2 = 10) Rnd 5: Dc in each st around. [10] Rnd 6: (3 dc, dec) 2 times. [8] (2 dec → 10 − 2 = 8)
FO, leaving a 20 cm (8 in) tail. Optional: sl st around the flattened edge in CC2, then weave in that end.
Belly patch (make 1) — CC3
A flat circle about 5 cm (2 in) across. Do not stuff.
Rnd 1: 6 dc in a MR. [6] Rnd 2: Inc in each st around. [12] (6 inc → 6 + 6 = 12) Rnd 3: (1 dc, inc) 6 times. [18] (6 inc → 12 + 6 = 18) Rnd 4: (2 dc, inc) 6 times. [24] (6 inc → 18 + 6 = 24) Rnd 5: (3 dc, inc) 6 times. [30] (6 inc → 24 + 6 = 30) Rnd 6: (4 dc, inc) 6 times. [36] (6 inc → 30 + 6 = 36)
FO, leaving a 30 cm (12 in) tail.
Assembly
Use pins. Check the toy from the front after every piece. Sew with matching yarn unless a leaving tail is already the right colour. Whip stitch or ladder stitch, then bury the end through the body or head and snip it inside.
1. Face (while the head is still separate)
- Beak (CC1): pin the open edge to the front of the head, centred under the main eyes, with the top of the beak touching Rnd 13. The tip points forward and very slightly down. Sew all the way around the 12-st edge.
- Wattle (CC2): pin it directly under the beak. Sew along about one-third of its edge so the rest hangs free. Do not stitch it flat against the head.
- Comb (CC2): pin the Row 1 edge to the front of the crown over Rnds 3–5, centred above the third eye. Spikes point up. Sew the base down securely.
- Antennae (CC2): pin the open stalk ends to the crown over Rnds 2–4, just behind the comb, about 4 cm (1.5 in) apart. Sew through each of the 6 stitches, then go around a second time. These are small parts and must not pull off.
2. Body pieces
- Belly patch (CC3): pin it to the lower front so it is centred on the BLO ridge (Rnd 12), half on the base curve and half on the side, reaching up toward about Rnd 20. Ease it over the curve. Do not stretch it flat. Sew around the outer edge.
- Wings (MC): pin one to each side over Rnds 14–20, with the Rnd 8 edge against the body and the tip pointing back and slightly down. They should mirror each other. Sew around the flattened opening edge.
- Tail (MC): pin the three feathers in a fan at the back over Rnds 19–23. The centre feather sits a little higher; the side feathers angle out. Overlap the bases slightly and sew them down firmly.
- Feet and toes (CC1): sew 3 toes to the top of each foot, fanned along the front edge, each toe overlapping the foot by about half its length. Then pin the feet to the front of the base. About two-thirds of each foot tucks under the body, near the BLO ridge; the toe end sticks out. Turn the toes out about 30 degrees. Leave about 2 cm (0.75 in) between the inner edges. Sew all the way around each foot. Sewing toes to the underside will make the toy rock — keep them on top.
3. Head to body
Pin the 18-st head opening to the 18-st body opening, stitch for stitch. Set the head slightly forward of centre, tilted about 15 degrees so the beak points a little down. This is what makes it read as a chicken rather than a ball stacked on a ball.
Sew with one of the long tails. Before the last few stitches, add a pinch more filling at the neck if the join feels soft. Finish the seam, weave the end through the body, and snip it inside.
4. Sit test
Put Cosmo on a table.
- If it rolls backward, the feet are too far back. Move them forward, or add a little more of each foot showing at the front.
- If it rolls sideways, the filling in the base is uneven. A few extra stitches will not fix that; the filling has to sit evenly above the BLO ridge.
- The wings, tail and antennae are balance decoration, not supports. The base and the feet do the sitting.
Finishing
- Weave in every end. None should be knotted on the outside.
- Optional alien freckles: 5 to 7 small straight stitches or French knots in CC2, scattered on one side of the body. Keep them small so they do not pull the fabric.
- Optional wing and tail edging in CC2, if you did not add it earlier.
- Surface wash only. Do not machine-wash a toy with safety eyes. Reshape and let it dry flat.
Safety
- Safety eyes and small sewn parts are a choking hazard for children under 3. For a baby-safe toy, embroider the eyes instead and use the embroidered toes.
- Embroidered eyes: with black yarn, satin-stitch two ovals about 1 cm (0.5 in) wide between Rnds 10 and 11, 8 sts apart, and a smaller oval about 0.7 cm (0.25 in) wide between Rnds 7 and 8. Add a tiny white straight stitch on each as a highlight.
- Sew antennae, toes, comb and beak on firmly and pass the yarn through the head or body before cutting. Test each part with a gentle tug.
- Do not add wire, pipe cleaners or beads to the antennae.
- This is a seated display or cuddle toy. The flat base and splayed feet are there so it stays put on a shelf or a lap, not so it can stand on two legs.
Proportion check
If your tension matched, you should be close to these sizes before sewing. A centimetre either way is fine; a piece that is wildly larger means the hook is too big or the stitch is the wrong one (US double crochet instead of UK dc).
| Piece | About |
|---|---|
| Body | 10 cm (4 in) wide, 10 cm (4 in) tall |
| Head | 7 cm (2.75 in) wide |
| Wing | 3.5 cm (1.5 in) long |
| Foot | 4 cm (1.5 in) across |
| Belly patch | 5 cm (2 in) across |
| Antenna | 4 cm (1.5 in) end to end |
| Finished toy | 19 cm (7.5 in) tall |
Disclaimer: This pattern was generated by AI and should be reviewed for accuracy before use. While we strive for quality, AI-generated content may contain errors. Please verify measurements, stitch counts, charts, and instructions before beginning your project. Generated by purlJam.uk
Love this pattern?
Save this pattern to your free PurlJam libraryAccess your pattern anytime
Bookmark this page to access your pattern anytime