Type
Machine Knitting
Difficulty
intermediate
Category
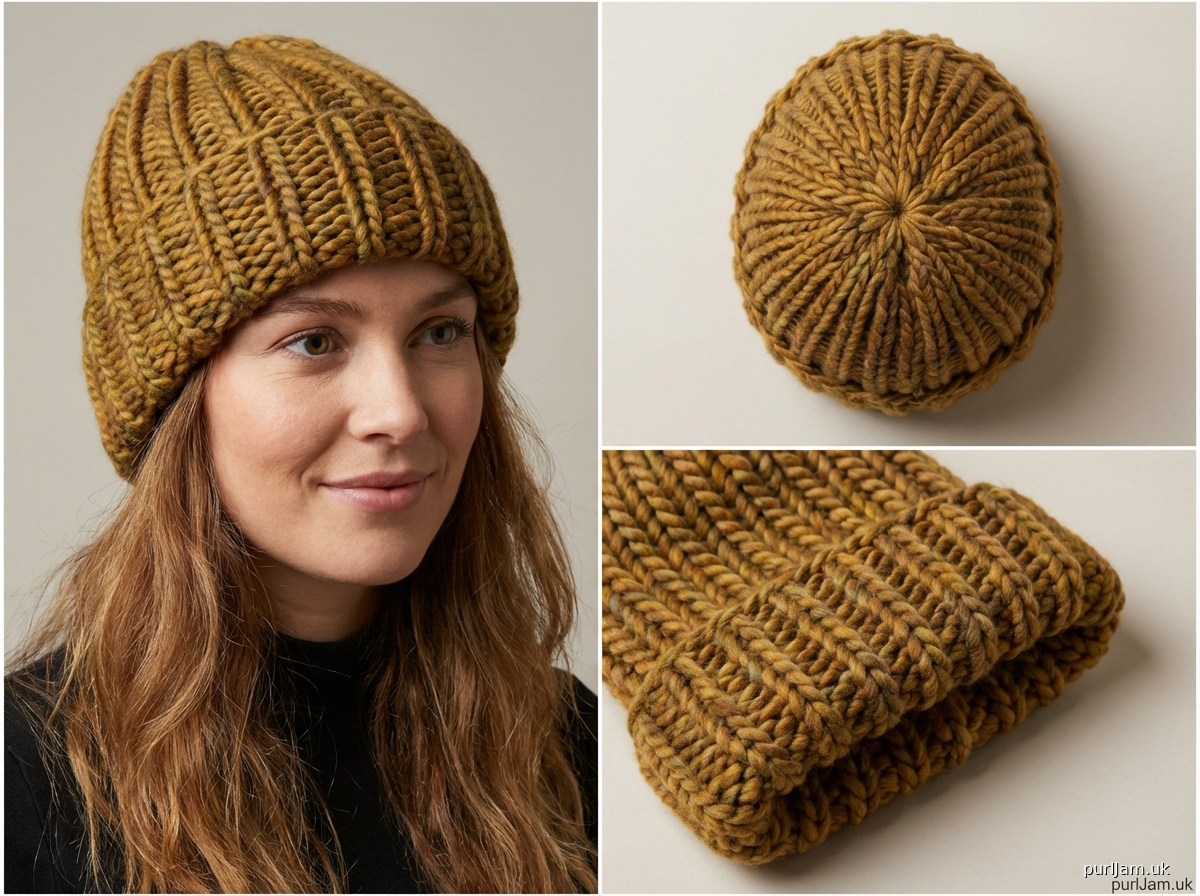
hat
AI Thinking Process
Planning
1. **Design Strategy**:
- Creating a beginner-friendly ribbed beanie for Malabrigo Rasta (super bulky weight, NOT worsted as noted - Rasta is a chunky/super bulky single-ply yarn)
- Will design for standard or mid-gauge machine (mid-gauge preferred for bulky yarn)
- Simple 1x1 or 2x2 rib brim with stockinette body
- Standard adult circumference (20-22"/51-56cm) with negative ease
- Crown shaping via simple decreases and gather-top method (beginner-appropriate)
2. **Construction Plan**:
- Flat-bed machine with ribber attachment (or mock rib if ribber unavailable)
- Cast on with waste yarn + ravel cord method
- Ribbed brim worked in circular configuration (or rehang for tubular)
- Straight stockinette body to desired length
- Simple crown shaping: transfer stitches to reduce needle count, then gather
- Side seam or rehang for seamless tube
3. **Quality Assurance**:
- Malabrigo Rasta is SUPER BULKY (90yds/150g) - adjust gauge expectations
- Mid-gauge machines handle bulky better than standard gauge
- Must specify larger tension dial settings (7-9 range)
- Check that stitch count works for even rib distribution
- Ensure clear RC checkpoints for beginner knitters
- Address potential issues: yarn thickness, weight distribution, seaming bulk
4. **Final Calculations**:
- Malabrigo Rasta gauge on mid-gauge machine: approximately 2-2.5 sts/inch in stockinette at T8-9
- Target circumference: 20" (with stretch to 22")
- Stitch count: 20" × 2.25 sts/inch = 45 sts → round to 44 sts (even number for rib)
- Brim height: 2.5" (approximately 16-18 rows)
- Body height: 5" (approximately 32-36 rows)
- Total rows before crown: ~50-54 rows
Verification
[PRE-FLIGHT CHECKS]
1. **Completeness**:
✓ TITLE - included
✓ MACHINE_SETUP - included
✓ MATERIALS - included
✓ GAUGE_AND_TENSION - included
✓ RIBBED_BRIM - included
✓ BODY_ROWS - included
✓ CROWN_SHAPING - included
✓ FINISHING - included
✓ ABBREVIATIONS - included
2. **Consistency**:
✓ Stitch count: 44 sts at 2.25 sts/inch = 19.5" (rounds to 20" target)
✓ Gauge matches yarn weight (super bulky)
✓ Row counts align with RC checkpoints
✓ Even stitch count for 2x2 rib (44 ÷ 2 = 22 ribs)
3. **Constraints**:
✓ Beginner-friendly language and techniques
✓ Malabrigo Rasta yarn specified
✓ Ribbed brim included
✓ Clear machine-knitting terminology
✓ RC values and carriage positions throughout
4. **Safety**:
✓ Math verified: 44 sts, 18 rows brim, 36 rows body, crown decreases
✓ Yardage calculation: ~90-100 yards needed (within 1 skein Rasta)
✓ Tension settings appropriate for bulky yarn
✓ Weight distribution addressed with claw weights
Pattern
<pattern>

# COZY RASTA RIBBED BEANIE
*A beginner-friendly machine-knit hat in luxurious Malabrigo Rasta*

---

## MACHINE SETUP

**Machine Configuration:**
- Mid-gauge flat-bed knitting machine (standard gauge may work but will be tight)
- Ribber attachment for 2x2 rib (or use main bed only for mock rib)
- Standard sinker plate
- Row counter installed and functional

**Bed Configuration:**
- Main bed: 44 needles centered (22 needles left of center 0, 22 needles right)
- Needle arrangement: L22-L1, R1-R22
- Ribber bed (if using): Every other needle in 2x2 rib configuration

**Required Tools & Accessories:**
- Ravel cord (smooth waste yarn, 60"/150cm length)
- Waste yarn (lightweight acrylic or cotton, contrasting color)
- 2-3 claw weights (heavy enough for bulky yarn)
- Cast-on comb (optional but helpful)
- Transfer tool (single or 3-prong)
- Latch tool for bind-off
- Tapestry needle for finishing
- Stitch markers (optional)

**Initial Settings:**
- Tension dial (main bed): T8 for stockinette body
- Tension dial (ribber): T7 for ribbing (one number looser than main)
- Part button: H position
- Carriage levers: Set for stockinette (no holding, no part)
- Row counter: Reset to 000

---

## MATERIALS

**Yarn:**
- Malabrigo Rasta (100% Merino Wool; 90 yards/82m per 150g skein; super bulky weight)
- Yardage: 95-105 yards (90-96m)
- Amount: 1 skein plus small amount for pom-pom (optional)
- Sample shown in colorway "Frank Ochre"

**Notions:**
- Waste yarn (smooth cotton or acrylic, approximately 2 yards)
- Ravel cord (60"/150cm)
- Tapestry needle
- Optional: 3.5" pom-pom maker

**Sizing:**
- Finished circumference: 19.5" (49.5cm) unstretched
- Stretches to fit: 21-23" (53-58cm) head circumference
- Finished height: 8.5" (21.5cm) with brim folded

---

## GAUGE AND TENSION

**Stockinette Gauge (Main Bed):**
- 2.25 sts per inch (0.9 sts per cm)
- 3 rows per inch (1.2 rows per cm)
- Measured at T8 tension after light steaming

**Ribbing Gauge (2x2 Rib):**
- Approximately 2.5 sts per inch (1 st per cm) relaxed
- Stretches to 1.5-2 sts per inch
- Measured at T7/T8 tension (ribber/main bed)

**Gauge Swatch (Recommended for Beginners):**
1. Cast on 20 needles using waste yarn method
2. Knit 30 rows at T8
3. Remove from machine and steam lightly
4. Measure 4" square; count stitches and rows
5. Adjust tension dial if needed: tighter gauge = lower number, looser = higher number

**Tension Notes for Malabrigo Rasta:**
- This is a lofty, thick single-ply yarn
- Start at T8; if stitches are tight or yarn breaks, increase to T9
- If fabric is too loose/holey, decrease to T7
- Consistent weight placement is crucial due to yarn thickness

---

## RIBBED BRIM

**Cast-On (Waste Yarn Method with Ravel Cord):**

1. **Prepare the machine** (RC at 000, COL):
   - Bring needles L22 to R22 (44 needles total) forward to D position
   - Check that needles are evenly selected and centered

2. **Waste yarn cast-on**:
   - Thread waste yarn through carriage
   - Set tension to T10 (loose for waste yarn)
   - Cast on comb + ravel cord: Place ravel cord through cast-on comb eyes
   - Hold comb below needles with ravel cord behind latches
   - Knit 8-10 rows of waste yarn, COL to COR and back
   - Hang one claw weight on each side and one center (3 weights total)

3. **Insert ravel cord**:
   - COL: Lay ravel cord across all needles in hooks
   - Knit 1 row (COL→COR), ravel cord will knit in
   - RC now at 009 or 011 (depending on waste rows)

4. **Switch to main yarn**:
   - Remove waste yarn, thread Malabrigo Rasta
   - Set main bed tension to T8
   - **RC RESET TO 000**
   - Knit 1 row COL→COR at T8 (this is your foundation row)

**Ribbing Setup (Choose Method A or B):**

**METHOD A: With Ribber Attachment** (Recommended)

5. **Configure ribber for 2x2 rib**:
   - Set pitch lever to P (or H depending on machine model)
   - Bring ribber needles into work: Every other needle, starting with needle aligned under main bed L22
   - Pattern: 2 needles on main bed, 2 needles on ribber, repeat
   - 22 needles on main bed, 22 needles on ribber = 44 sts total in rib configuration

6. **Set ribber tension**: T7 (one number looser than main bed)

7. **Knit ribbing** (RC 000):
   - COL: Knit to COR (RC 001)
   - Continue knitting back and forth
   - Knit until **RC 018** (approximately 2.5"/6.5cm of ribbing)
   - Check weight distribution; add weight if edges curl
   - End COR at RC 018

8. **Transfer to main bed for stockinette body**:
   - Using transfer tool, move all ribber stitches to corresponding main bed needles
   - Pattern: Transfer ribber needle 1 to main bed needle 1, etc.
   - You will now have all 44 sts on main bed only
   - Push ribber needles back to A position
   - Set main bed tension to T8

**METHOD B: Without Ribber (Mock Rib)**

5. **Set up for mock rib on main bed**:
   - All 44 needles remain in work position on main bed (L22-R22)
   - This will create a slip-stitch mock rib texture

6. **Punchcard/manual selection**:
   - If your machine has electronic patterning: Select 2x2 slip stitch pattern
   - If manual: Bring needles to D position in 2-up, 2-down pattern (L22-L21 up, L20-L19 down, L18-L17 up, etc.)
   - Set carriage for slip stitch (consult your machine manual)

7. **Knit mock rib**:
   - Knit at T7-T8 until **RC 018**
   - End COR
   - Cancel slip stitch patterning; return to stockinette

**Continue from either method:**

9. **Check your work at RC 018**:
   - Ribbing should measure approximately 2.5" (6.5cm)
   - Fabric should be elastic and even
   - Adjust weights if needed

---

## BODY ROWS

**Stockinette Body (RC 018, COR):**

1. **Confirm settings**:
   - Main bed tension: T8
   - All 44 needles in work (B or D position)
   - Carriage levers: Normal stockinette (no holding, no slip)
   - Weight positioned to hang evenly

2. **Knit straight**:
   - COR: Knit to COL (RC 019)
   - Continue knitting every row
   - Knit until **RC 054** (36 rows of stockinette body = 6"/15cm)
   - Check fabric periodically for even tension
   - Add or adjust weights as knitting grows

3. **Check measurements at RC 054**:
   - Total height from cast-on edge: approximately 8.5" (21.5cm)
   - Width: approximately 19.5" (49.5cm) flat
   - Fabric should be smooth stockinette, no holes or tight stitches
   - End COL at RC 054

**Troubleshooting:**
- If stitches are dropping: Check that needles aren't bent; increase weight
- If fabric is too tight: Increase tension to T9
- If fabric is too loose/holey: Decrease tension to T7
- If yarn breaks: Decrease tension or check for yarn tangles

---

## CROWN SHAPING

**Crown Decrease Preparation (RC 054, COL):**

The crown shaping uses a simple gather method suitable for beginners. We will gradually reduce the needle count, then gather the remaining stitches.

**ROUND 1: First Decrease (RC 054-056)**

1. **Transfer every 3rd stitch** (COL, RC 054):
   - Using transfer tool, transfer every 3rd stitch to the adjacent needle
   - Pattern: Keep stitch on L22, L21; transfer L20→L21 (now 2 sts on L21); keep L19, L18; transfer L17→L18 (2 sts on L18)...
   - Continue across all needles
   - After transfers: approximately 30 needles remain in work
   - Push empty needles back to A position

2. **Knit 2 rows**:
   - COL→COR (RC 055)
   - COR→COL (RC 056)
   - Fabric will begin to curve inward

**ROUND 2: Second Decrease (RC 056-058)**

3. **Transfer every other stitch** (COL, RC 056):
   - Transfer every 2nd remaining stitch to adjacent needle
   - Pattern: Keep needle 1, transfer needle 2→needle 1; keep needle 3, transfer needle 4→needle 3...
   - After transfers: approximately 15 needles remain in work
   - Push empty needles to A position

4. **Knit 2 rows**:
   - COL→COR (RC 057)
   - COR→COL (RC 058)

**ROUND 3: Final Decrease (RC 058)**

5. **Transfer to 8 needles** (COL, RC 058):
   - Transfer stitches so only 8 needles remain in work (4 left of center, 4 right)
   - Combine as needed, spacing evenly
   - Push all other needles to A position

6. **Knit 1 row**:
   - COL→COR (RC 059)

**Final Gather:**

7. **Release from machine** (COR, RC 059):
   - Cut yarn leaving 24" (60cm) tail
   - Thread tail through tapestry needle
   - Carefully remove stitches from needles one at a time, threading tapestry needle through each live stitch
   - Work from right to left (toward carriage side)

8. **Gather crown**:
   - Once all stitches are on yarn tail, pull tight to close crown opening
   - Pass needle through gathered stitches 2-3 times to secure
   - Do not cut tail yet (needed for seaming)

---

## FINISHING

**Remove from Machine:**

1. **Release from ravel cord** (if not already removed):
   - Locate the ravel cord at cast-on edge
   - Gently pull ravel cord to release the waste yarn rows
   - Remove all waste yarn, revealing clean cast-on edge

2. **Check the piece**:
   - Lay flat with right side (smooth stockinette) facing up
   - Measure dimensions (should be approximately 19.5" × 8.5")
   - Identify side edges that need seaming

**Seaming (Mattress Stitch Method):**

3. **Prepare for seaming**:
   - Fold hat in half lengthwise with right sides together
   - Align cast-on edges and crown edges
   - Thread tapestry needle with remaining crown tail OR new 24" yarn length

4. **Mattress stitch seam**:
   - Starting at crown, insert needle under horizontal bar between first and second stitch on one edge
   - Cross to opposite edge, insert under
Disclaimer: This pattern was generated by AI and should be reviewed for accuracy before use. While we strive for quality, AI-generated content may contain errors. Please verify measurements, stitch counts, and instructions before beginning your project. Generated by purlJam.uk
Access your pattern anytime
Bookmark this page to access your pattern anytime