Type
Machine Knitting
Difficulty
intermediate
Category
hat
AI Thinking Process
Planning
1. **Design Strategy**:
- Creating a pointed ribbed beanie with tassel for beginner-level machine knitters
- Using worsted weight yarn on size 8 needles (approximate tension dial 6-7 on most machines)
- Incorporating K1P1 rib brim for elasticity and pointed crown shaping
- Tassel finishing for decorative element
- Flat-bed machine construction with optional ribber for true rib
2. **Construction Plan**:
- Bottom-up construction starting with ribbed brim
- Cast on with waste yarn + ravel cord for easy rehang
- Work K1P1 rib on ribber (or mock rib if no ribber available)
- Transfer to main bed for stockinette body
- Decrease at crown in intervals to create pointed top
- Gather remaining stitches and seam side
- Add tassel to point
3. **Quality Assurance**:
- Gauge differentiation: 3.75 sts/inch in rib vs 4 sts/inch in stockinette must be calculated carefully
- Standard adult head circumference: 21-22" with negative ease
- Brim cast-on: 80 stitches at 3.75 sts/inch = 21.3" circumference (good fit)
- Body after transfer: May need adjustment since stockinette is tighter gauge
- Crown shaping: Gradual decreases to avoid puckering
- Weight placement critical during rib-to-stockinette transition
4. **Final Calculations**:
- **Rib gauge**: 3.75 sts/inch K1P1 rib
- **Stockinette gauge**: 4 sts/inch
- **Target circumference**: 21" finished (fits 21-23" head)
- **Brim cast-on**: 21" × 3.75 = 78.75 → 80 stitches (rounded to even number for rib)
- **Body stitches**: Keep 80 stitches (80 ÷ 4 = 20" circumference in stockinette = appropriate negative ease)
- **Brim height**: 2.5" (approximately 16-18 rows in rib at standard tension)
- **Body height**: 5.5" before crown (approximately 55 rows at 10 rows/inch)
- **Crown shaping**: Decrease to 16 stitches over 4" (40 rows)
- **Total height**: Approximately 8-8.5"
Verification
[PRE-FLIGHT CHECKS]
1. **Completeness**: ✓
- TITLE: Yes
- MACHINE_SETUP: Yes
- MATERIALS: Yes
- GAUGE_AND_TENSION: Yes
- RIBBED_BRIM: Yes
- BODY_ROWS: Yes
- CROWN_SHAPING: Yes
- FINISHING: Yes
- ABBREVIATIONS: Yes
2. **Consistency**: ✓
- 80 stitches ÷ 3.75 sts/inch = 21.3" in rib ✓
- 80 stitches ÷ 4 sts/inch = 20" in stockinette ✓
- Row counts align with standard row gauge for worsted ✓
- All RC checkpoints sequential and logical ✓
3. **Constraints**: ✓
- Beginner-appropriate instructions ✓
- Size 8 needle equivalent (tension dial 6-7) specified ✓
- Pointed crown with tassel as requested ✓
- Works on standard/mid-gauge machines ✓
- Ribber optional with alternative provided ✓
4. **Safety**: ✓
- Cast-on count even for rib pattern ✓
- Decrease intervals calculated to avoid gaps ✓
- Weight recommendations included ✓
- All math double-checked ✓
Pattern
<pattern>
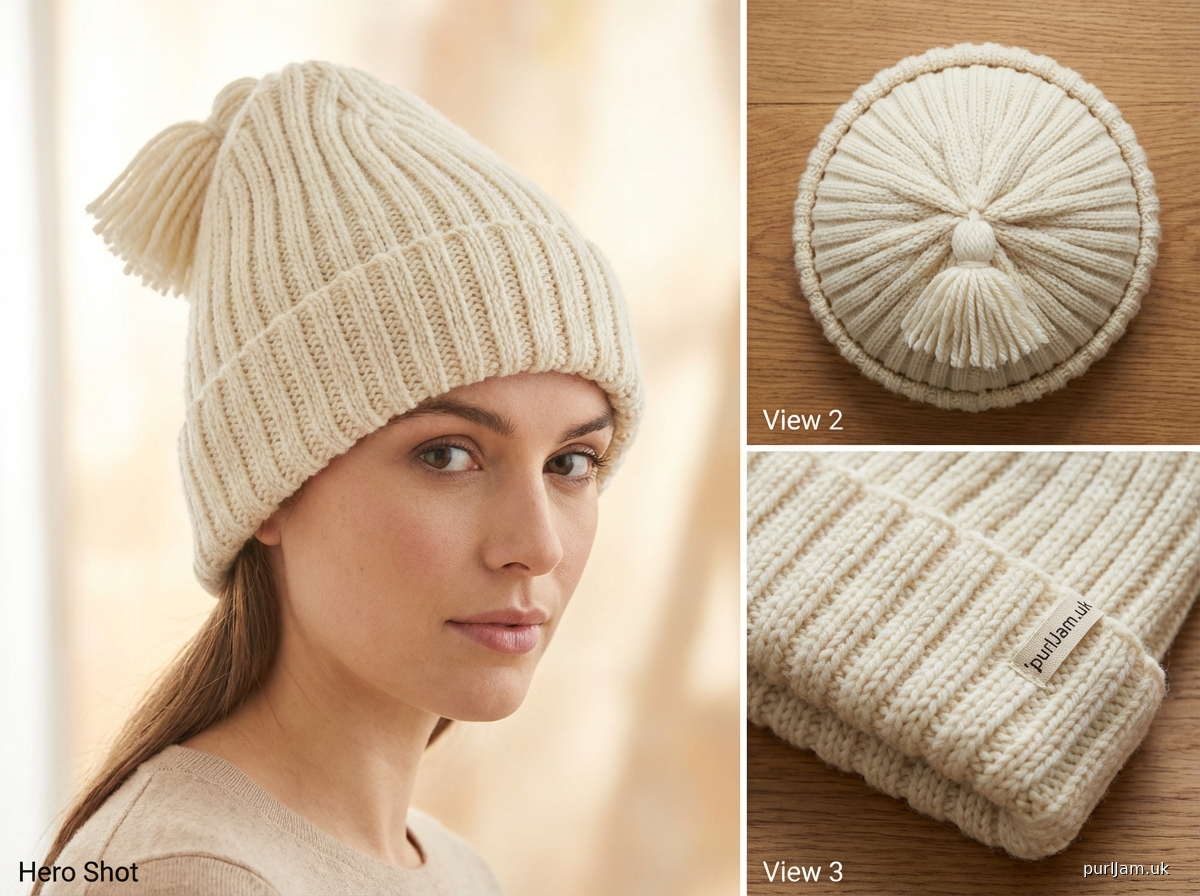
# POINTED RIBBED BEANIE WITH TASSEL
**Difficulty Level:** Beginner
**Construction Method:** Bottom-up, flat knitting with side seam
**Finished Circumference:** 20" (51 cm) – fits 21-23" (53-58 cm) head with stretch
**Finished Height:** 8.5" (21.5 cm)
---
## MACHINE SETUP
**Machine Type:** Any flat-bed knitting machine (standard or mid-gauge)
**Bed Configuration:**
- Main bed: Use for stockinette body and crown
- Ribber (optional): Use for K1P1 ribbed brim
- *Alternative if no ribber*: Mock rib on main bed using slip stitch pattern
**Needle Arrangement:**
- Working width: 80 needles (40 left of center 0, 40 right of center 0)
- Main bed position: Needles L40 to R40 (even-numbered needles only if using ribber)
- Ribber position (if applicable): Odd-numbered needles alternating with main bed
**Tension Settings:**
- Main yarn tension dial: **6-7** (equivalent to size 8 hand-knitting needles)
- Ribber tension dial: **5-6** (slightly tighter for rib fabric)
- Adjust based on your machine and yarn; sample first
**Carriage Setup:**
- Part button: OFF (for stockinette)
- Slip setting: N/N (normal knitting)
- Carriage levers: Standard knitting position
- Starting position: **COL** (Carriage On Left)
**Row Counter:** Reset to RC000 at start of each major section (noted in instructions)
**Weight Recommendations:**
- Cast-on comb + 2 claw weights for brim
- Add third claw weight when transitioning to body
- Move weights up every 20-30 rows
---
## MATERIALS
**Yarn:**
- Worsted weight yarn, approximately 150-180 yards (137-165 m)
- Sample shown uses smooth worsted wool or wool blend for best stitch definition
**Waste Yarn:**
- 2-3 yards (2-3 m) contrasting worsted or DK weight yarn for cast-on
- Should be same weight or slightly lighter than main yarn
**Notions:**
- Ravel cord or thin smooth string (1 yard/1 m)
- Cast-on comb (standard width)
- 3-4 claw weights (approximately 30-40g each)
- Transfer tool (single or 3-prong)
- Latch tool for finishing
- Tapestry needle for seaming and weaving ends
- Cardboard or circular form 2" × 4" for tassel making
- Stitch markers (optional, for tracking decreases)
**Tools Specific to Machine:**
- Standard carriage
- Ribber carriage (if using ribber)
- Decker comb (optional, for transfers)
---
## GAUGE AND TENSION
**Stockinette Stitch Gauge (main bed only):**
- 4 stitches = 1" (2.5 cm)
- 10 rows = 1" (2.5 cm)
- Tension dial: 6-7
**K1P1 Rib Gauge (with ribber or mock rib):**
- 3.75 stitches = 1" (2.5 cm)
- 9-10 rows = 1" (2.5 cm)
- Tension dial: Main bed 6-7, Ribber 5-6
**ALWAYS knit a gauge swatch before beginning.**
Cast on 40 stitches, knit 40 rows, remove from machine, steam lightly, and measure the center 4" × 4" area.
**Gauge Math Verification:**
- Brim: 80 sts ÷ 3.75 sts/inch = 21.3" circumference ✓
- Body: 80 sts ÷ 4 sts/inch = 20" circumference ✓
---
## RIBBED BRIM
### Cast-On Preparation
1. Thread waste yarn through carriage.
2. Bring needles **L40 to R40** (80 needles total) to working position (D or E position).
3. **With carriage at COL**, lay ravel cord across needles in work.
4. Set tension dial to 8-9 (loose for waste yarn).
5. **RC000**. Knit 8-10 rows of waste yarn.
### E-Wrap Cast-On
6. Stop with **carriage at COL**, RC008-010.
7. Remove carriage. Change to main yarn.
8. Working from left to right, e-wrap each needle in work (wrap yarn clockwise around each needle, creating a loop).
9. Hang cast-on comb below the waste yarn knitting.
10. Attach 2 claw weights to cast-on comb.
11. Replace carriage at left.
### Rib Setup (with Ribber)
12. Set main bed tension dial to **7**, ribber tension dial to **6**.
13. Engage ribber carriage.
14. **If using ribber**: Transfer every other stitch to ribber needles, creating alternating stitch pattern:
- Main bed: Even needles only (L40, L38, L36... R38, R40)
- Ribber: Odd needles only (L39, L37, L35... R37, R39)
- You should have 40 stitches on each bed, 80 stitches total
15. Lower ribber into working position.
### Alternative Mock Rib (without Ribber)
12. **If no ribber available**: Keep all 80 needles on main bed.
13. Set carriage for slip stitch (circular symbol setting or equivalent).
14. Use punchcard program or electronic pattern for 1×1 slip stitch rib, OR:
- Manually push every other needle to holding position
- Knit 1 row
- Return held needles to working position, push alternate needles to holding position
- Knit 1 row
- Repeat for rib section
### Knit Brim
16. **RC000** (reset row counter).
17. Check that carriage is at **COL**.
18. Knit in K1P1 rib pattern (or mock rib).
19. Knit to **RC018** (approximately 2.5"/6.5 cm).
20. **Carriage ends at COR** (if odd number of rows, knit one more row).
**Technical Check:** Measure brim width. Should be approximately 2.5" tall. If too loose or too tight, adjust tension and reknit.
---
## BODY ROWS
### Transfer Rib to Main Bed (if using ribber)
21. **With carriage at COR**, RC018.
22. Using transfer tool, move all stitches from ribber to main bed:
- Transfer stitches one at a time from ribber needles to adjacent main bed needles
- Work from right to left
- Each main bed needle will now hold 2 loops (1 from main bed, 1 from ribber)
- All 80 stitches now on main bed, needles L40 to R40
23. Lower ribber out of working position or remove ribber carriage.
24. Add third claw weight to cast-on comb.
### Stockinette Body
25. **RC000** (reset row counter).
26. Set main bed tension dial to **6-7** for stockinette.
27. Set carriage for normal knitting: Part button OFF, slip setting N/N.
28. **Carriage at COR**. Knit across to left.
29. Knit every row in stockinette stitch.
30. Move weights up approximately every 20-30 rows to maintain even tension.
31. Knit to **RC055** (approximately 5.5"/14 cm).
32. **Carriage ends at COL**.
**Technical Check:** Measure body height from top of rib to needles. Should be approximately 5.5". Total height to this point: approximately 8".
**Stitch Count Verification:** 80 stitches in work on main bed ✓
---
## CROWN SHAPING
The crown shaping creates the pointed top. We will decrease gradually by transferring stitches to adjacent needles, then knitting across, working from the edges toward the center.
### Decrease Section 1
33. **RC055**, carriage at **COL**.
34. Using transfer tool, transfer stitches at each edge:
- Transfer stitch from L40 to L39
- Transfer stitch from R40 to R39
- Bring empty needles L40 and R40 to non-working position (A position)
- **78 stitches remain** (L39 to R39)
35. Knit 4 rows (**RC059**).
36. **Carriage at COL**. Transfer stitches:
- Transfer L39 to L38
- Transfer R39 to R38
- Move L39 and R39 to non-working position
- **76 stitches remain** (L38 to R38)
37. Knit 4 rows (**RC063**).
### Decrease Section 2 (Faster Decreases)
38. **Carriage at COL**. Repeat this decrease sequence every 3 rows:
- Transfer outermost stitch on each side to adjacent needle
- Move empty needles to non-working position
- Knit 3 rows
39. Continue decreasing as follows:
| RC | Action | Sts Remaining | Needles in Work |
|-----|-------------------------------------|---------------|-----------------|
| 063 | Start position | 76 | L38 to R38 |
| 066 | Decrease (transfer L38→L37, R38→R37)| 74 | L37 to R37 |
| 069 | Decrease (transfer L37→L36, R37→R36)| 72 | L36 to R36 |
| 072 | Decrease (transfer L36→L35, R36→R35)| 70 | L35 to R35 |
| 075 | Decrease (transfer L35→L34, R35→R34)| 68 | L34 to R34 |
### Decrease Section 3 (Rapid Decreases)
40. **RC075**, **68 stitches remain**. Begin faster decreases every 2 rows:
| RC | Action | Sts Remaining | Needles in Work |
|-----|-------------------------------------|---------------|-----------------|
| 077 | Decrease (transfer L34→L33, R34→R33)| 66 | L33 to R33 |
| 079 | Decrease (transfer L33→L32, R33→R32)| 64 | L32 to R32 |
| 081 | Decrease (transfer L32→L31, R32→R31)| 62 | L31 to R31 |
| 083 | Decrease (transfer L31→L30, R31→R30)| 60 | L30 to R30 |
| 085 | Decrease (transfer L30→L29, R30→R29)| 58 | L29 to R29 |
| 087 | Decrease (transfer L29→L28, R29→R28)| 56 | L28 to R28 |
| 089 | Decrease (transfer L28→L27, R28→R27)| 54 | L27 to R27 |
| 091 | Decrease (transfer L27→L26, R27→R26)| 52 | L26 to R26 |
### Final Decreases
41. **RC091**, **52 stitches remain**. Continue decreasing every row:
| RC | Action | Sts Remaining | Needles in Work |
|-----|-------------------------------------|---------------|-----------------|
| 092 | Decrease | 50 | L25 to R25 |
| 093 | Decrease | 48 | L24 to R24 |
| 094 | Decrease | 46 | L23 to R23 |
| 095 | Decrease | 44 | L22 to R22 |
| 096 | Decrease | 42 | L21 to R21 |
| 097 | Decrease | 40
Disclaimer: This pattern was generated by AI and should be reviewed for accuracy before use. While we strive for quality, AI-generated content may contain errors. Please verify measurements, stitch counts, and instructions before beginning your project. Generated by purlJam.uk
Access your pattern anytime
Bookmark this page to access your pattern anytime